Tutorial on creating a data loader
This document has been machine translated.
This tutorial explains how to create a job using Talend to read data from a CSV file, process it, and insert it into a table using the Data Loader API.
Install and configure Talend Open Studio
First, install Talend Open Studio on your PC. Please refer to the following for installation and configuration.
This tutorial has been tested with Talend version 8.0.1.
Importing an xData job
In this tutorial, we will use "xData jobs" for easy access to the data loader API. xData jobs are wrapper modules that make it easy to use various xData APIs from Talend. To use xData jobs, you will need to import the module by following the steps below.
This tutorial assumes the use of xData jobs version 2.0.
Creating a data loader job
We are now ready to begin. From here, we will actually create a data loader job.
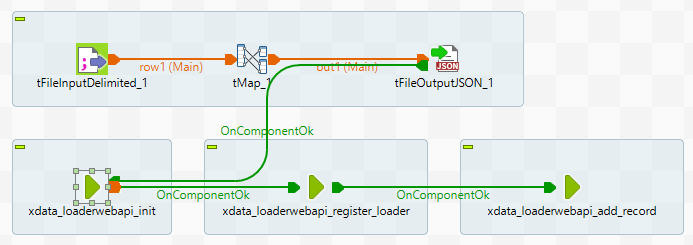
First, we will show the completed job. In this tutorial, we will explain the steps to complete this job.
Creating a new job
- Right-click on Job Designs in the tree on the left of Talend and select Create Job.
- Enter a Name (required), Purpose and Description (optional) and click Finish.
- The new job will be added under Job Designs.
- Double-click the created job to open it and follow the steps below.
Create CSV file import process
- Type "tFileInputDelimited" in the Palette search box on the right side of the screen and press Enter.
- The component tFileInputDelimited will be found, and add it to the open job by drag & drop.
- Click on tFileInputDelimited to make it selected, then select the Component tab at the bottom of the screen to open the component settings.
- Configure the settings for CSV reading. Make settings according to the CSV file to be read.
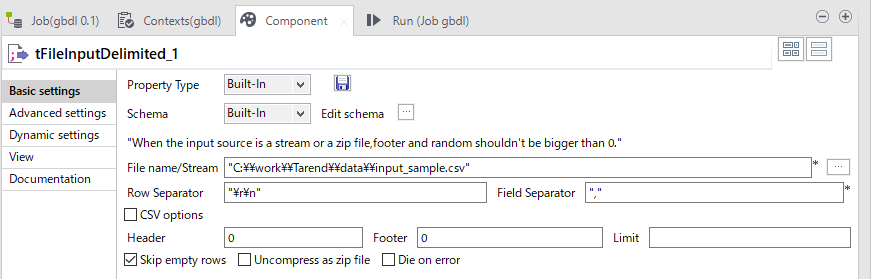
- Enter the path to the CSV file in Basic Settings > File name/Stream.
- Basic Settings > Enter "\r\n" for Row Separator and "," for Field Separator
- For Advanced Settings > Encoding, select UTF-8.
- go to Basic Settings > Edit Schema to set the schema. Set the schema according to the CSV file to be imported.
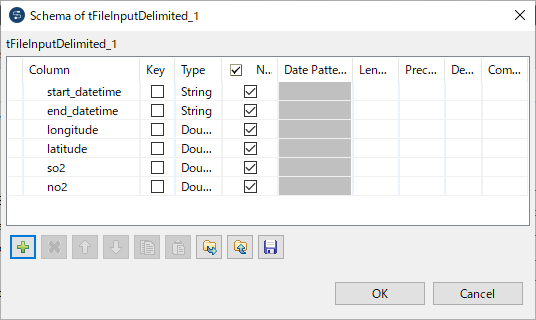
- start_datetime : String
- end_datetime : String
- longitude : Double
- latitude : Double
- no2 : Double
- so2 : Double
TIPS
- Talend requires that strings be enclosed in double quotation marks when specifying values.
- In strings,
\must be escaped to\\.
Creating a data processing operation
- Type "tMap" in the Palette search box on the right side of the screen and press Enter.
- The component tMap will be found and added to the open job by drag & drop.
- Drag and drop the output terminal from tFileInputDelimited you just created toward tMap and connect the connector.
- Double-click tMap to open the editor.
- Click the plus button on the right side of the editor to add an output. Name the output "out1" in this example.
- In the lower right corner of the editor, set the schema for the processed data. start_datetime, end_datetime, and geometry columns are required for the data loader and must be included, while the rest should be set according to the destination table.

- start_datetime : String
- end_datetime : String
- geometry : String
- risk : number
- Edit the Expression on the right side of the editor and map the input to the output.
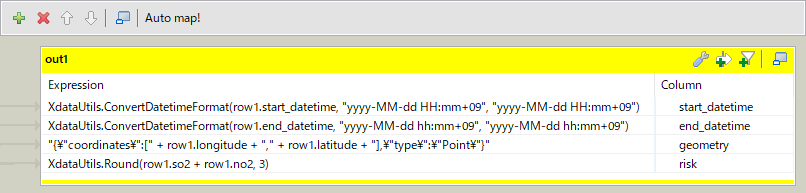
- start_datetime, end_datetime columns : use XdataUtils.ConvertDatetimeFormat to convert date format for data loader
- geometory column : combine longitude, latitude to create GeoJSON format string
- risk column : add no2 and so2 together and round to 3 decimal places using XdataUtils.Round
- press Ok button to confirm.
TIPS
- The functions listed above that begin with XdataUtils. are user-defined functions provided by xData jobs.
- If you have knowledge of Java coding, you can create your own user-defined functions. Right-click on Code > Global Routine > users in the tree on the left and select Create Routine.
- GeoJSON format is a format that represents geographic information in json format. For example, the geographic information of a point is represented as
{"type": "Point", "coordinates":[138.7309, 35.3628]}.
JSON Output
- Type "tFileOutputJSON" in the Palette search box on the right side of the screen and press Enter.
- The component tFileOutputJSON will be hit, and add it to the open job by drag & drop.
- Right-click on the tMap you just created and select out1 from the Row.
- A connector will appear, so connect it to tFileOutputJSON.
- Click tFileOutputJSON to make it selected, then select the Component tab at the bottom of the screen to open the component settings.
- Configure the JSON file output settings.
- Enter the path to the JSON file output in Basic Settings > File Name.
- Check Basic Settings > Generate an array json
TIPS
- This step is necessary because the data must be output as a JSON file in order to be passed to the xData job.
Once you have created this step, we recommend that you test run the job before proceeding. If no error occurs and the JSON file is output to the specified path, the job has been created correctly.
Calling the Data Loader API
- add the following three items from Job Designs > xdata_jobs in the left tree to the open job by drag & drop.
- xdata_loaderwebapi_init
- xdata_loaderwebapi_register_loader (not necessary if the table to insert into already exists)
- xdata_loaderwebapi_add_record
- tFileOutputJSON -> xdata_loaderwebapi_init -> xdata_loaderwebapi_register_loader -> xdata_loaderwebapi_add_record Component Ok, in that order. Right-click on the source and select On Component Ok from Triggers to make the connector appear. 1.
- Click xdata_loaderwebapi_init to select it, and add three items to Basic Settings > Context Param in the Component tab at the bottom of the screen and set as follows
- apiEndpoint : endpoint URL of the data loader API
- apiKey : Key of the data loader API
- apiSecret : Secret of the data loader API
- Click xdata_loaderwebapi_register_loader to select it, and add 4 items to Basic Settings > Context Param in the Component tab at the bottom of the screen and set as follows. For details on the parameters, see the API reference.
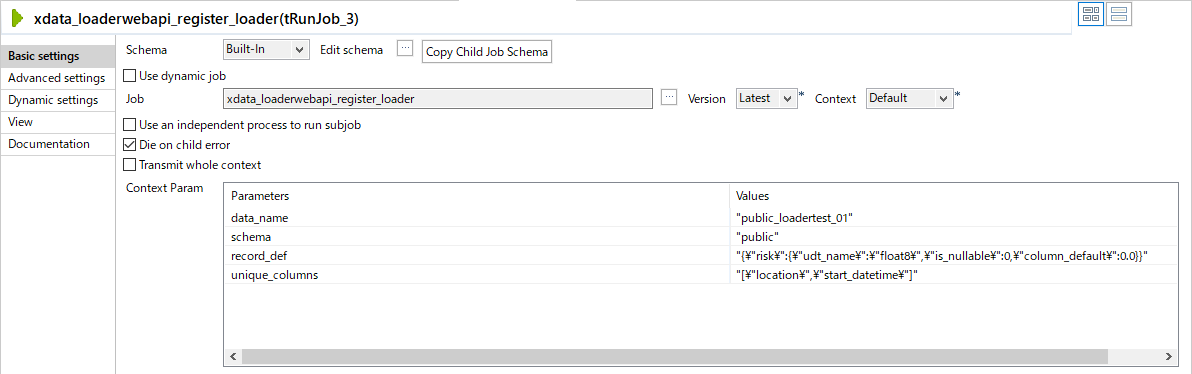
- data_name : Data name of the destination table to be created
- schema : Name of the schema for the table to be created
- record_def : column definitions for the table to be created (excluding required columns start_datetime, end_datetime, location)
- unique_columns : columns to be unique keys for the table
- select xdata_loaderwebapi_add_record by clicking on it, add two items to Basic Settings > Context Param in the Component tab at the bottom of the screen, and configure as follows. For details on the parameters, see the API reference.
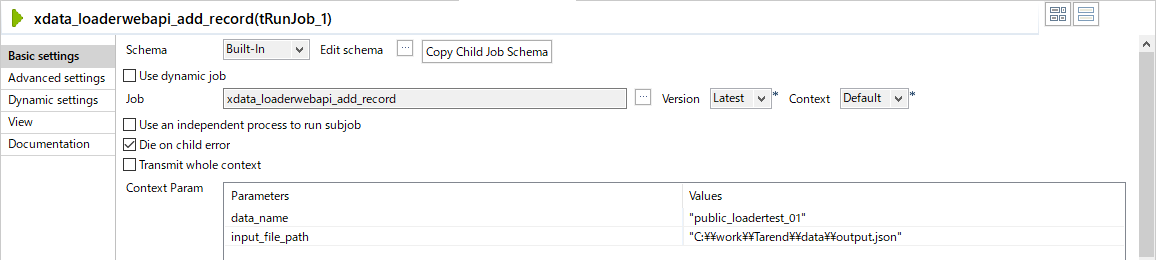
- data_name : Data name of the table into which the data will be inserted
- input_file_path : file path to read the data to be inserted (output path of the JSON file specified by tFileOutputJSON earlier)
Run a test data loader job
You can run an open job by pressing the green play button at the top of the screen.
TIPS
- Select the Run tab at the bottom of the screen to see the output from the job.
- In the output, you can see the payload sent to the data loader API and the result received as a result.
If the test run does not generate any errors and the tables are filled with the expected data, the job is complete.
Create execution module for the job
If necessary, you can export the execution module of the job you created. See below for the procedure.
The exported module is a Java program independent of Talend, so it is portable to any Java-enabled environment.
Tutorial Samples
You can download a sample job created in the tutorial.
The sample job can be imported by following the steps below.
- Right-click in the tree on the left and select Import items.
- Select the zip file of the job in Select archive file, check all items (Select All), and press the Finish button.
- If the import is successful, the job will be added to the tree under Job Designs.