xData Edge Environment Setup Manual (xData Edge 3.0 compliant)
Note
This document has been machine translated.
This manual describes how to build an xData Edge environment with a minimum of prerequisite knowledge.
Please note that some expressions may be inaccurate due to the avoidance of complicated terminology.
This article is based on the xData Edge Installation Guide in detail. If the operating system has changed due to a change in the version of xData Edge, please follow that guide.
Glossary
- Linux
A type of operating system like Windows or MacOS.
There are various types (distributions) of Linux.
Basically, it can be operated using only letters. The string of characters you type is called a “command”.
- Ubuntu
Ubuntu is a type of Linux (distribution).
Ubuntu has two versions: Ubuntu Desktop and Ubuntu Server. Most of the features are the same, but the details are different.
Since Ubuntu Desktop does not work, we will use Ubuntu Server.
- Virtual Environment
A virtual environment is an environment in which another OS runs inside an OS.
The OS inside is also called a “virtual machine.
- Hyper-V
Hyper-V is one of the methods to create a virtual environment on Windows.
Other examples include VirtualBox.
- IP address
An IP address is like an “address” on the Internet, indicating the location of a PC or other device.
It is in the format of xxx.xxx.xxx.xxx.xxx, where each xxx is a number from 0 to 255.
- SSH
SSH is a method of connecting from one PC to another PC over the Internet. In this case, SSH is used to connect to a virtual environment.
The virtual environment can be operated directly, but it is inconvenient. Therefore, it is often operated from the outside.
Procedure
Download Ubuntu Server
xData Edge runs on an operating system called Ubuntu Server.
Ubuntu Desktop and Ubuntu Server** are available for Ubuntu OS. xData Edge has been known to have trouble running on Ubuntu Desktop, so installing Ubuntu Server is strongly recommended. Ubuntu Desktop has been observed to cause problems with xData Edge.
Ubuntu Server version 18.04 or 20.04 is required. It is not the latest version. Be sure to install 18.04 or 20.04. This manual describes the 20.04 installation.
Files for installing Ubuntu Server are available at https://releases.ubuntu.com/focal/. Download it from the link next to “Server install image”.
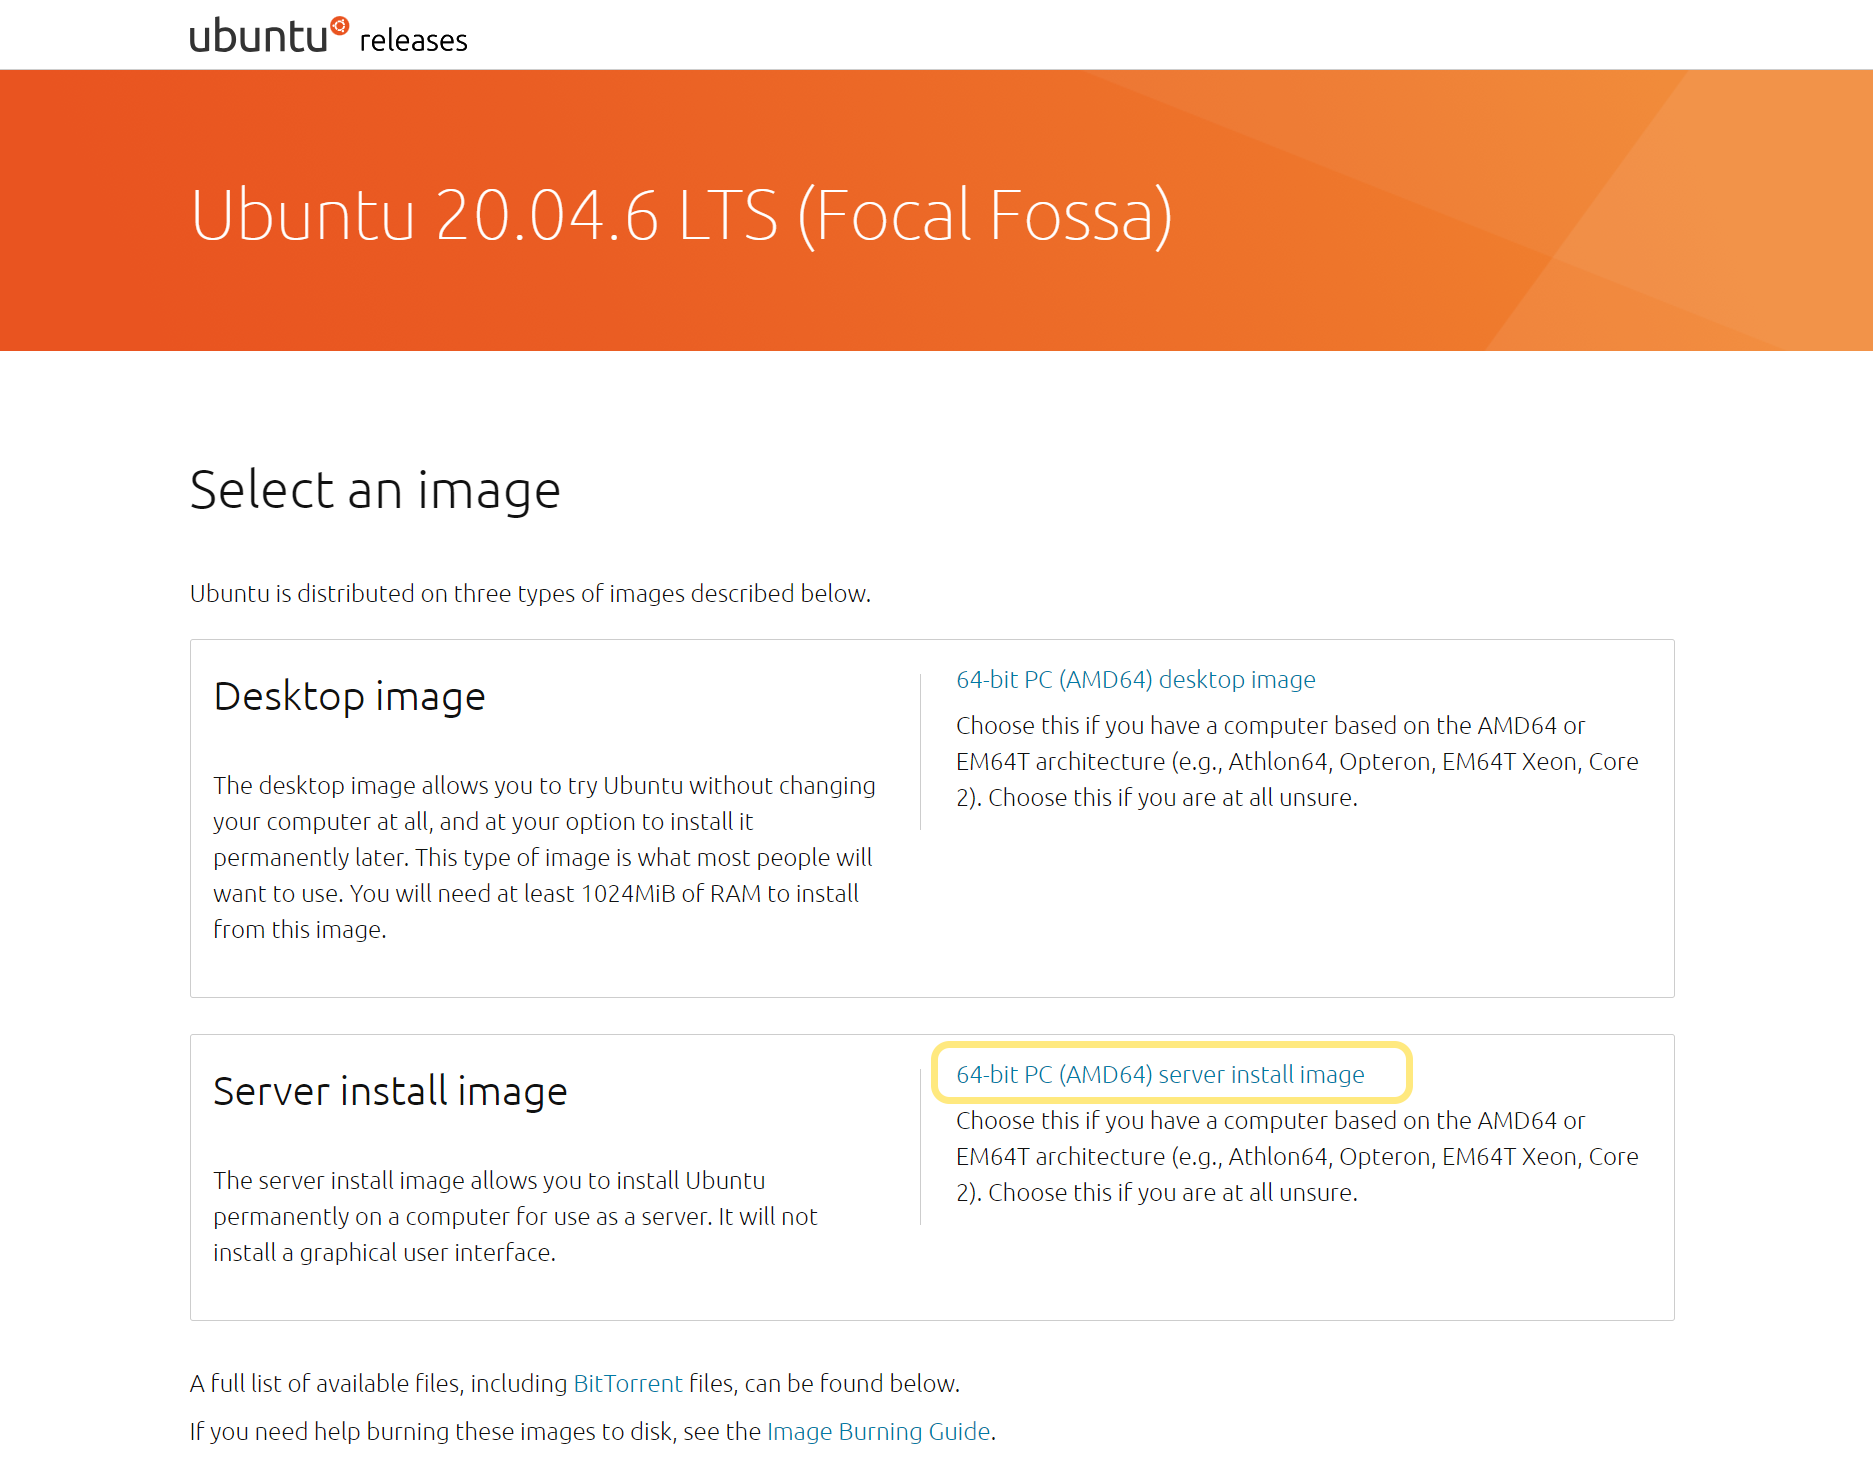
For version 20.04, the file name is ubuntu-20.04.6-live-server-amd64.iso.
Enabling Hyper-V
Hyper-V is disabled under normal conditions. Therefore, it must be enabled manually.
- Open the Start menu and go to Settings (gear icon).
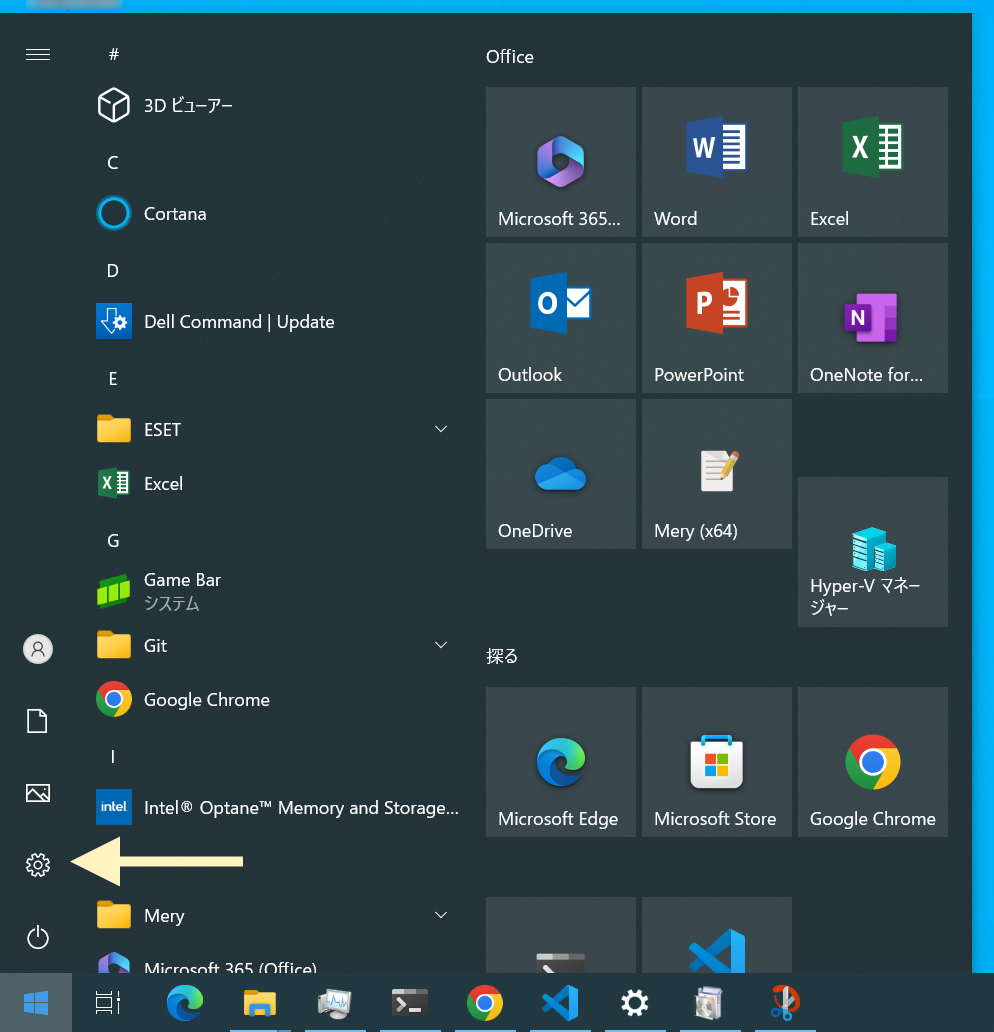
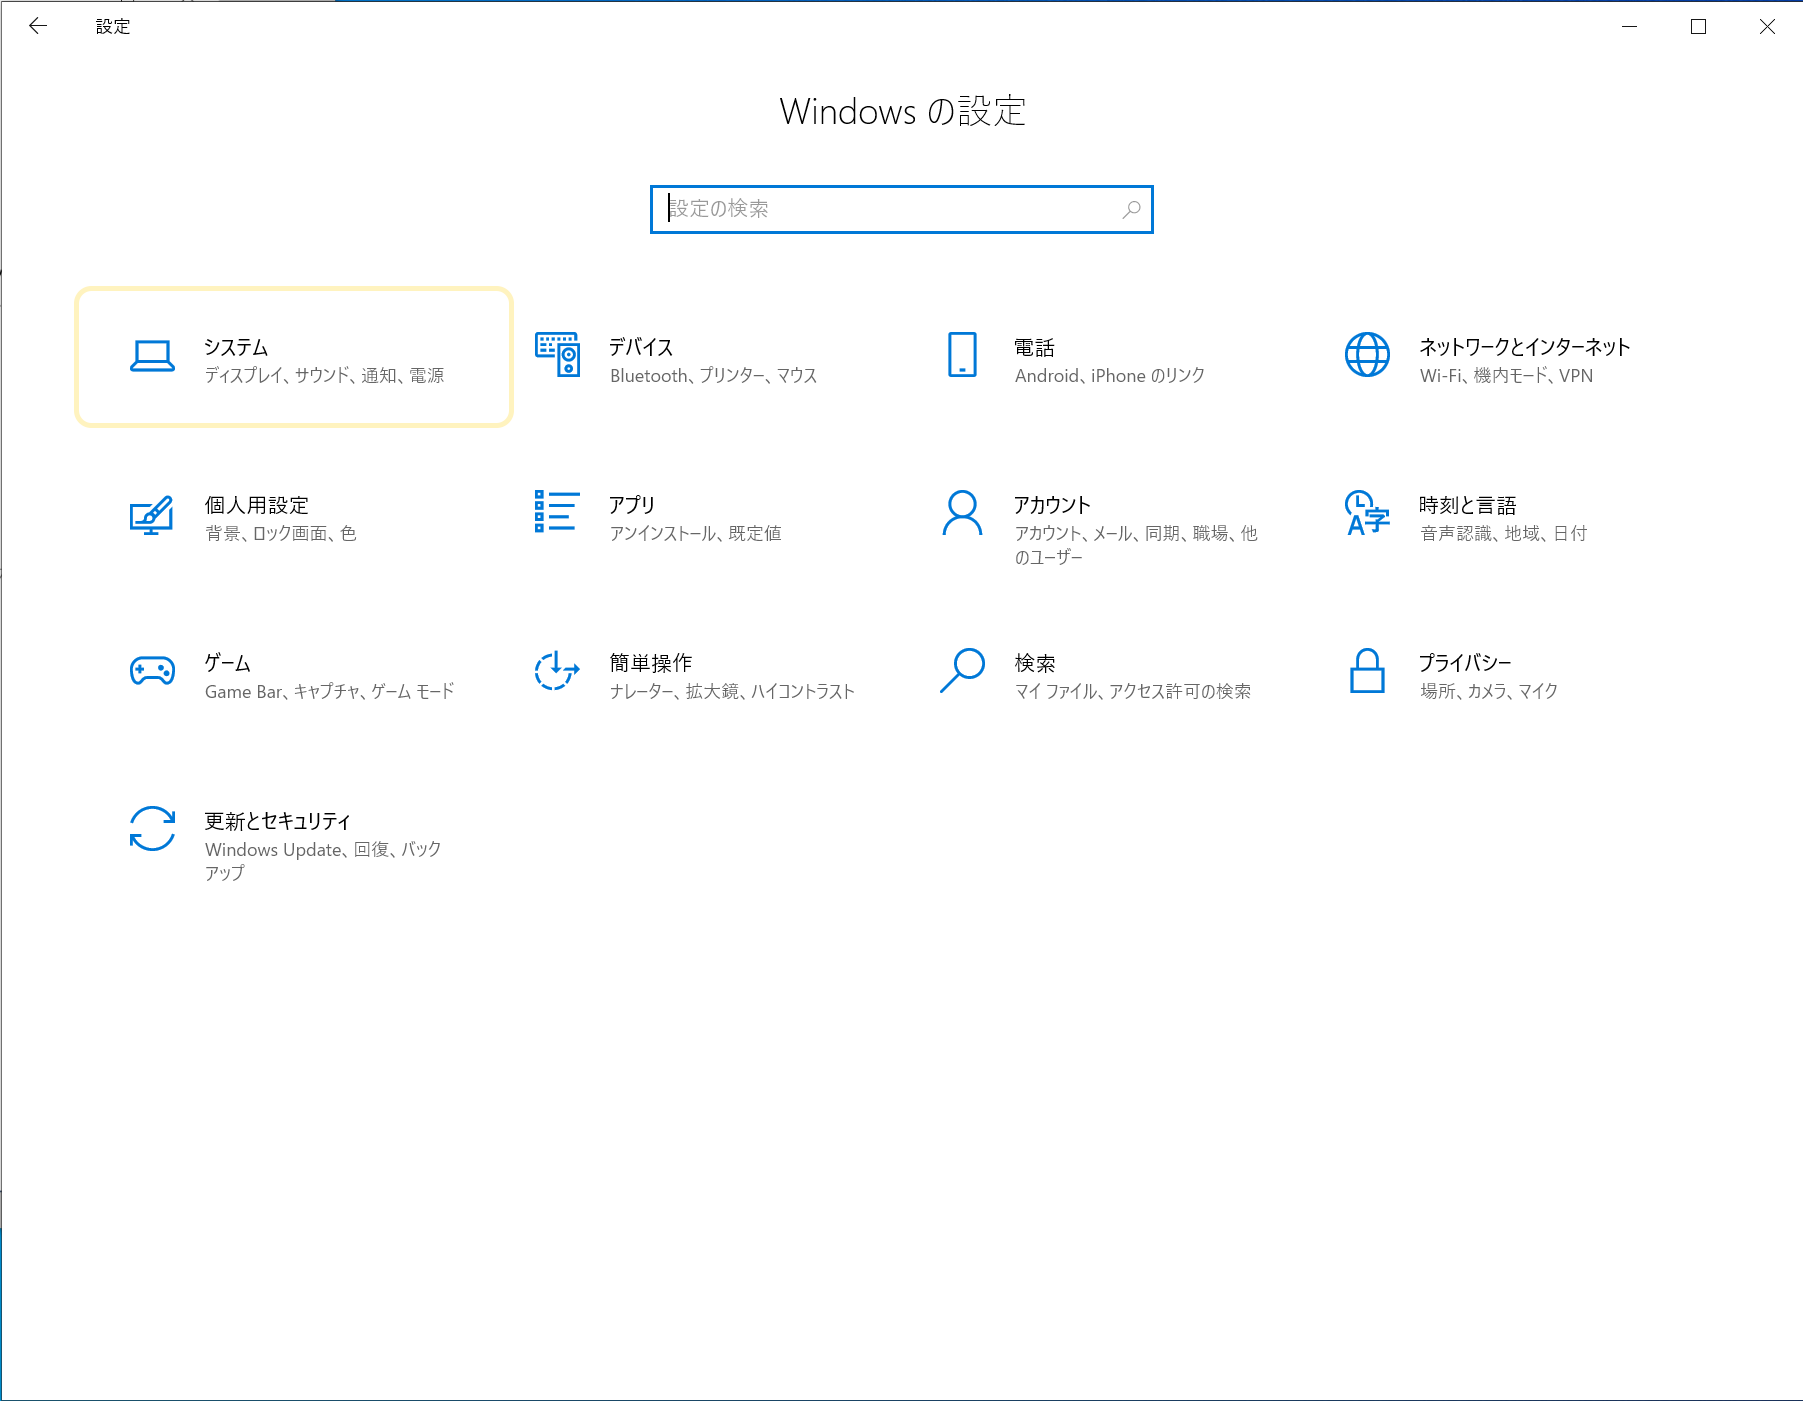
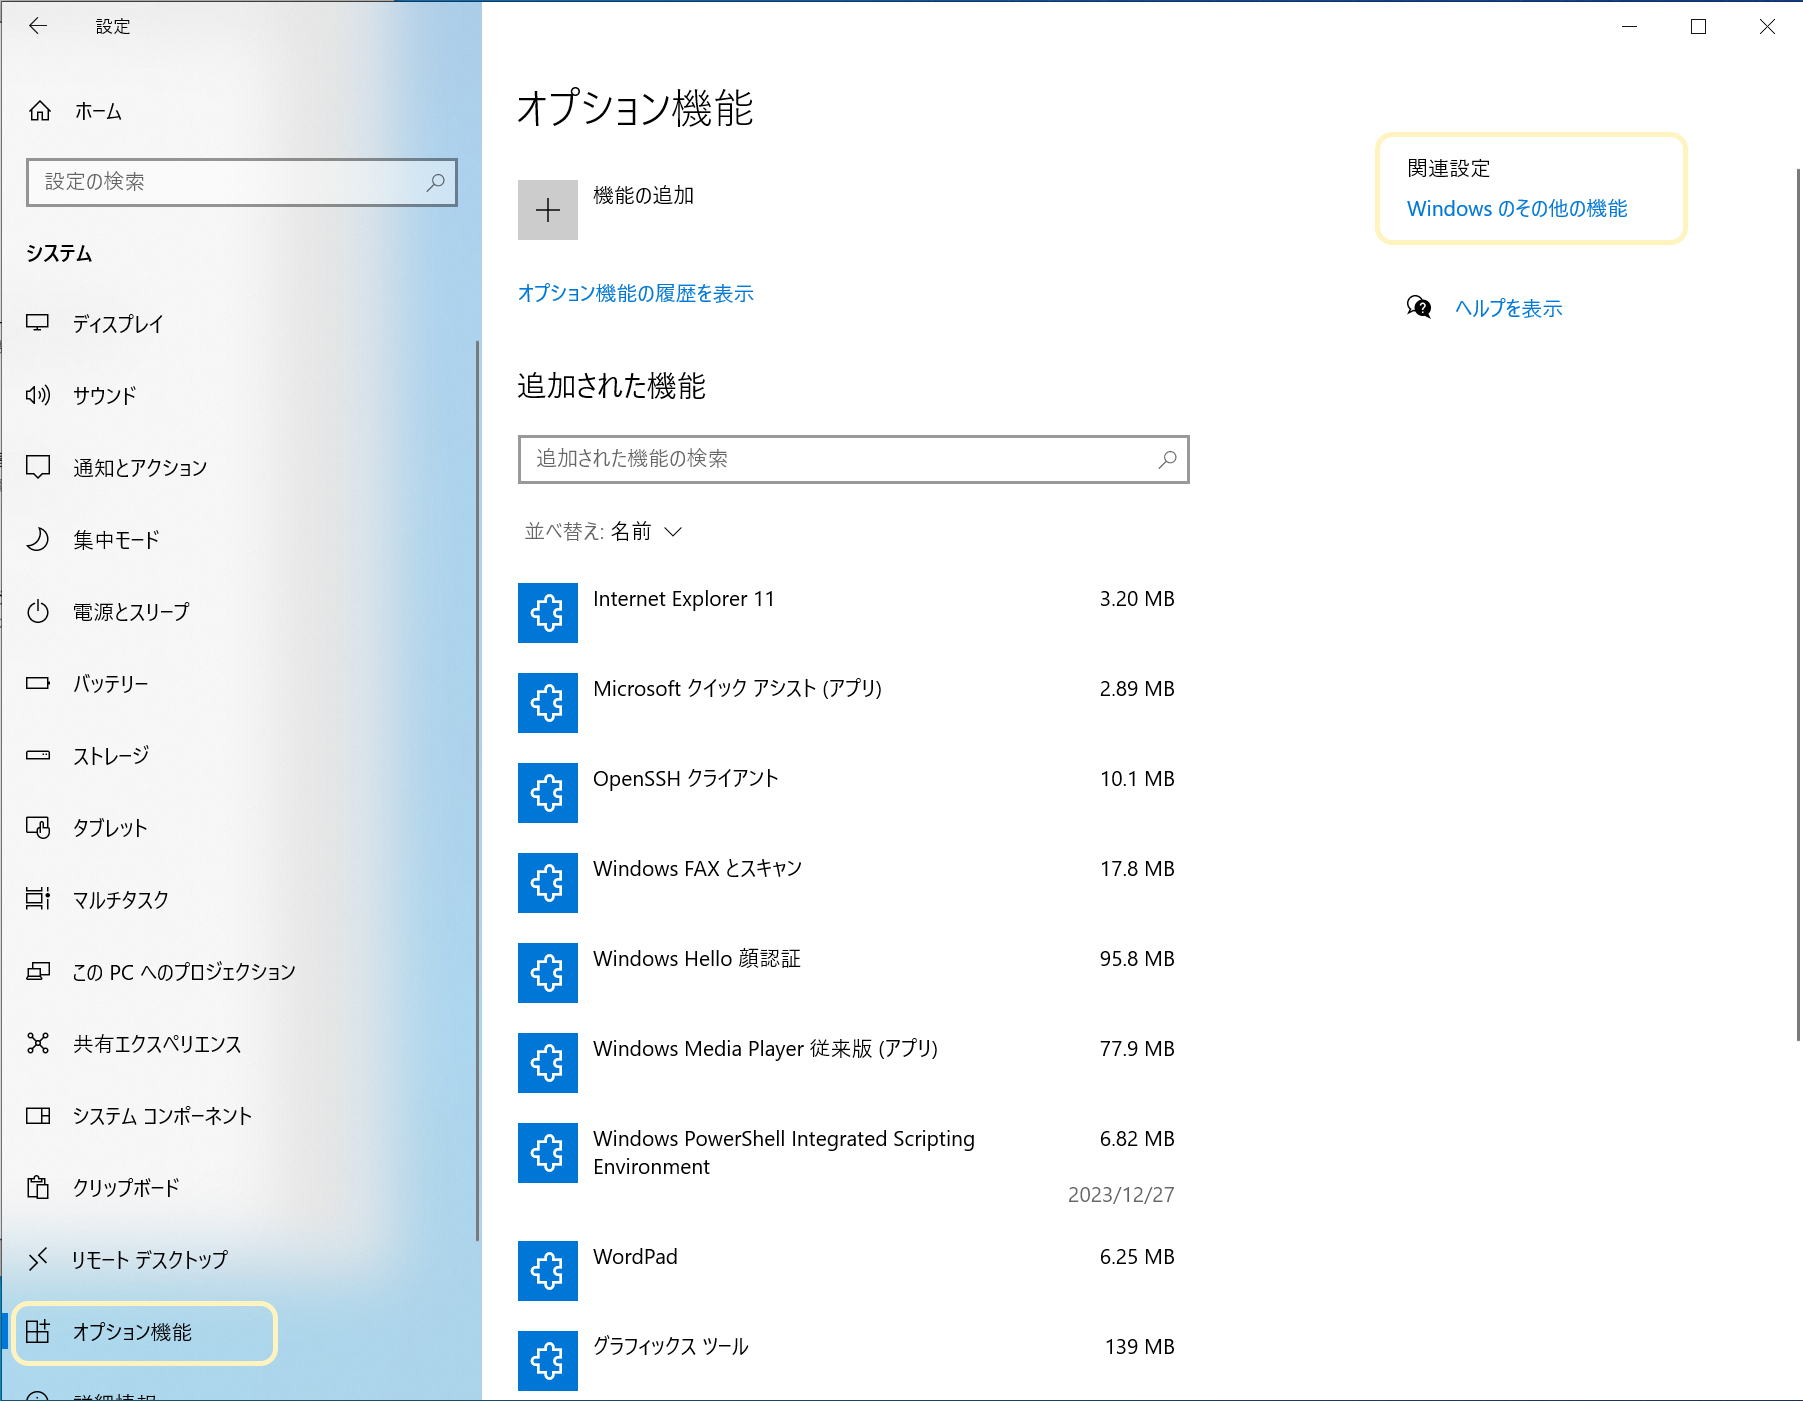
2.Select “System” > “Optional Features”.
3.Select “Windows Other Features” (right side of the screen in Windows 10, bottom of the screen in Windows 11)
4.Check “Hyper-V” and click “OK”.
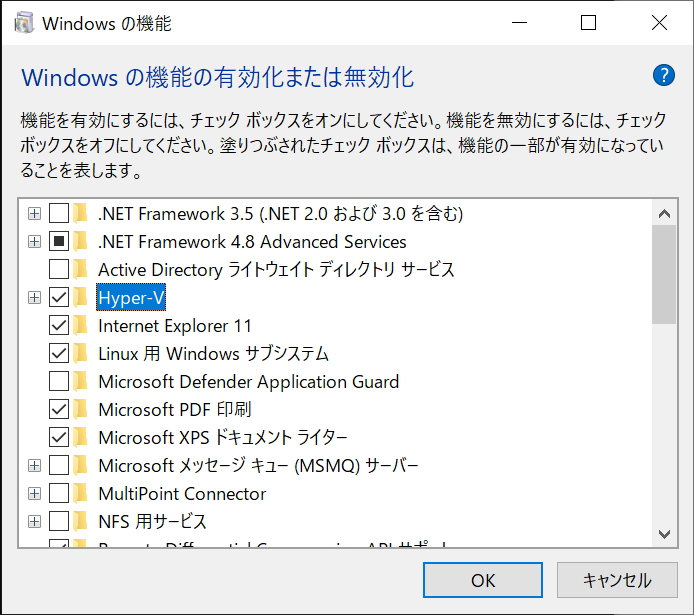
5.reboot the PC The above steps will enable the Hyper-V functionality.
Creating a virtual environment
Create a virtual environment on Hyper-V.
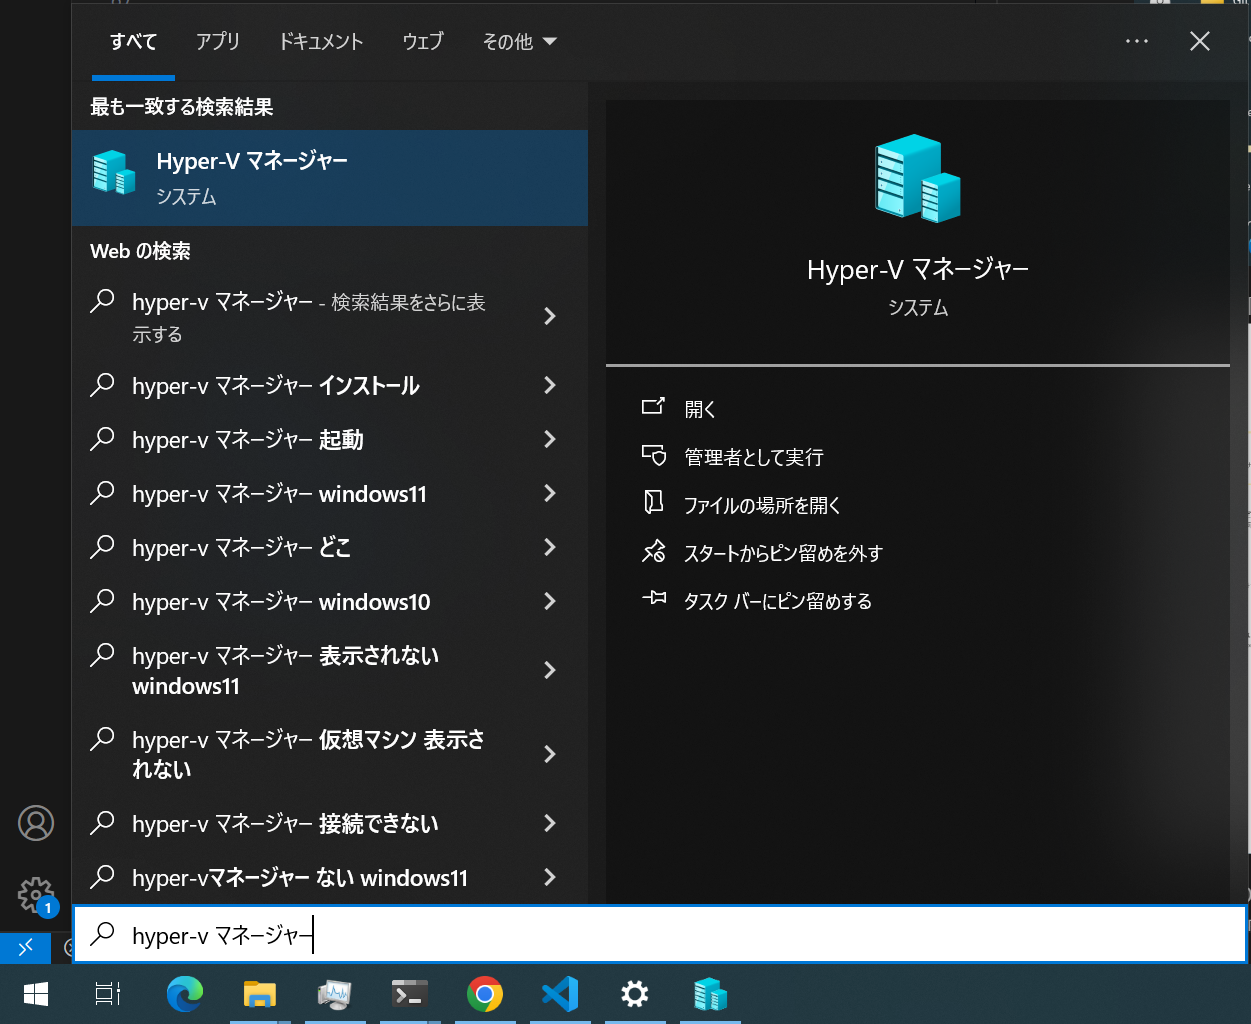
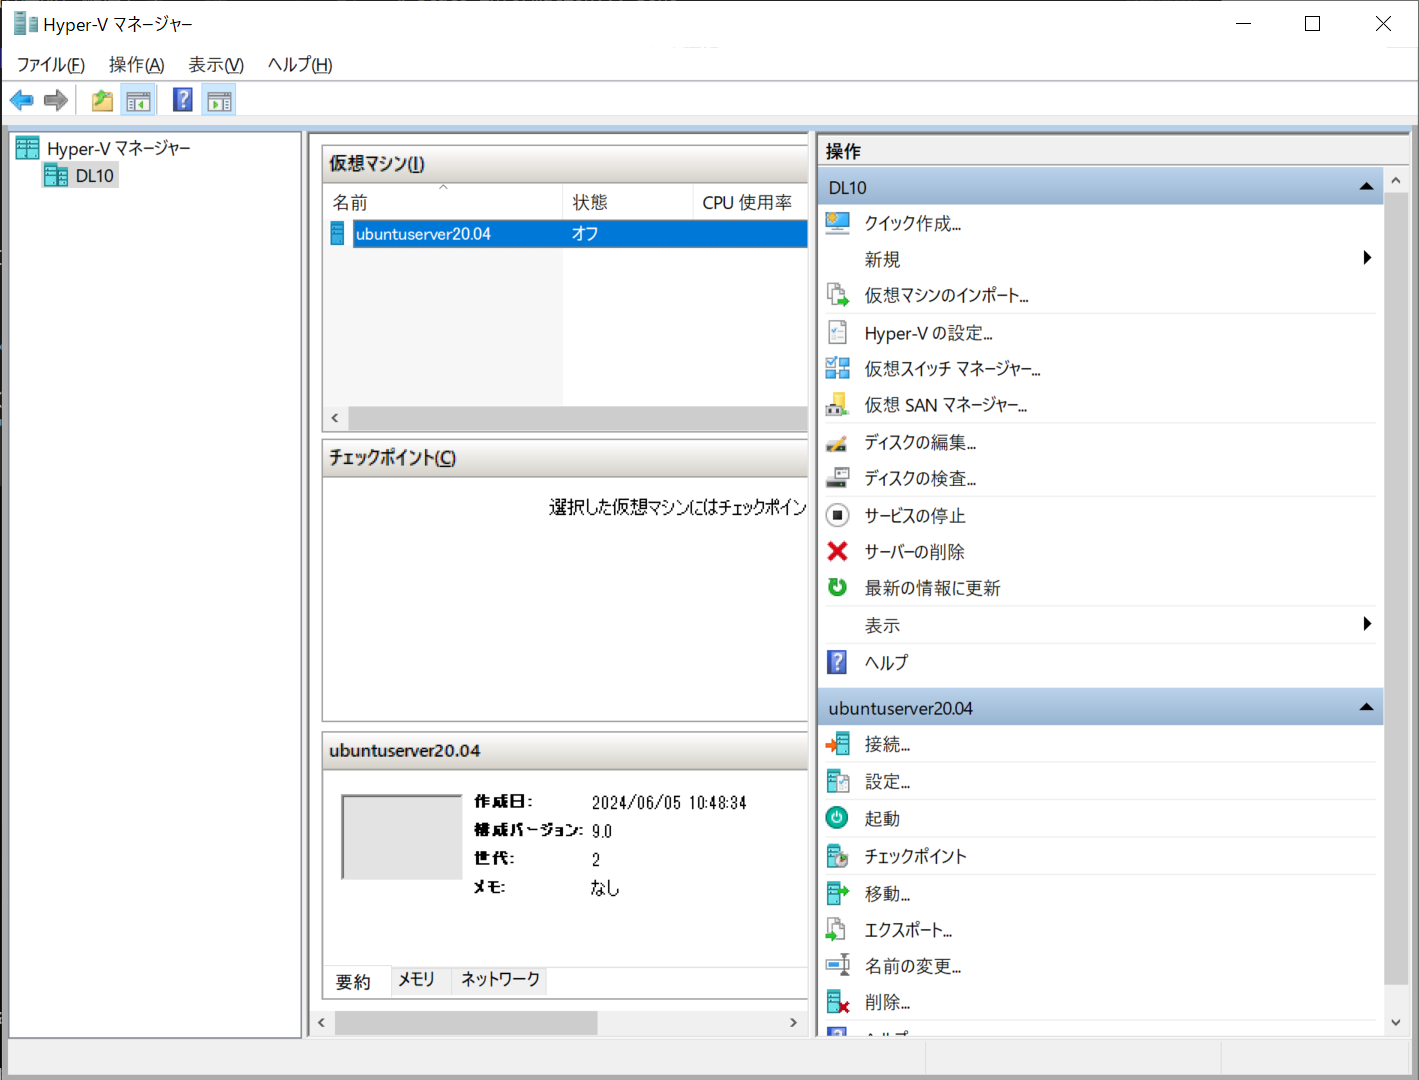
With the Start menu open, type “Hyper-V Manager” directly on the keyboard to start the “Hyper-V Manager”. The Hyper-V Manager allows you to create, start, and configure virtual environments.
 !
!
On this screen, right-click on the PC machine name on the left > select “New” > “Virtual Machine”.
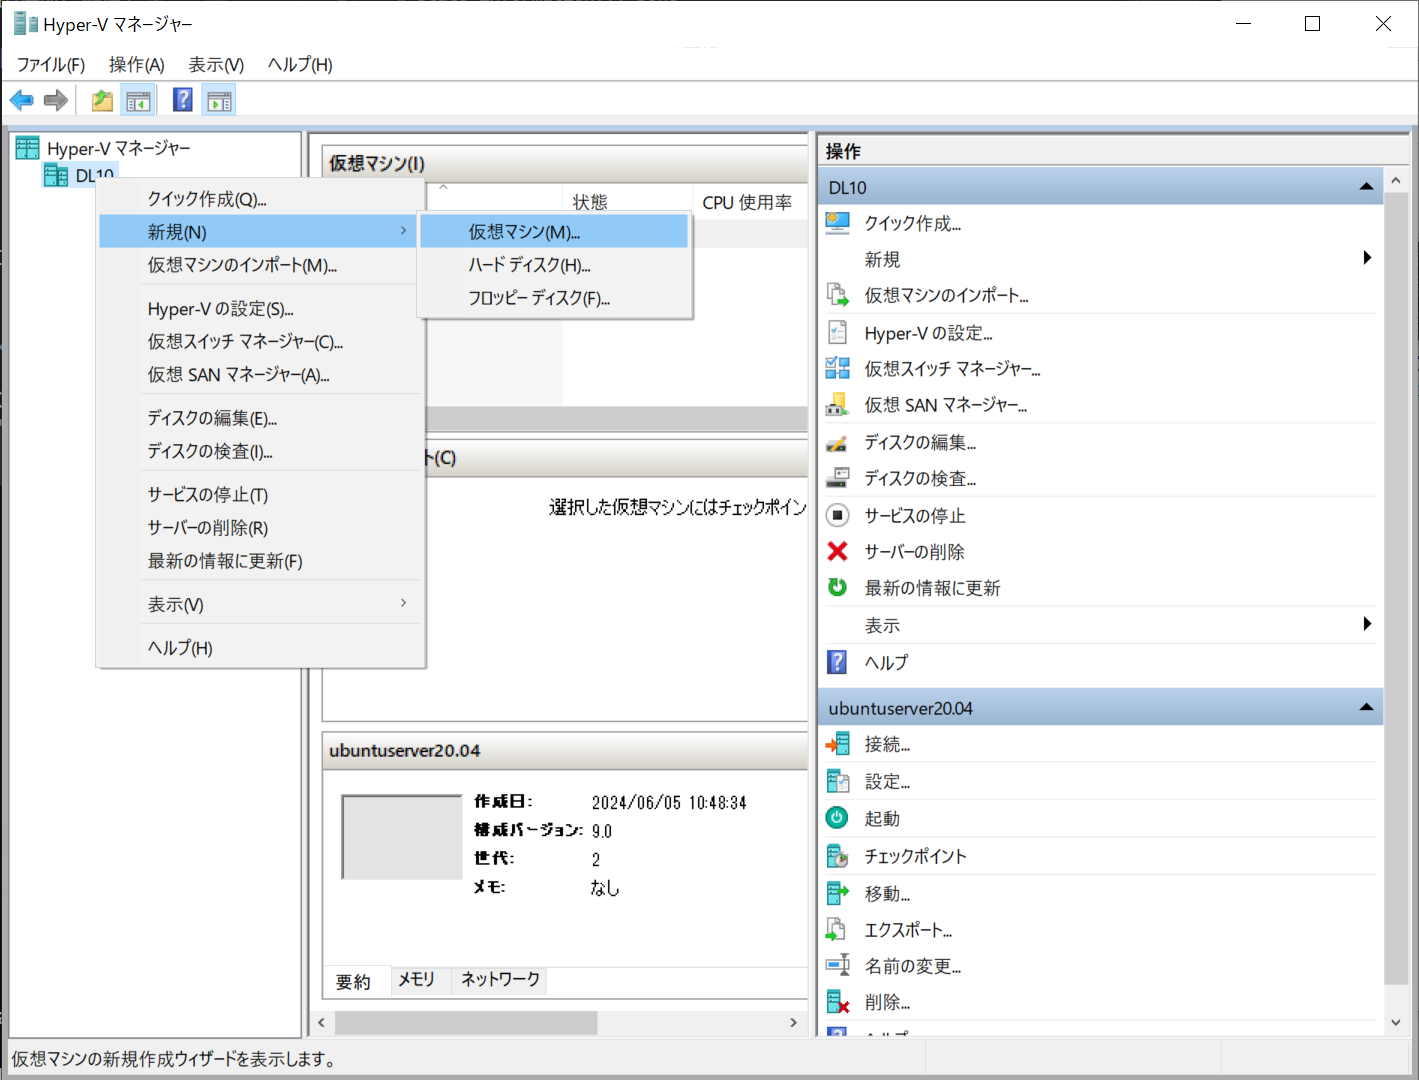
A screen will appear where you can configure the virtual environment settings as follows.
- Name: whatever you want
- 2nd generation
- Boot memory: 4096 MB (double or halve if you want to adjust)
- Connection: Default Switch (other than “no connection”)
- Virtual hard disk: “Create virtual hard disk”
- Name, location can be anything
- Size should be at least 64-128 GB (too large and it will overwhelm your PC)
- Installation options: “Install operating system from boot CD/DVD-ROM”.
- Image file (.iso): “Browse” > Specify the location of the OS installation file you just downloaded (
ubuntu-20.04.6-live-server-amd64.iso)
Installing Ubuntu Server
The virtual environment you have just created does not contain an OS, so you will need to install one.
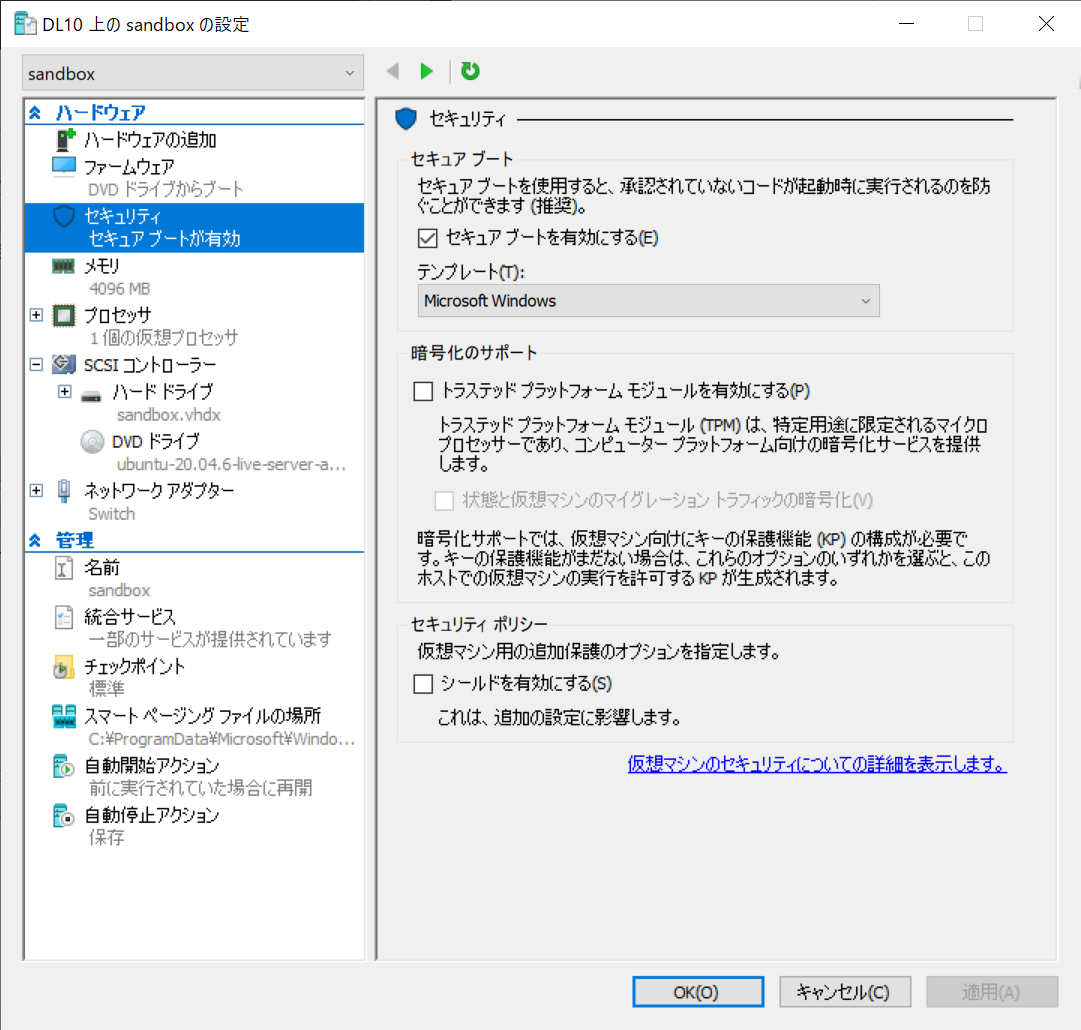
At this time, you must disable Secure Boot in the settings of the virtual environment you have created. Otherwise, you will not be able to enter the installation screen.
Select the virtual environment you created in the Hyper-V Manager (shown as “Virtual Machine”) and open “Settings” on the right side.
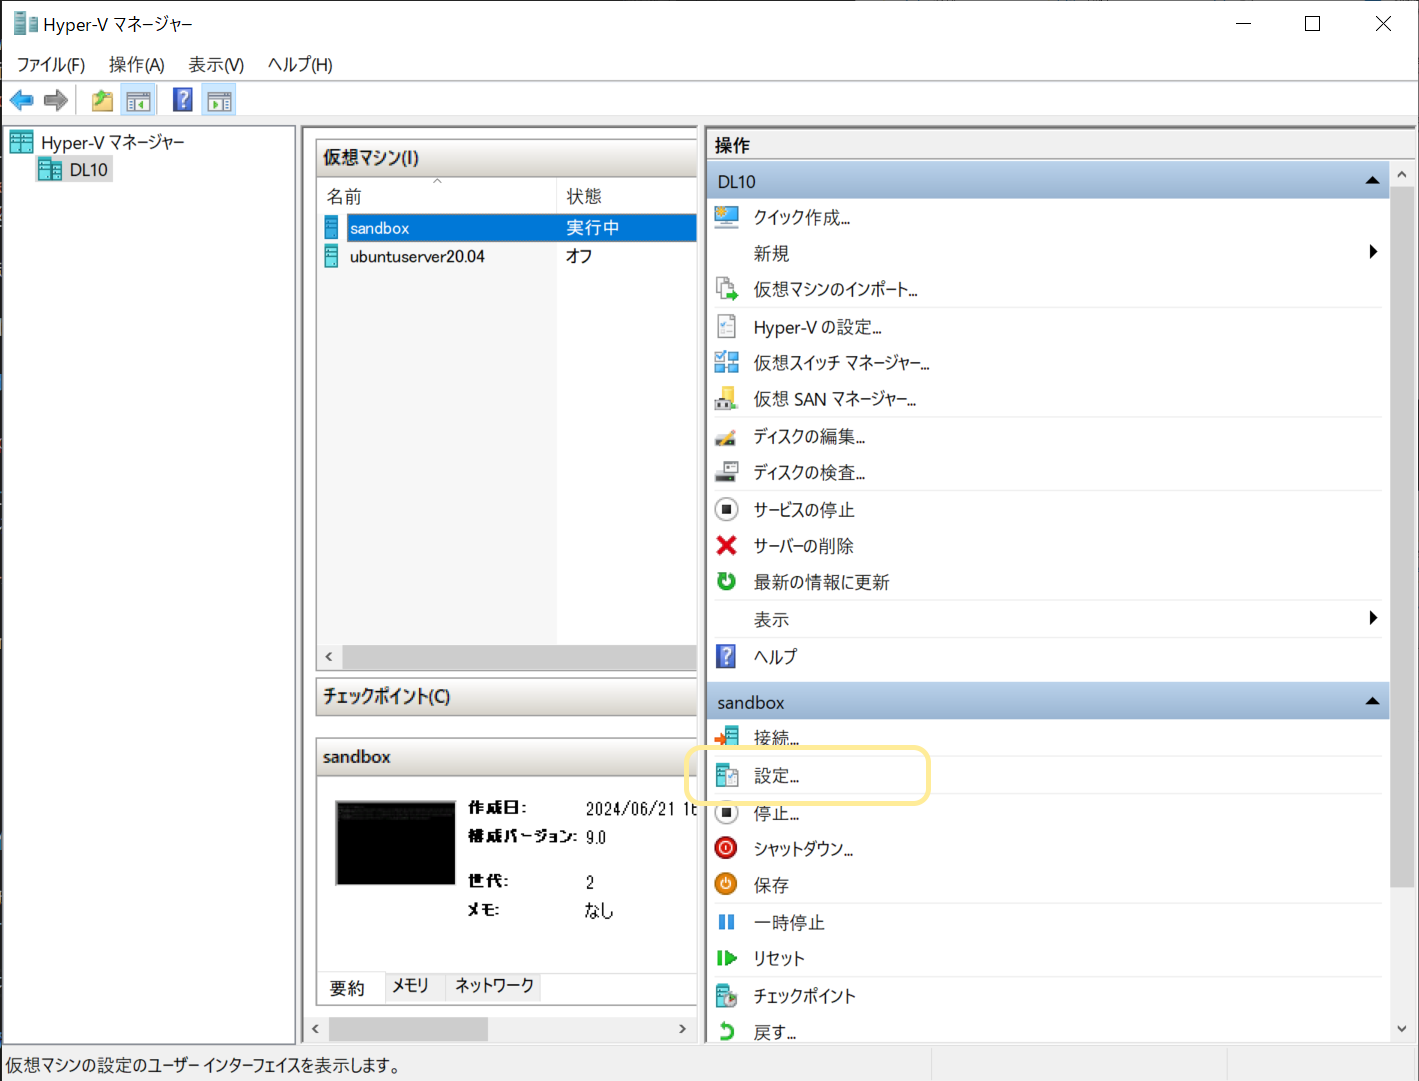
Uncheck “Security” > “Enable Secure Boot” and click “Apply.”
Once this is done, you can install the OS: select the virtual machine you created in the Hyper-V Manager and open “Connections” on the right side.
After starting the virtual machine, wait for a while and the following screen will appear.
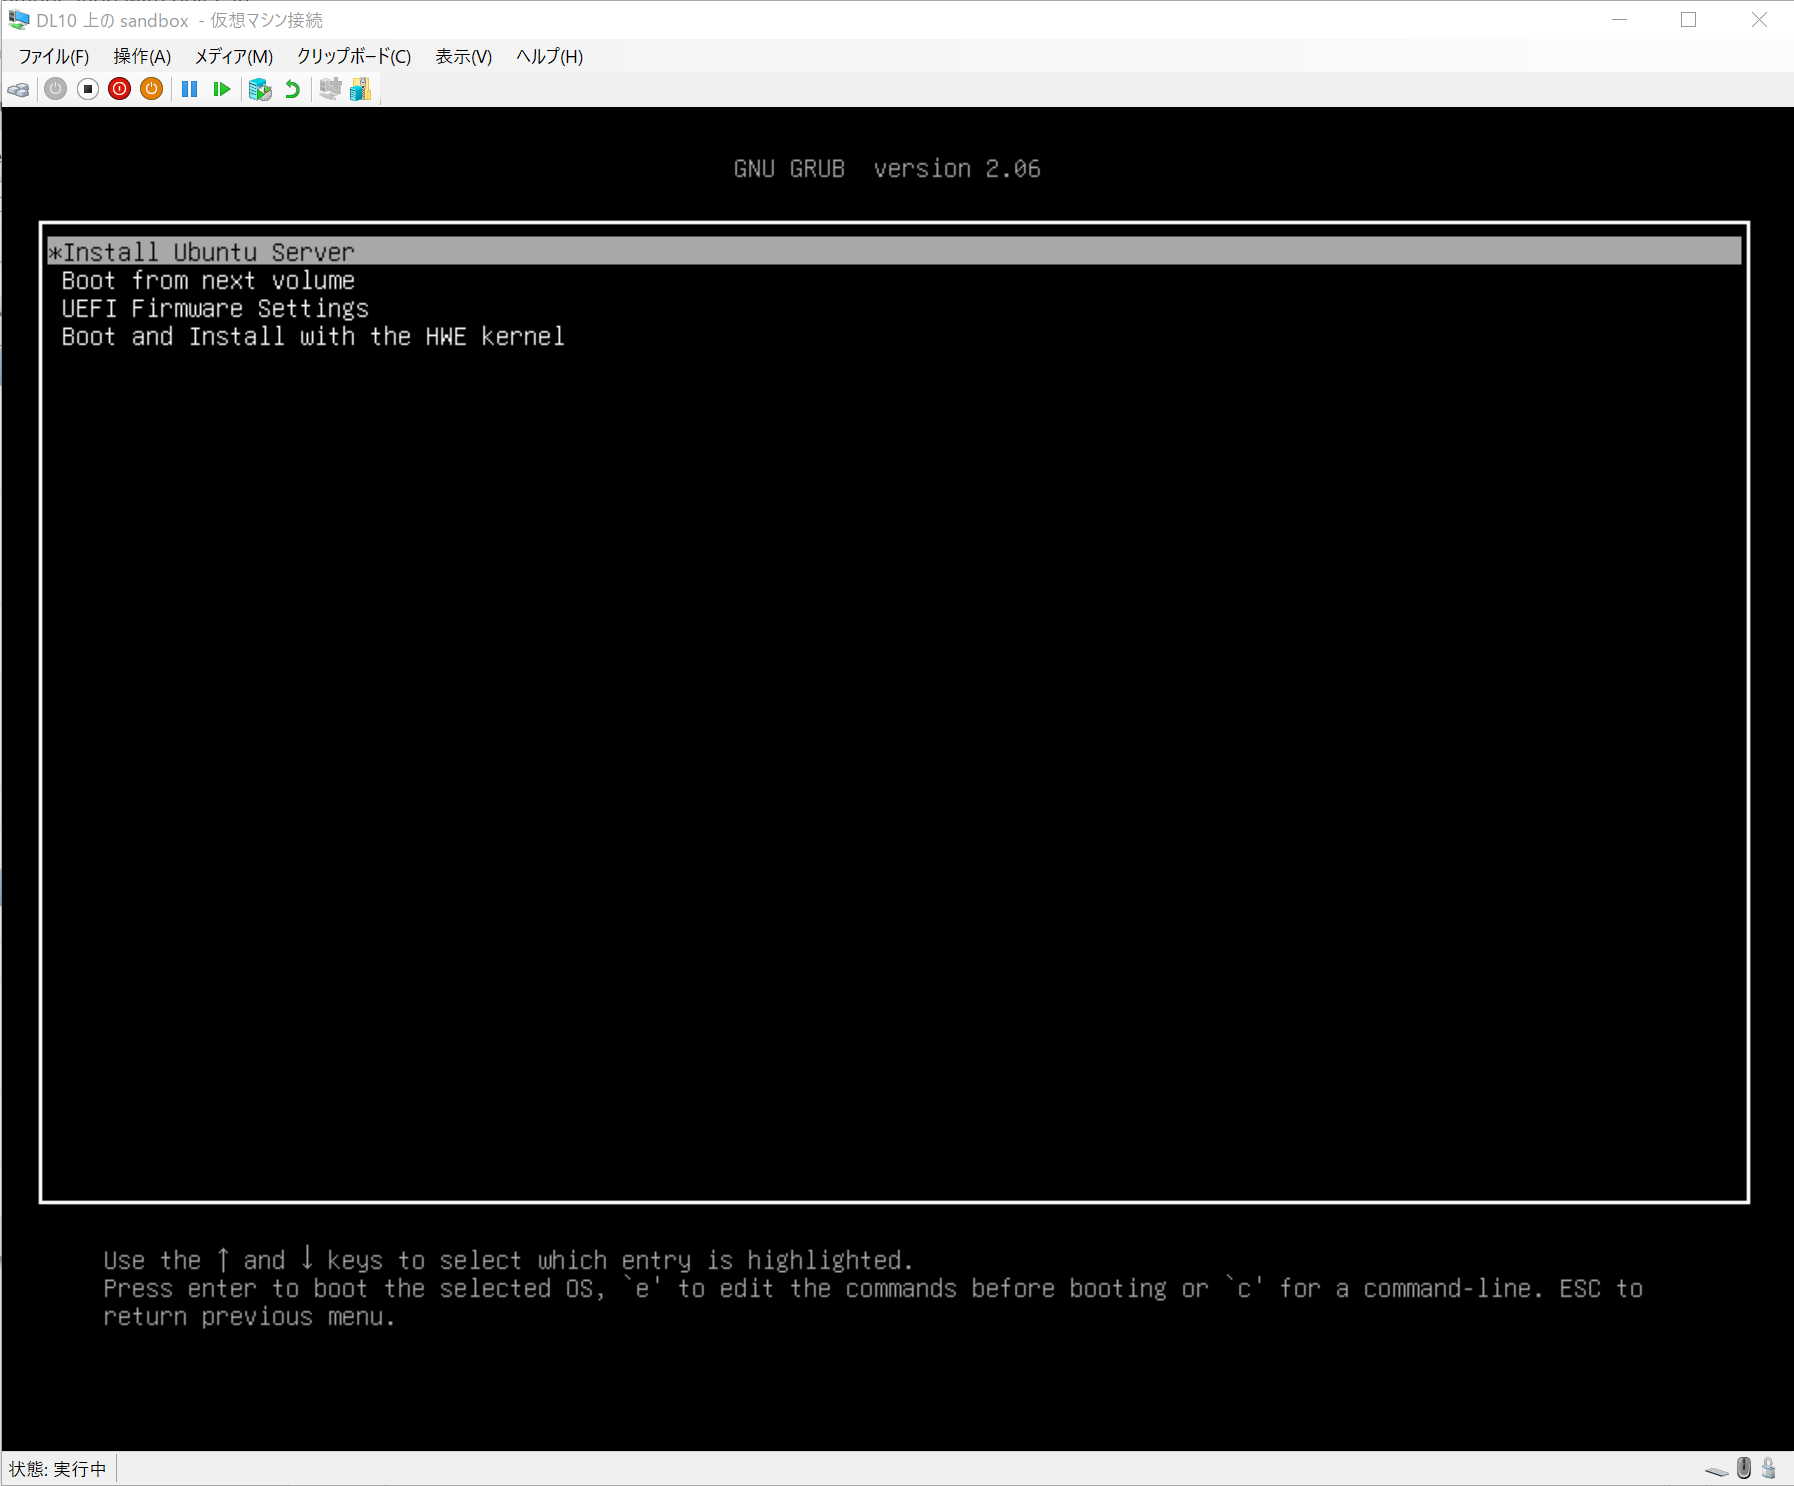
From this point on, all text-only screens are operated with the keyboard. To select a choice, use the four-way controller to select up, down, left, or right, and press Enter to confirm (this operation is implied by “select” below).
Select “Install Ubuntu Server”. Then configure the various settings.
Note the following
- On the “Installer update available” screen, be sure to select “Continue without updating”.
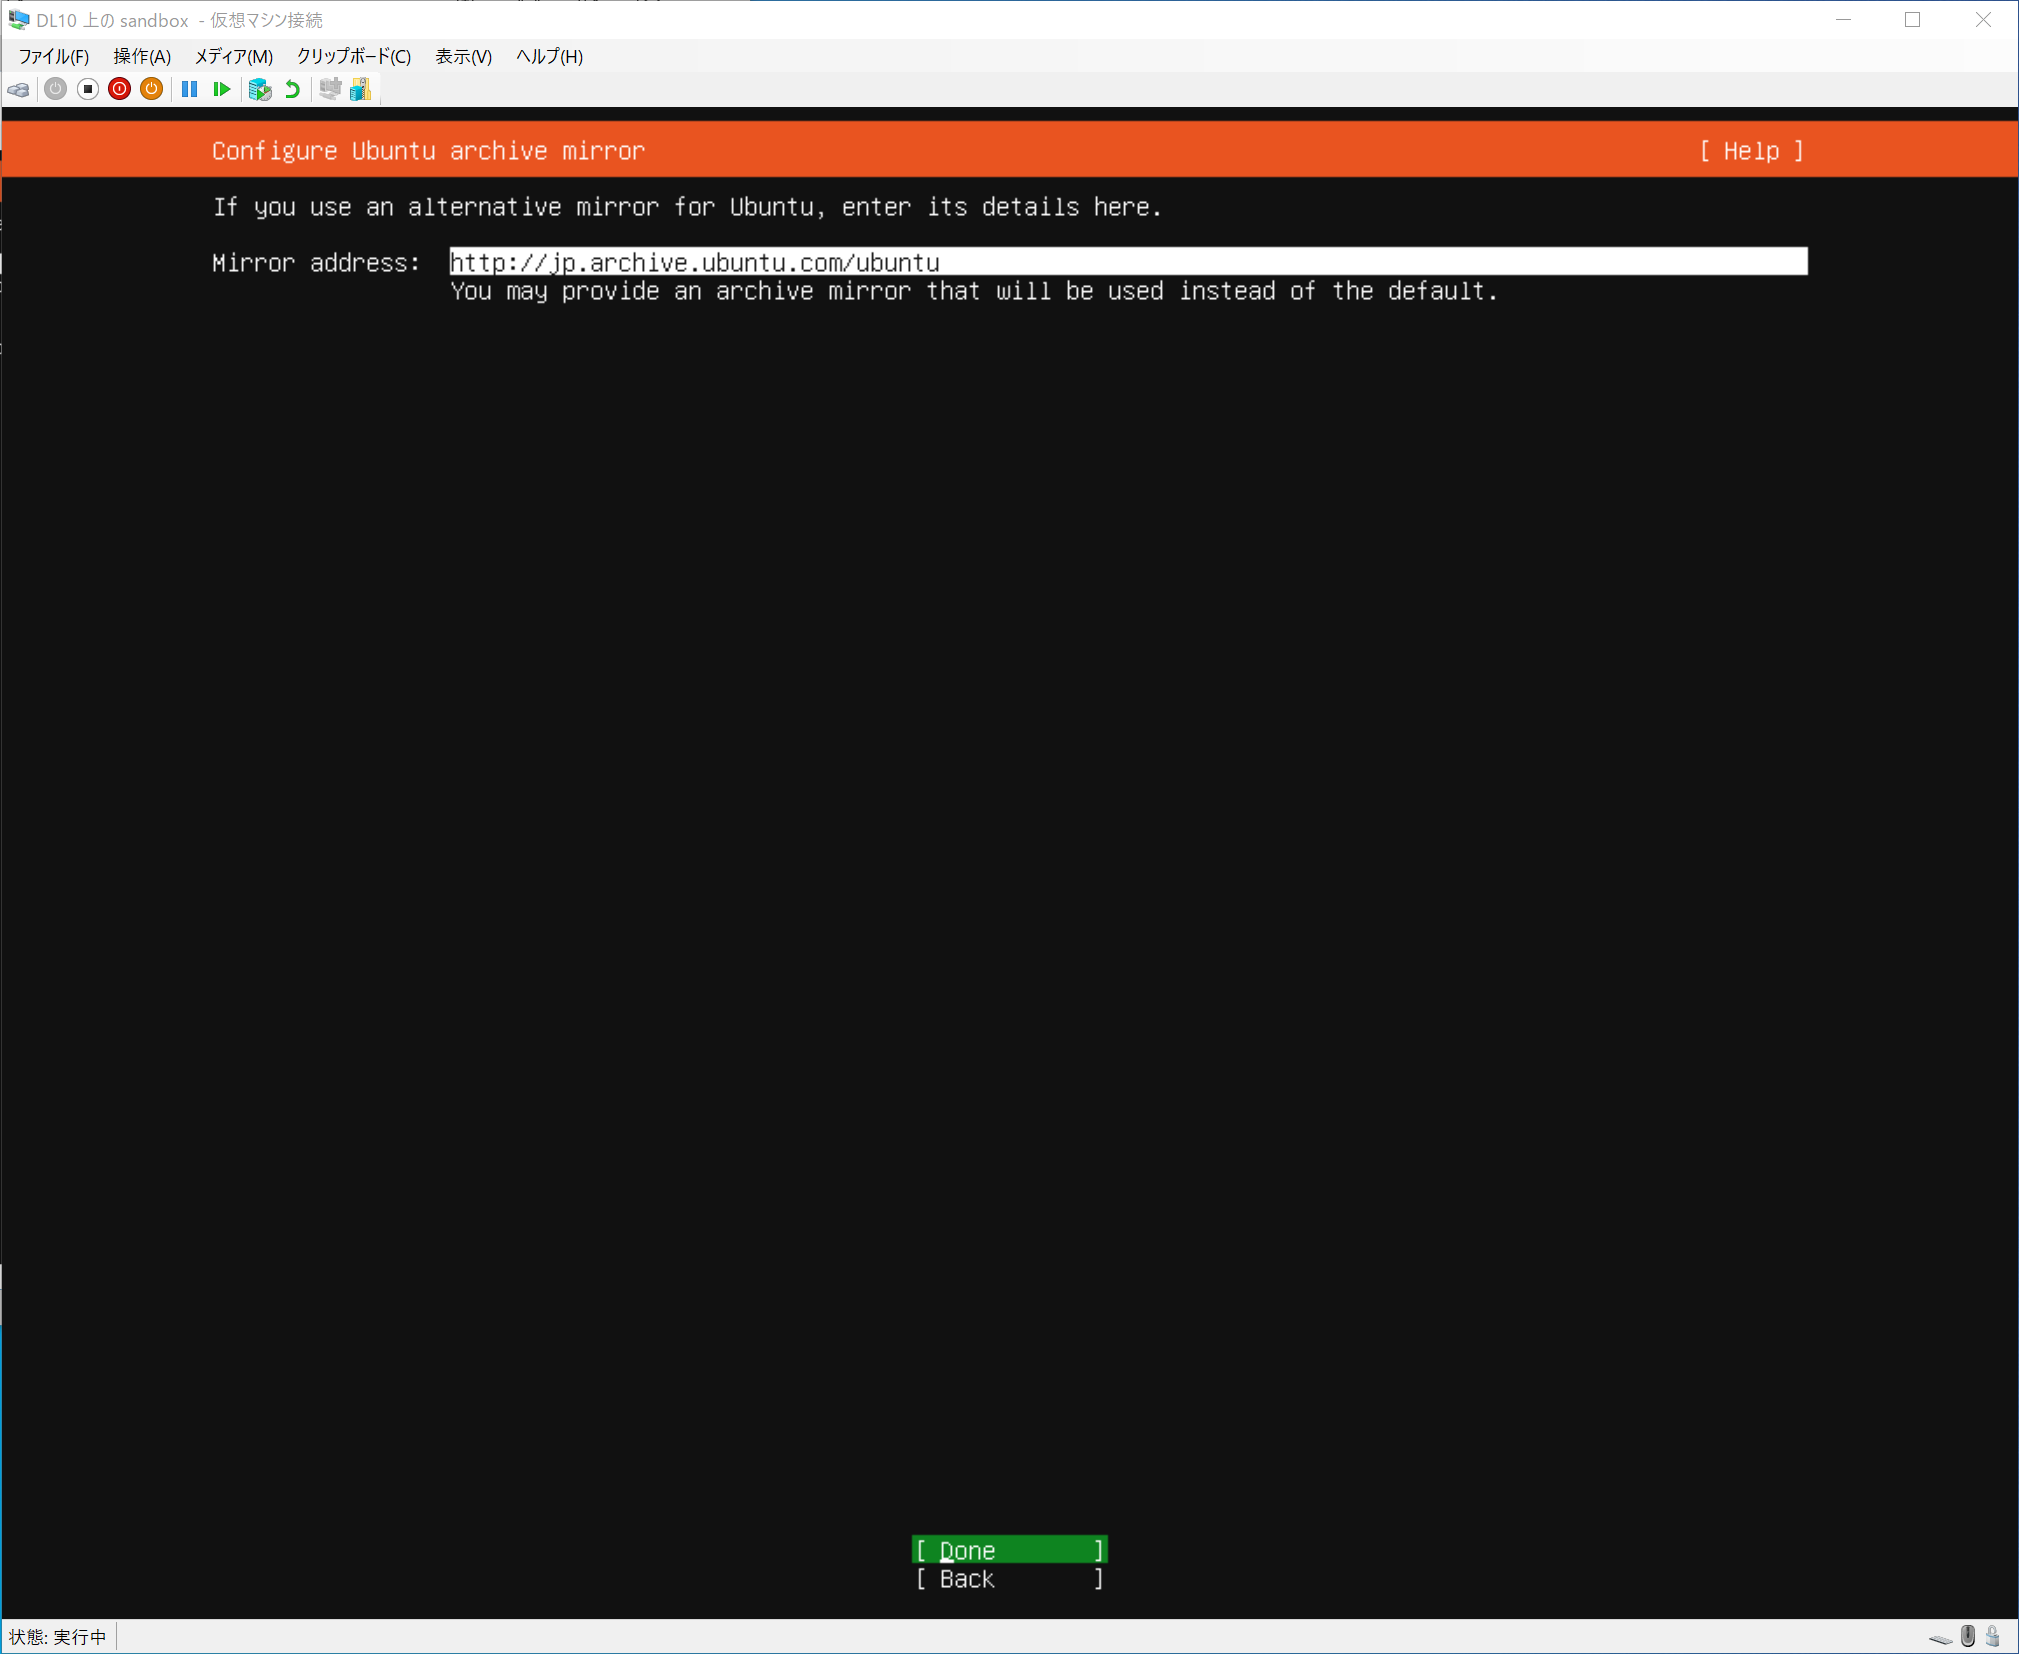
- In the “Configure proxy” screen, leave it blank for this time.
- (If you are using a proxy, this is not the case, but it is not covered here.
- On the “SSH Setup” screen, check the “Install OpenSSH server” checkbox.
Each setting is described in detail below.
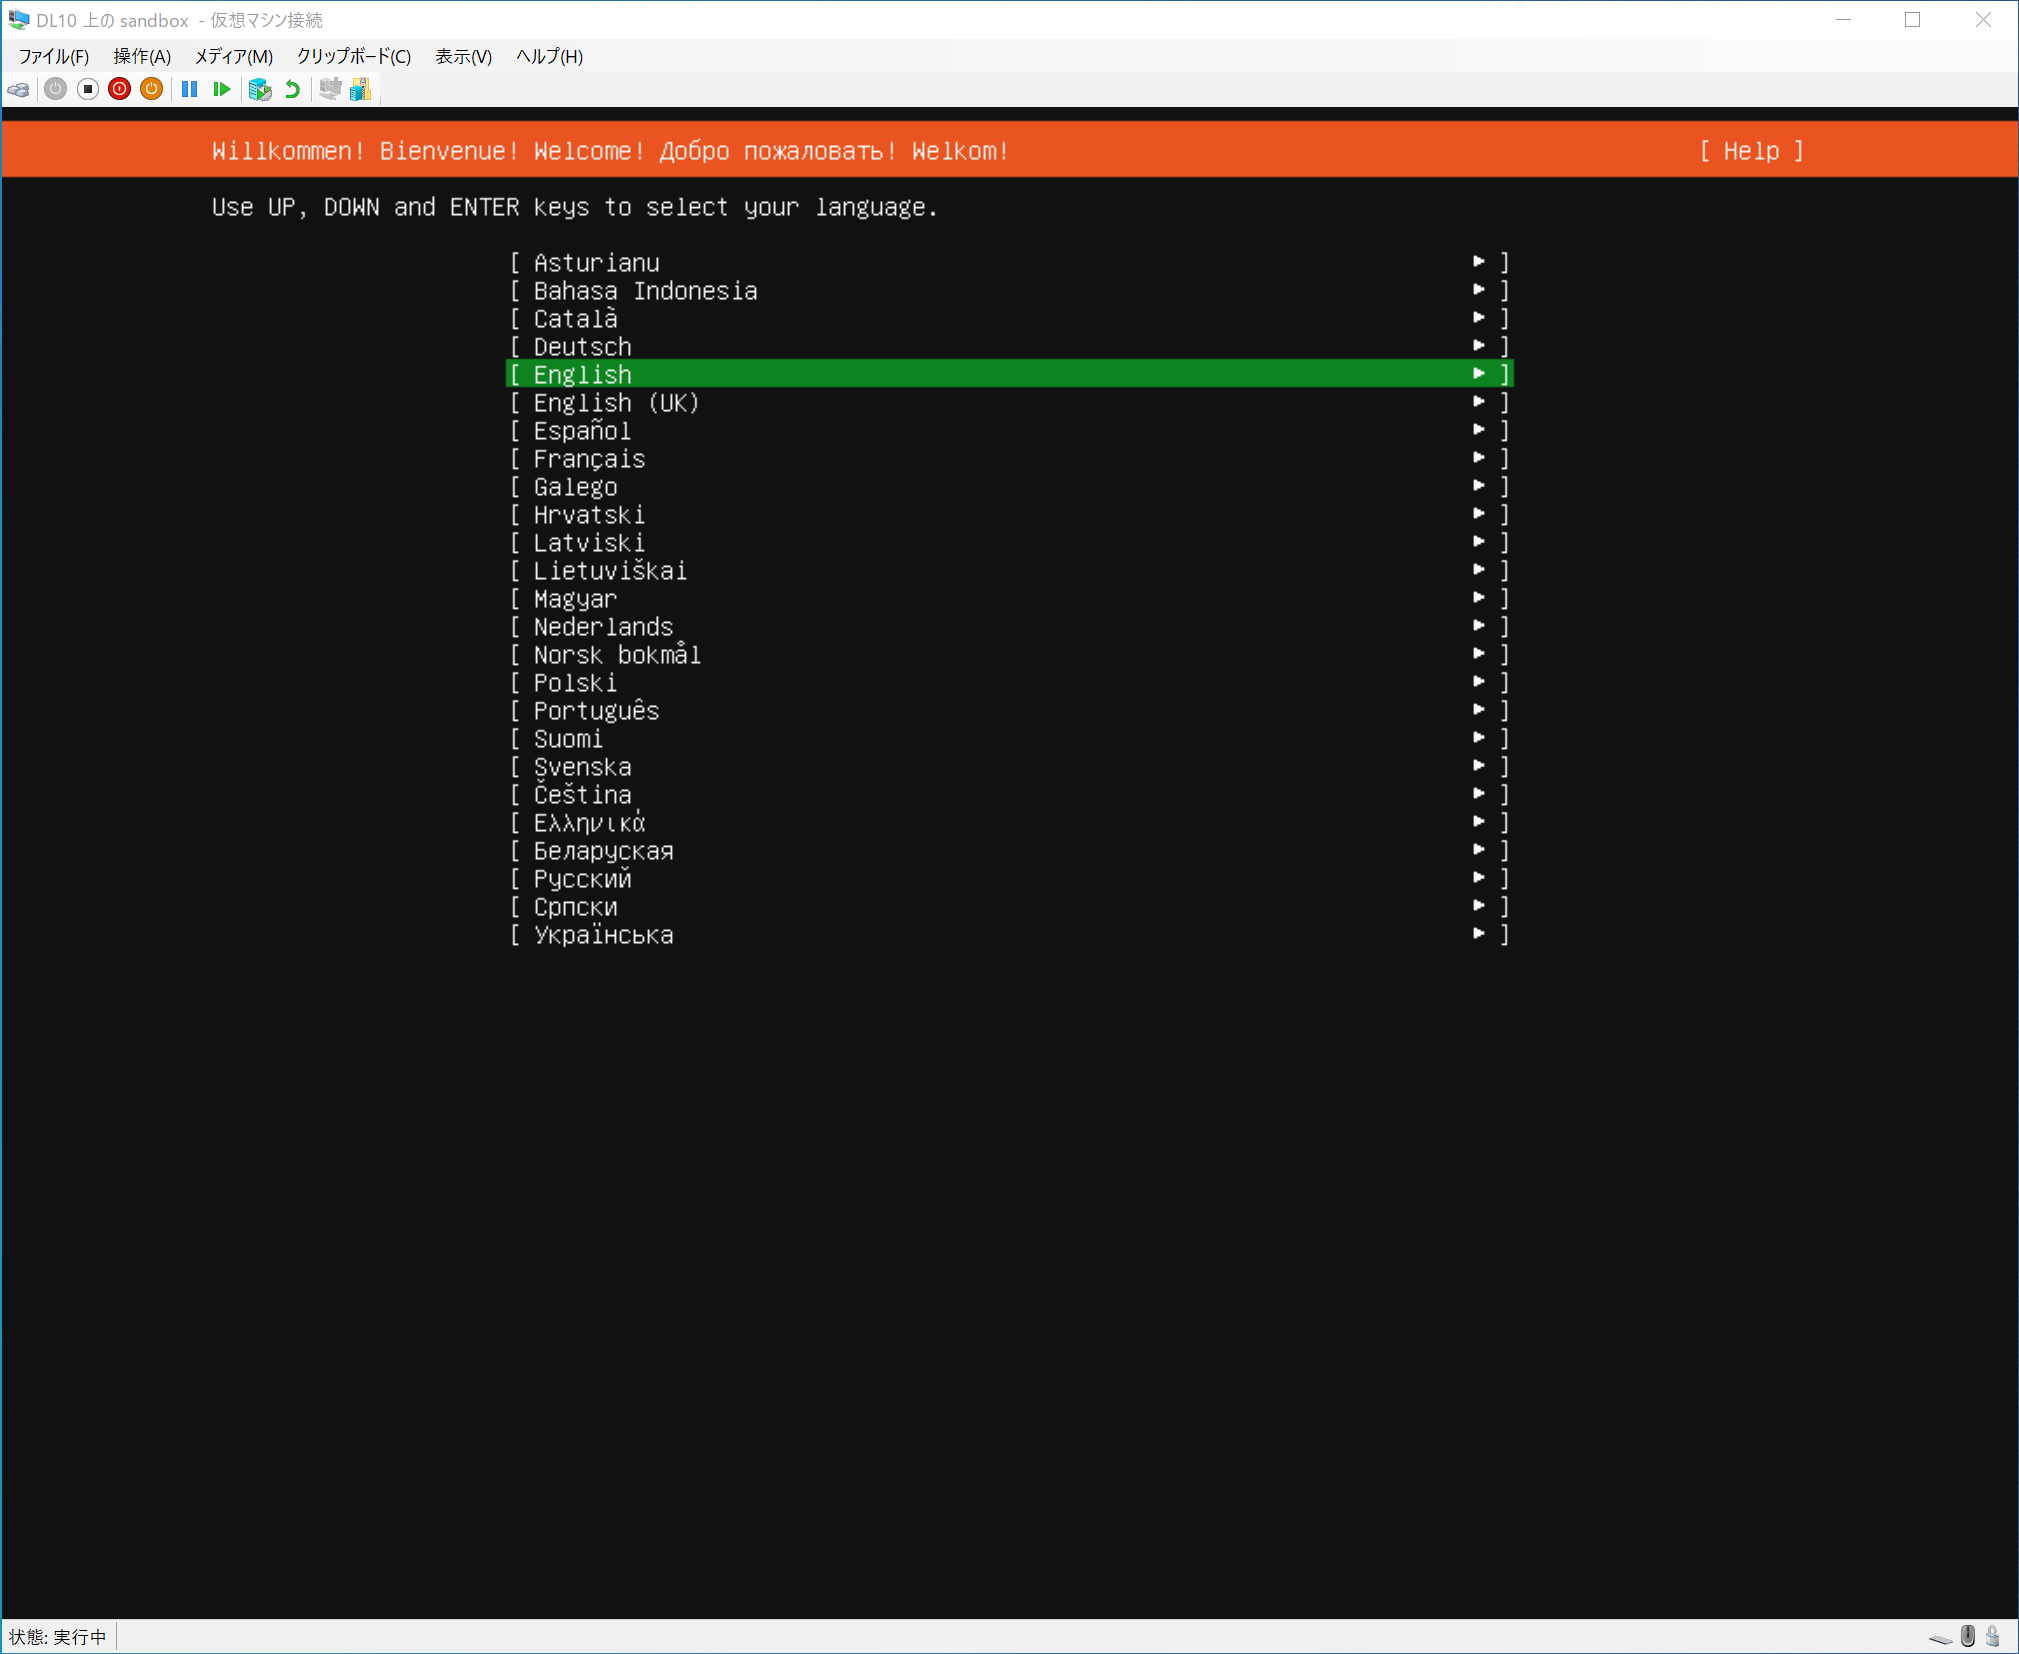
Select your preferred language. Basically, English (English).
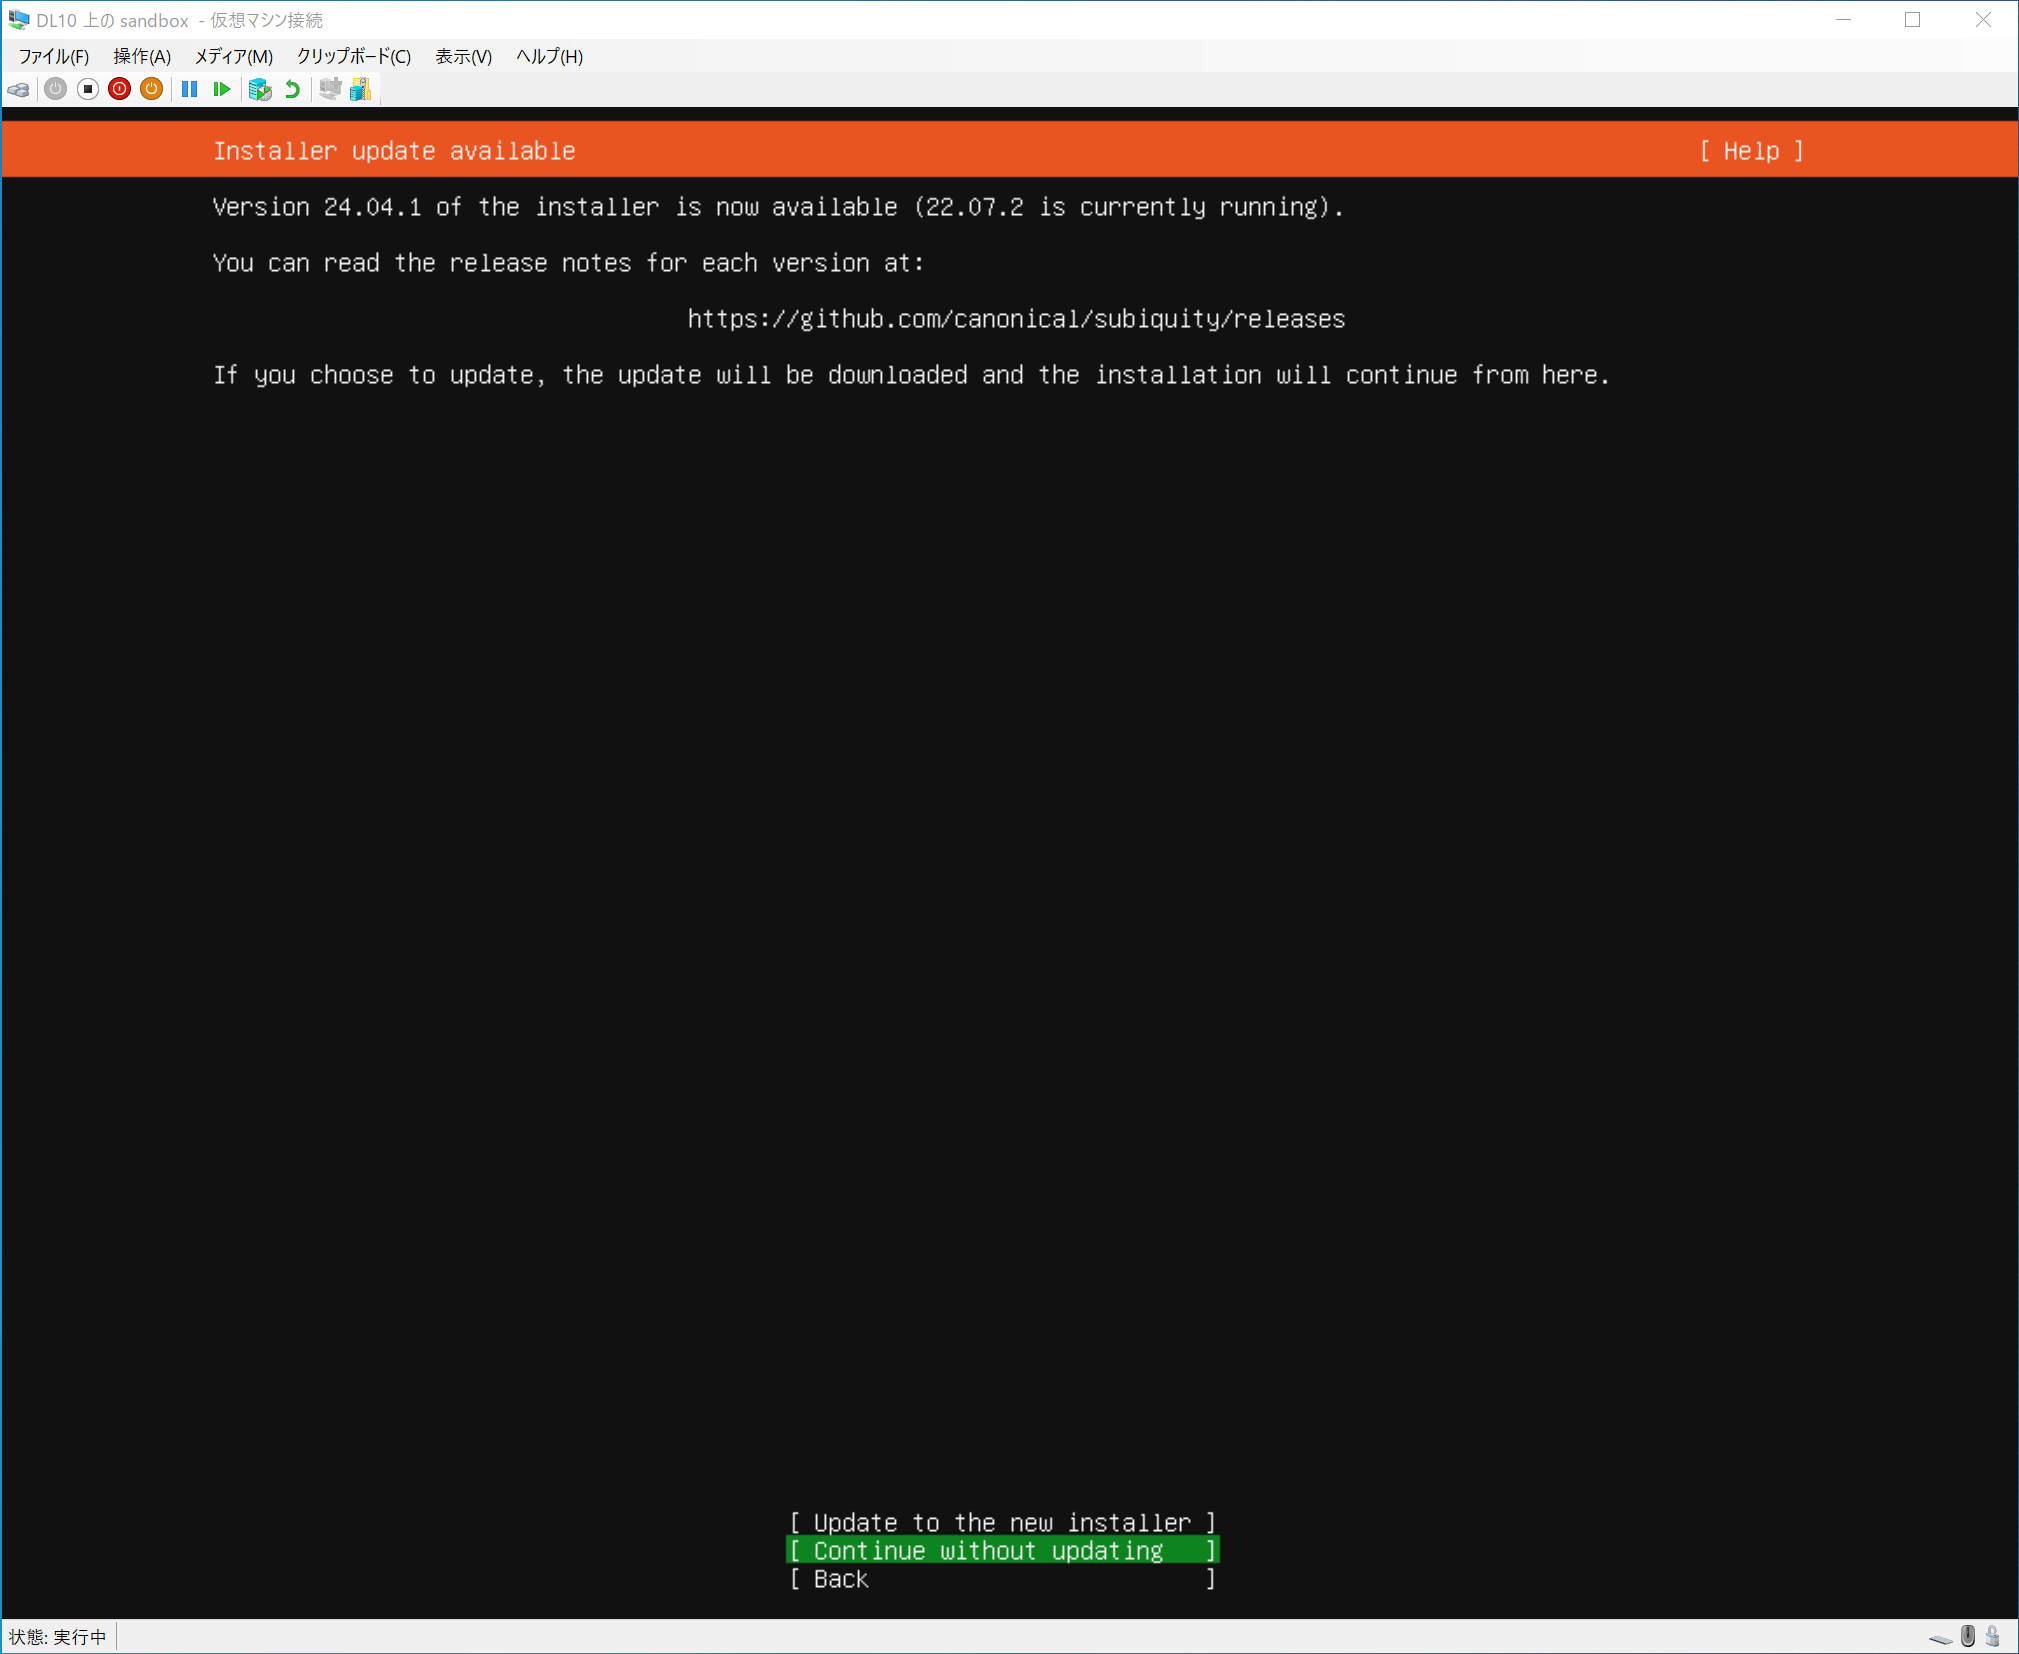
Select “Continue without updating”. Do not select “Update to the new installer” as it will result in an OS version that does not work with xData Edge.
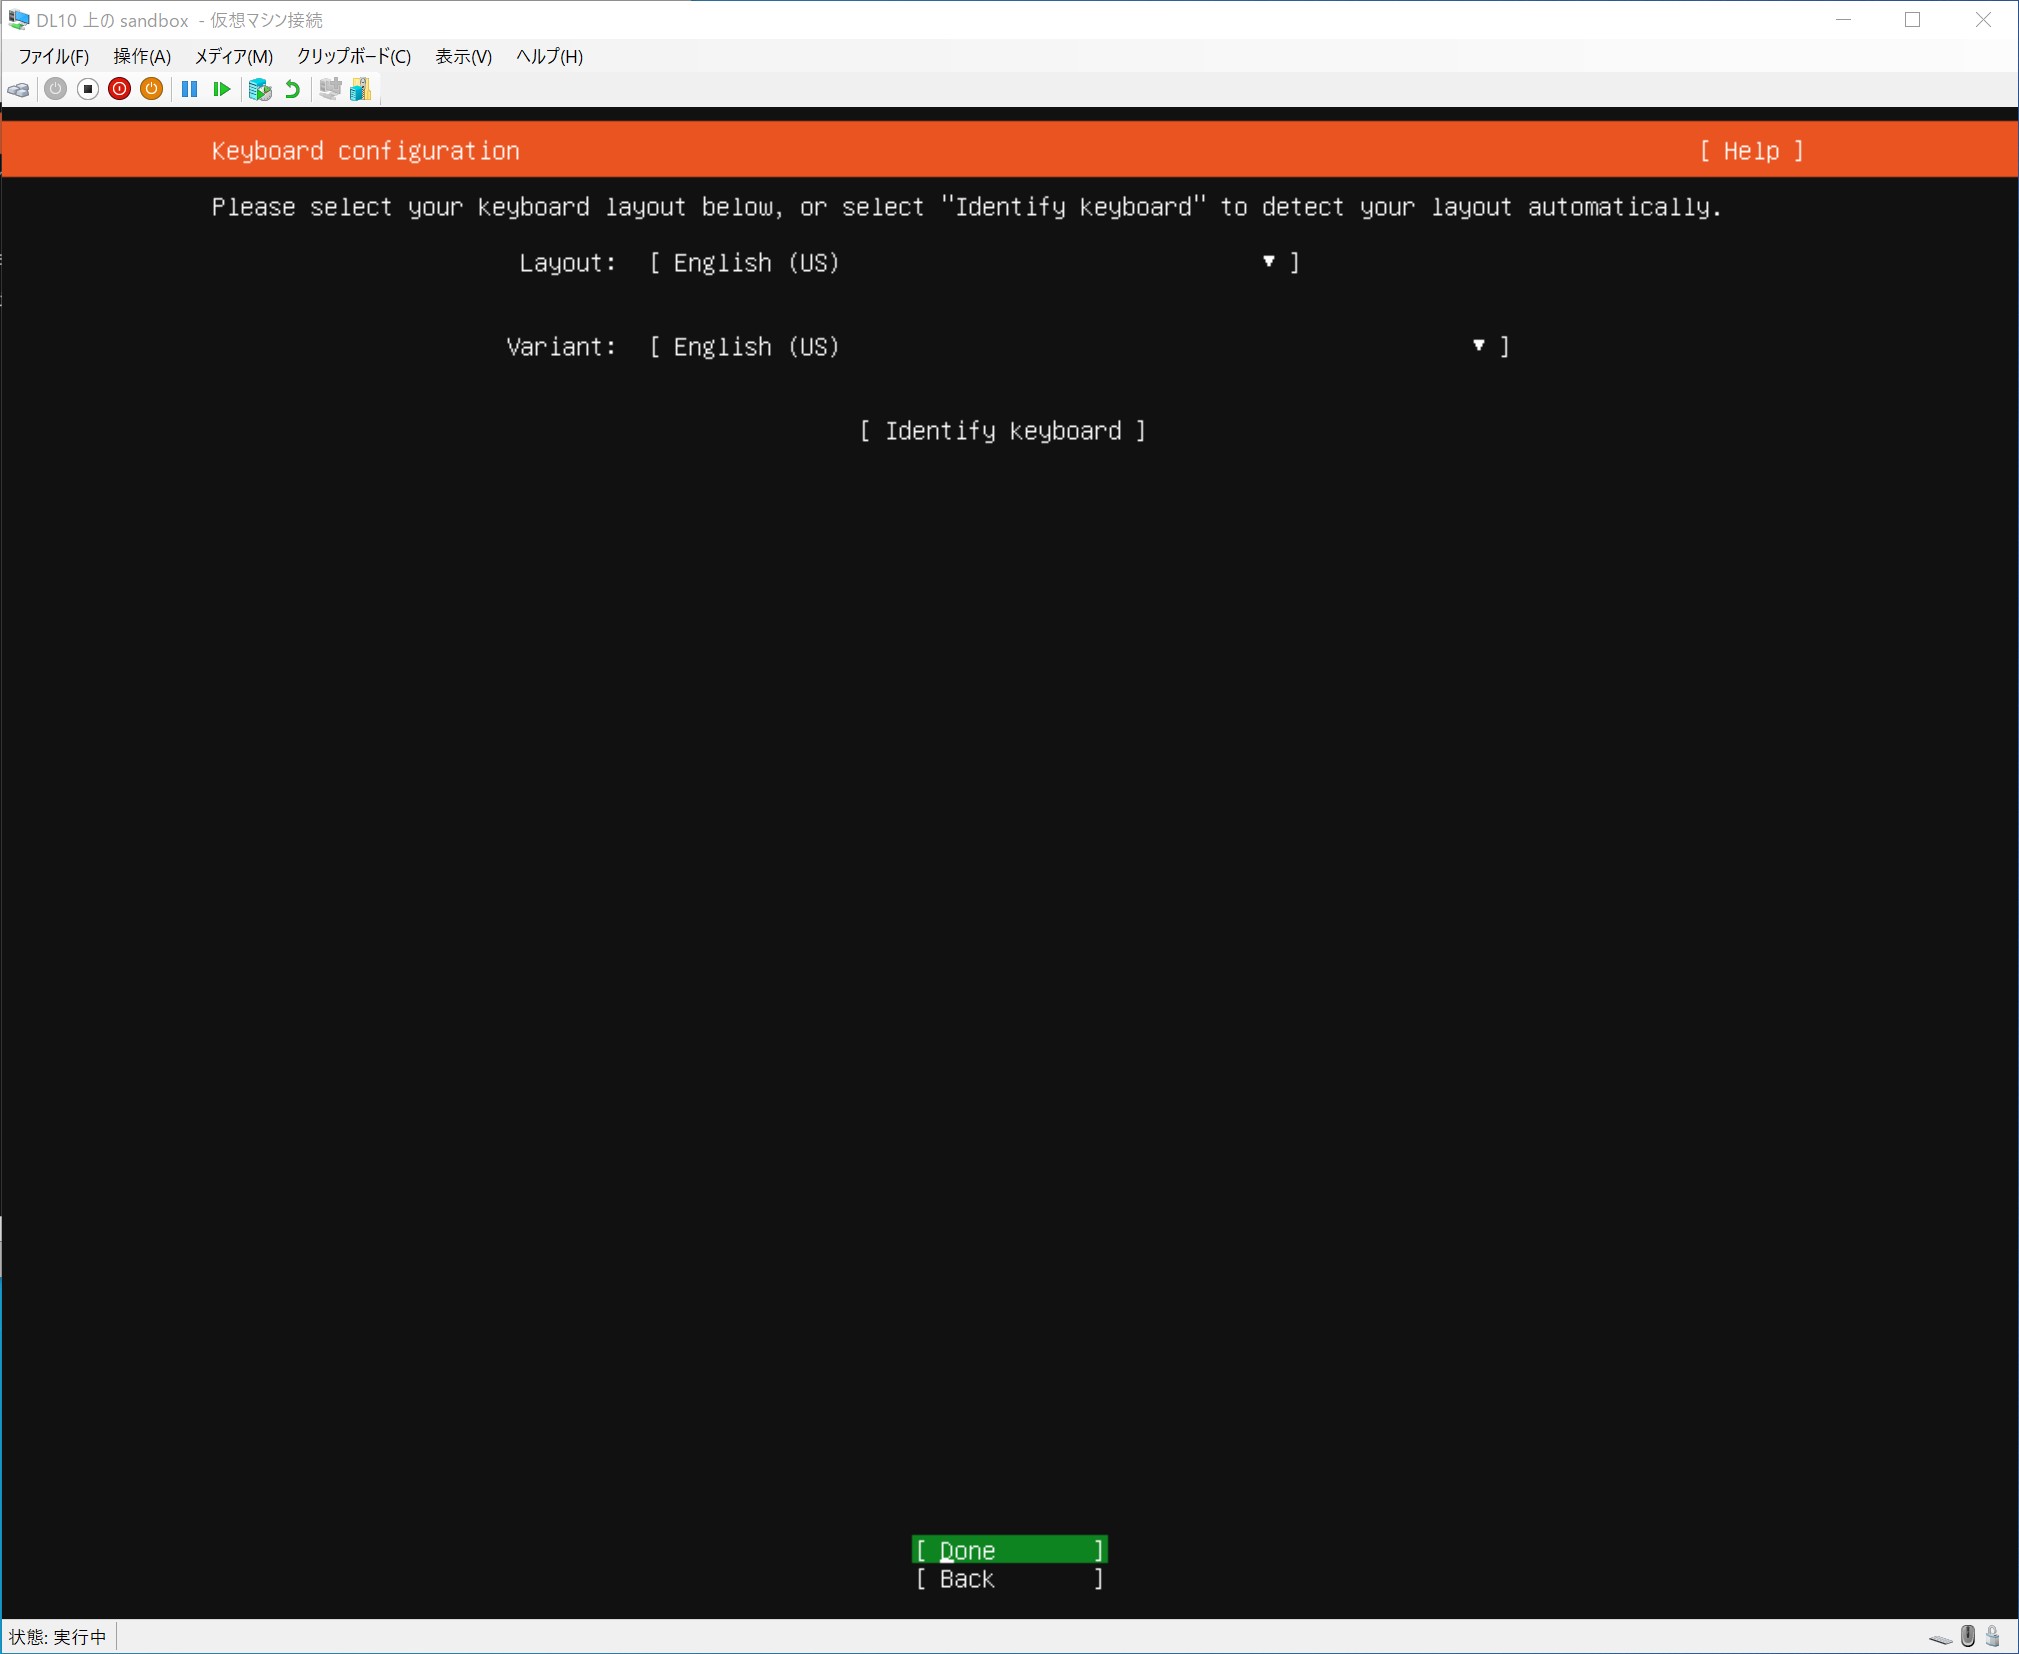
Specify the keyboard layout. In the environment shown in the image, the keyboard layout is English, but if you are using a Japanese keyboard (JIS layout), it will be “Japanese”.
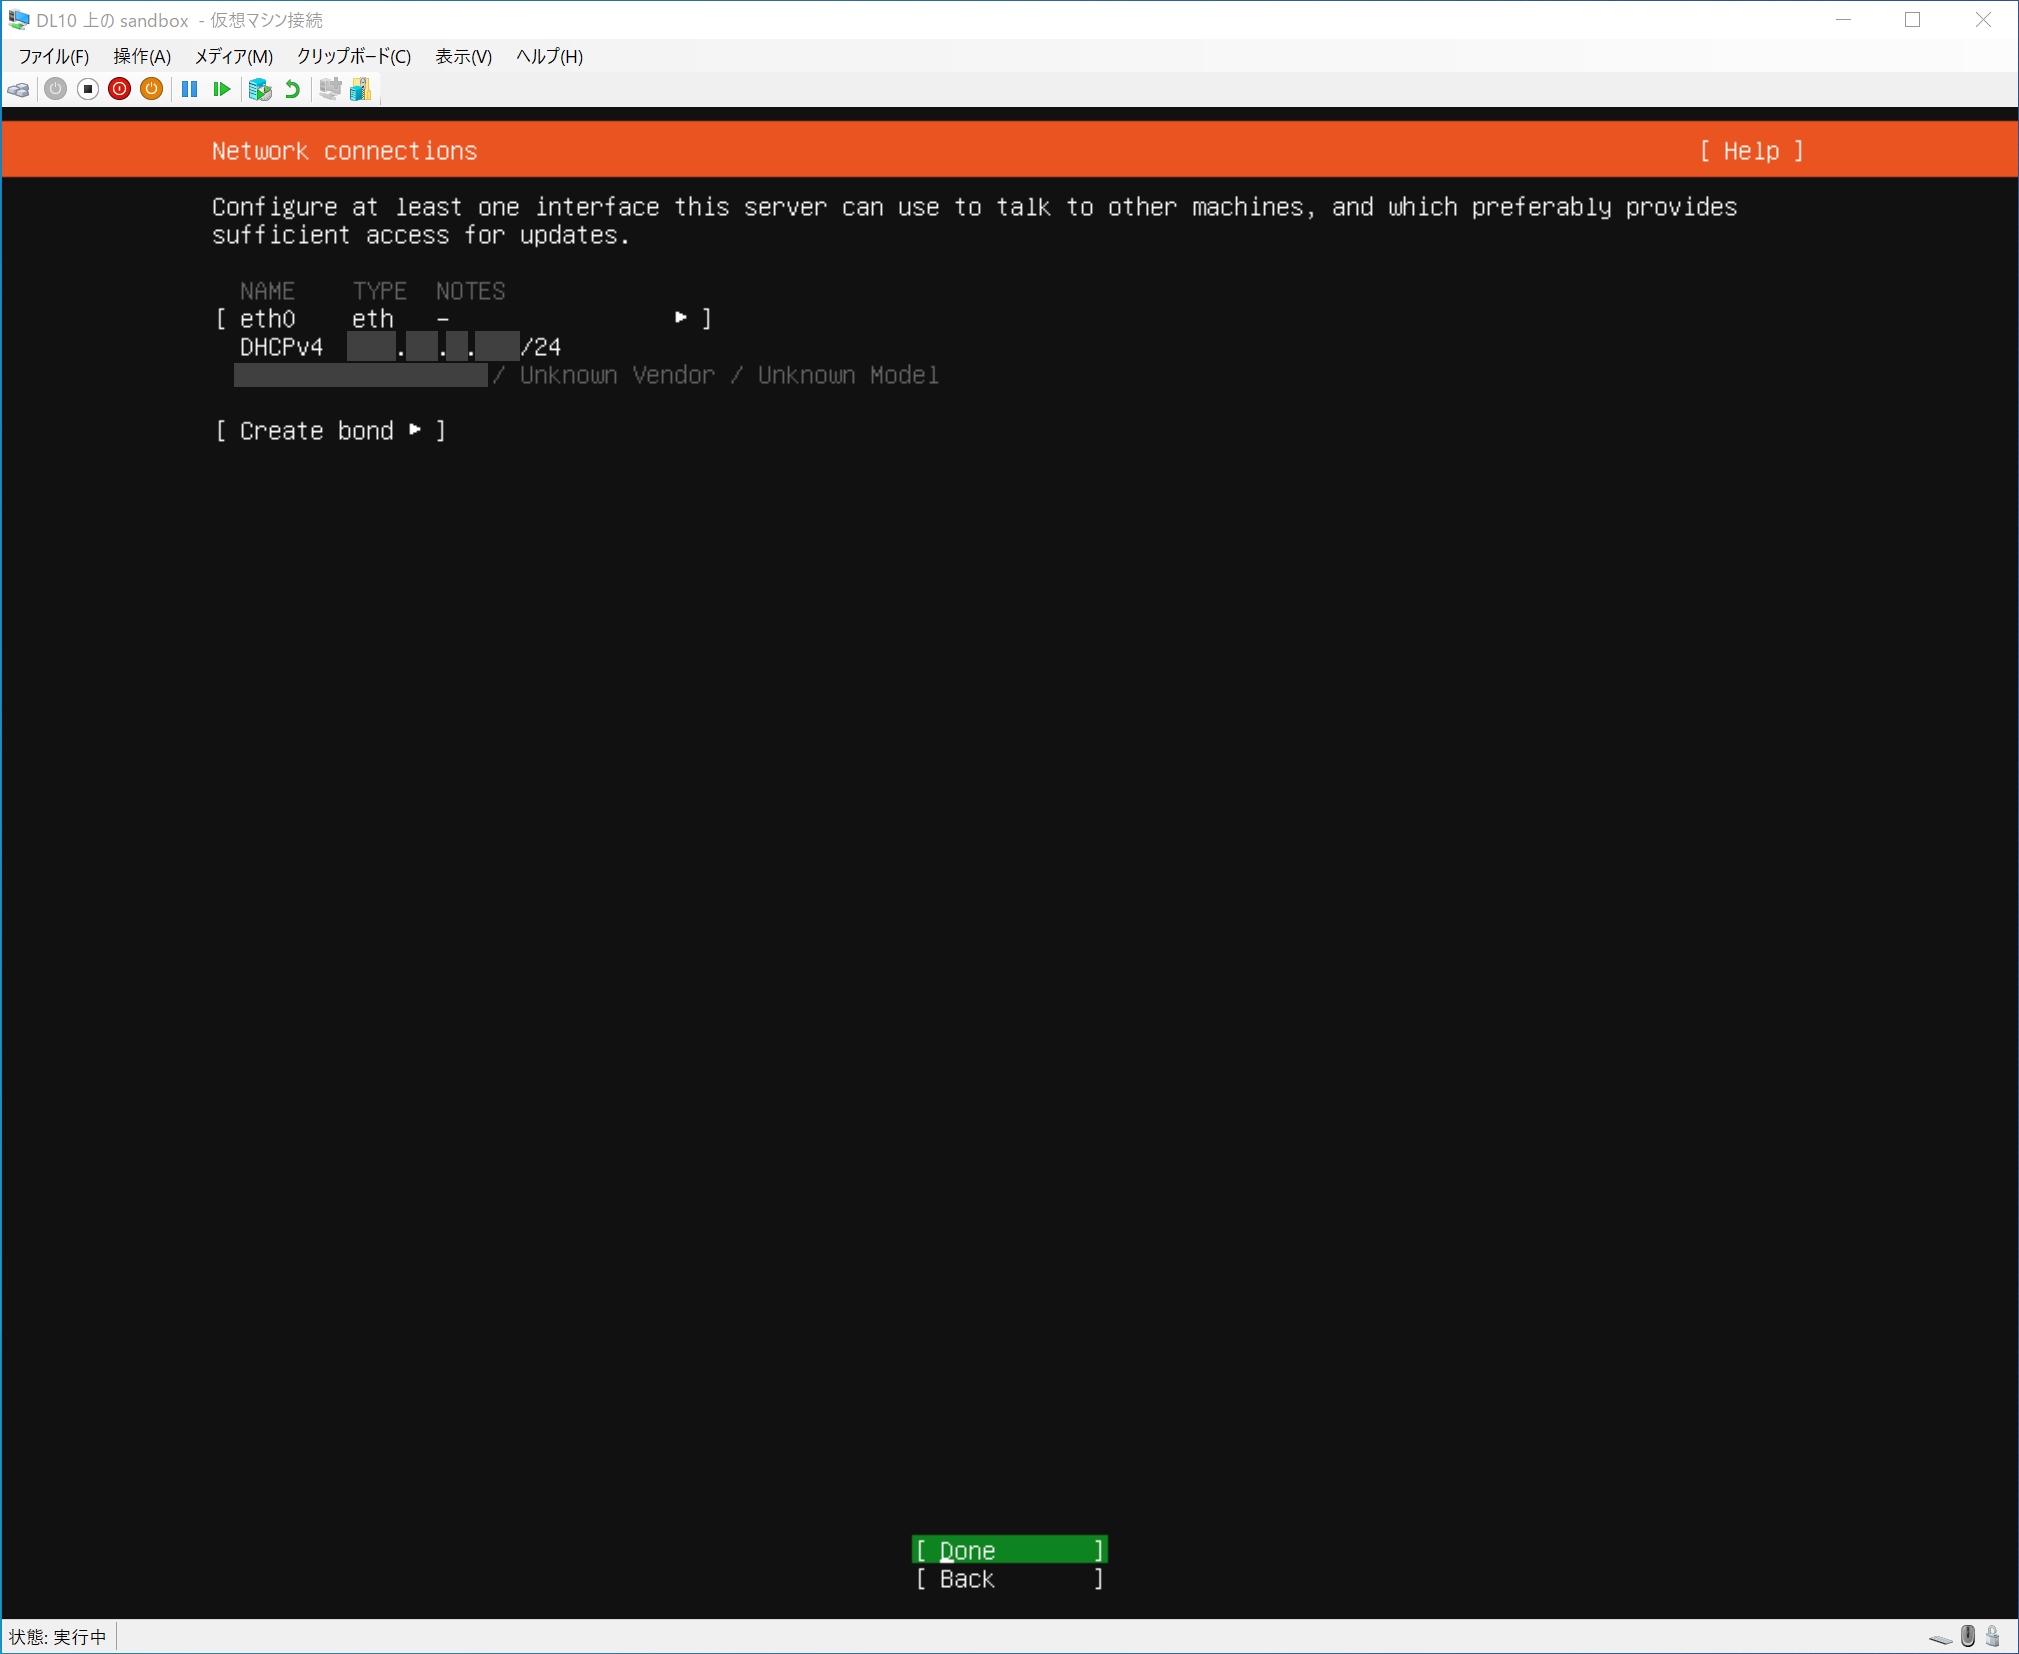
Network settings. In most cases, you can leave it as it is.
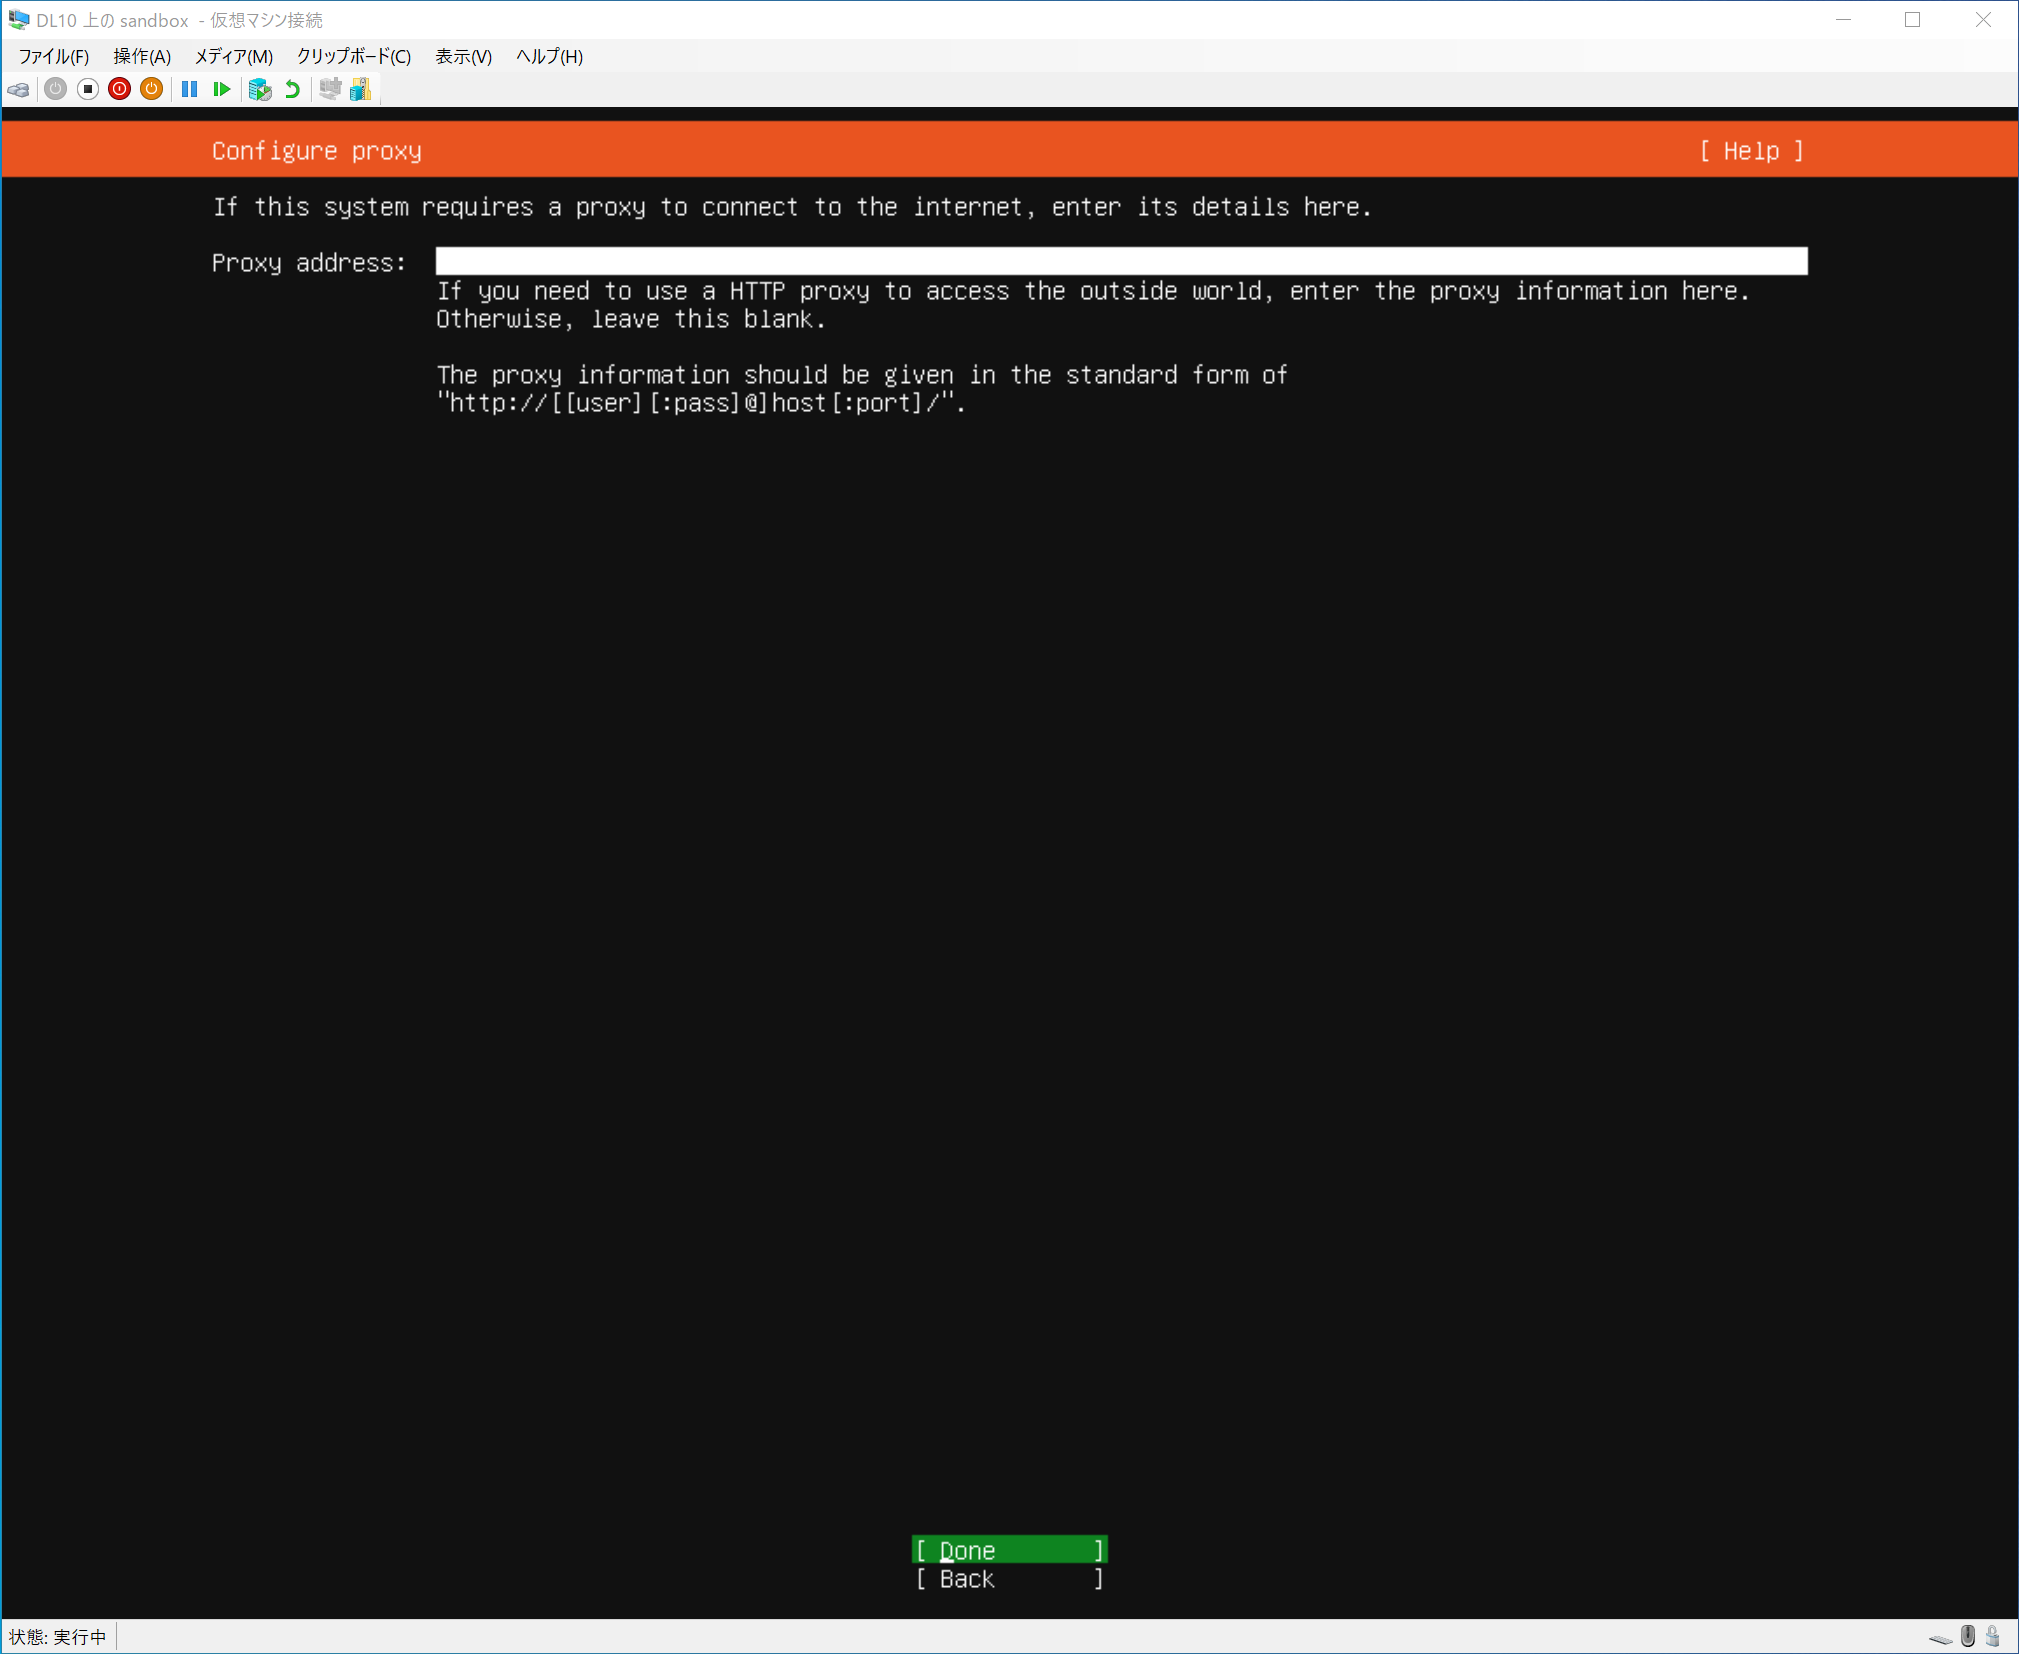
Proxy settings. Not set this time. It is possible to set up a proxy, but that process is not covered here.
Leave as is.
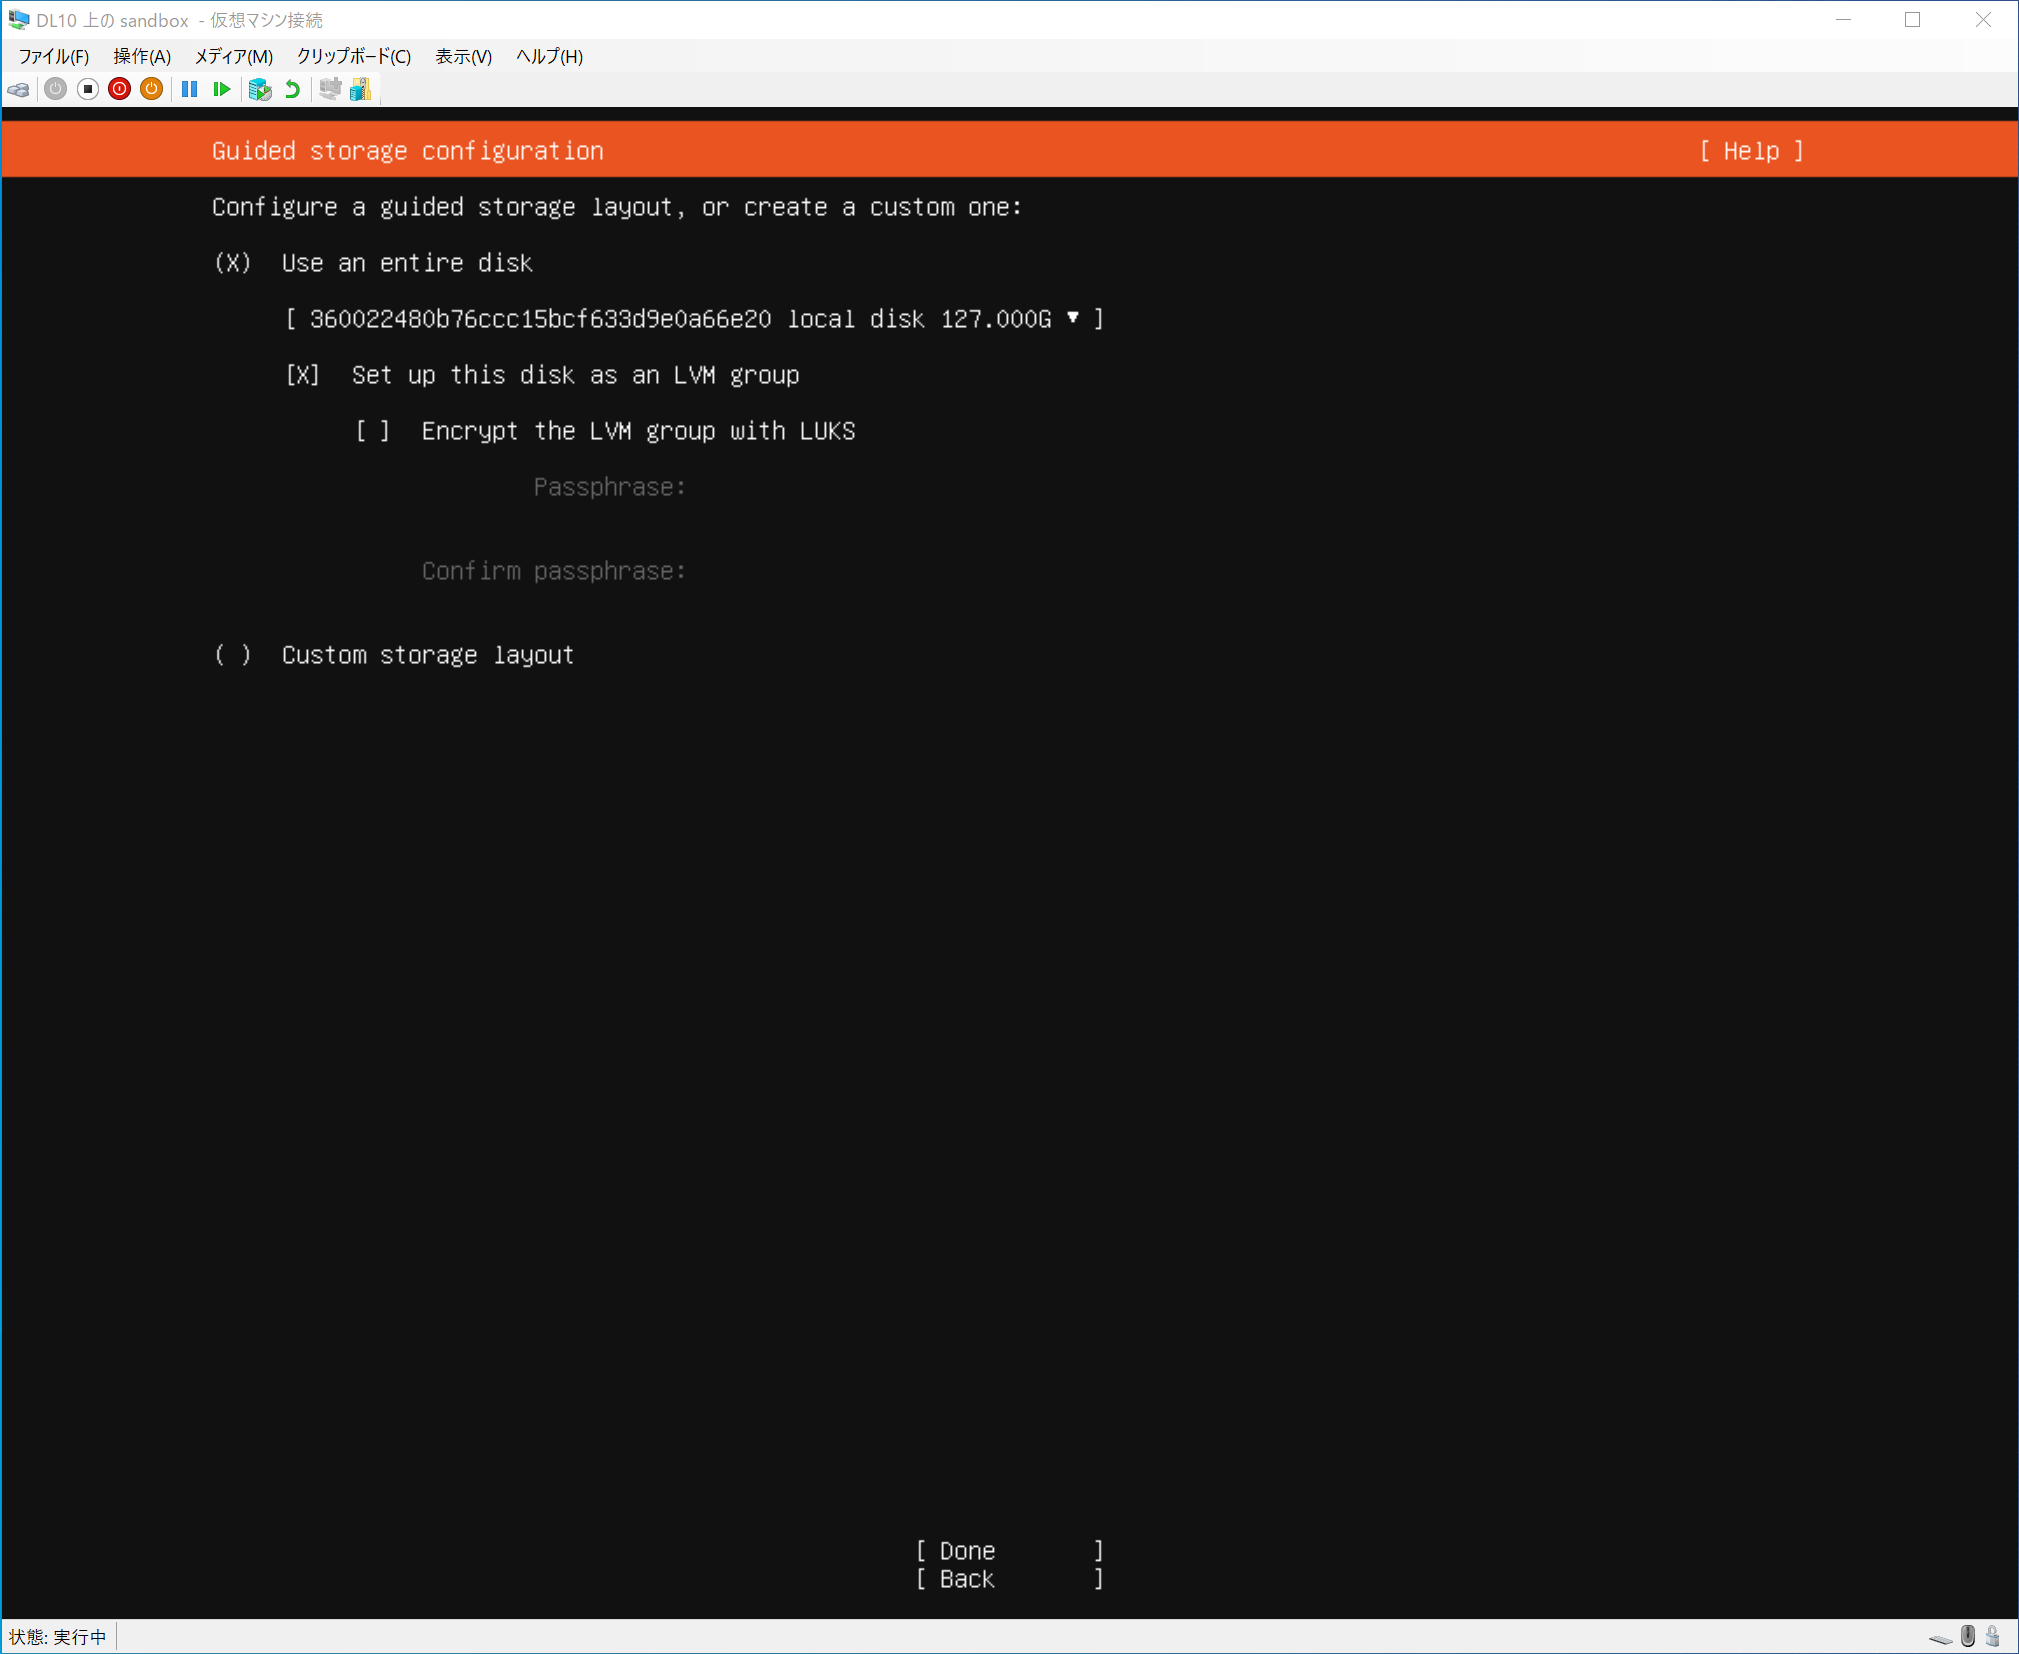
Select “Use an entire disk”.
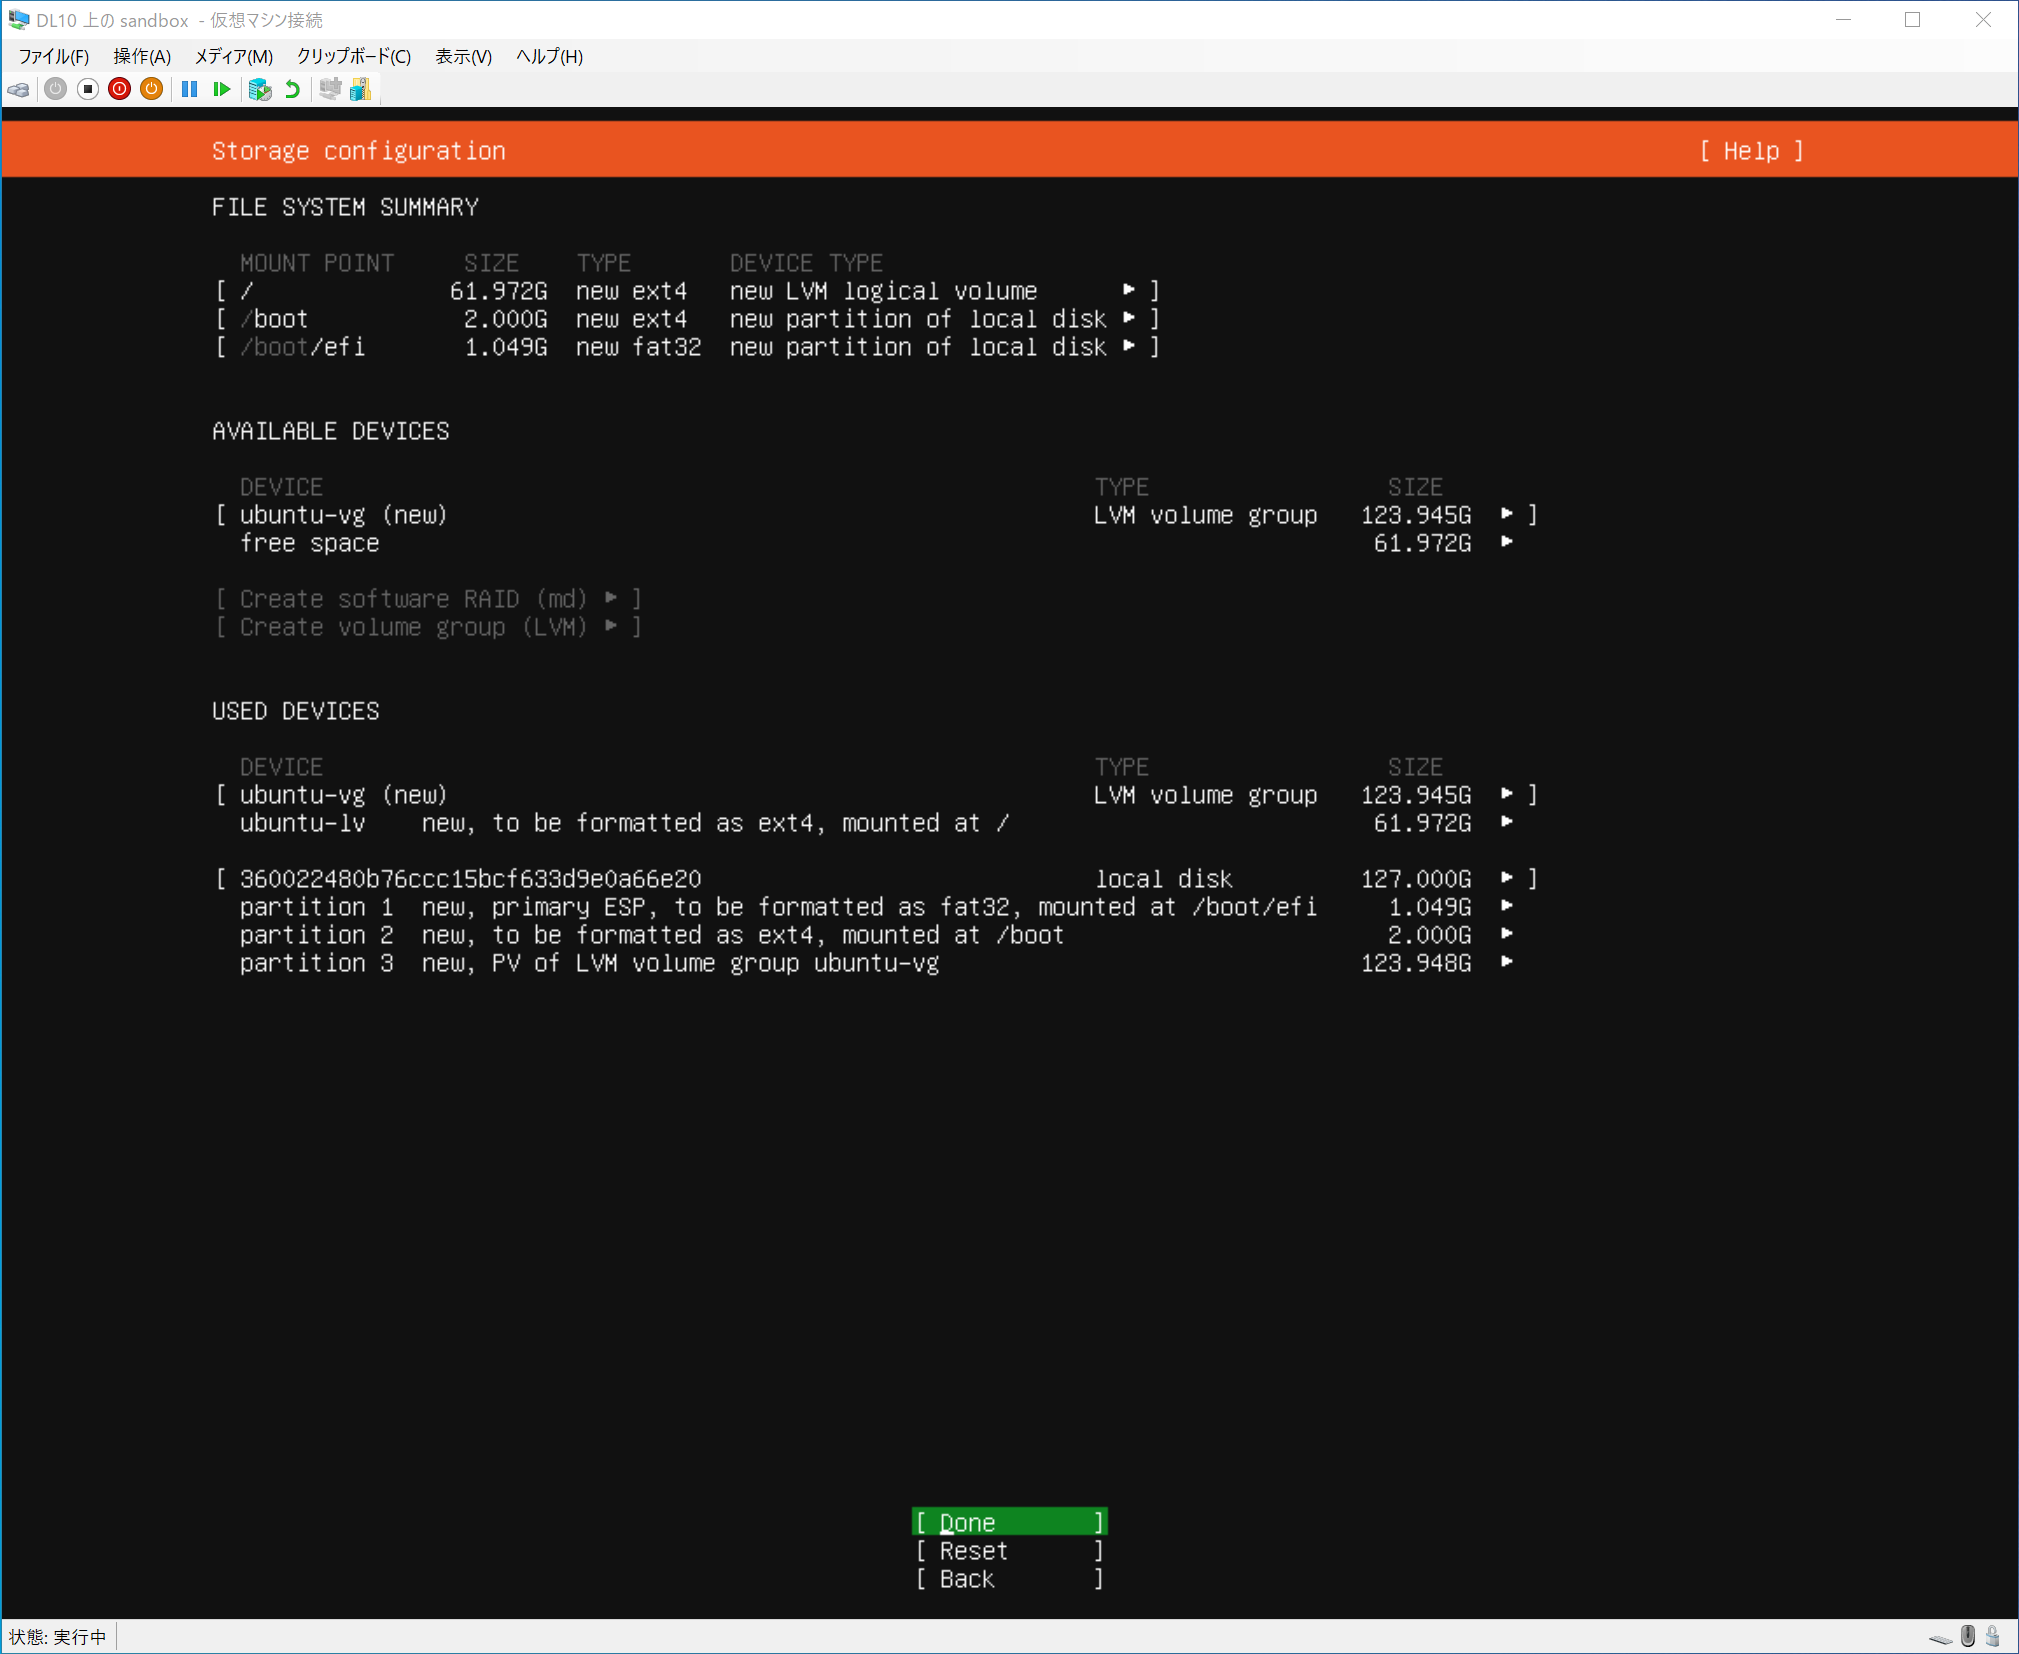
Confirm settings. Select “Done”.
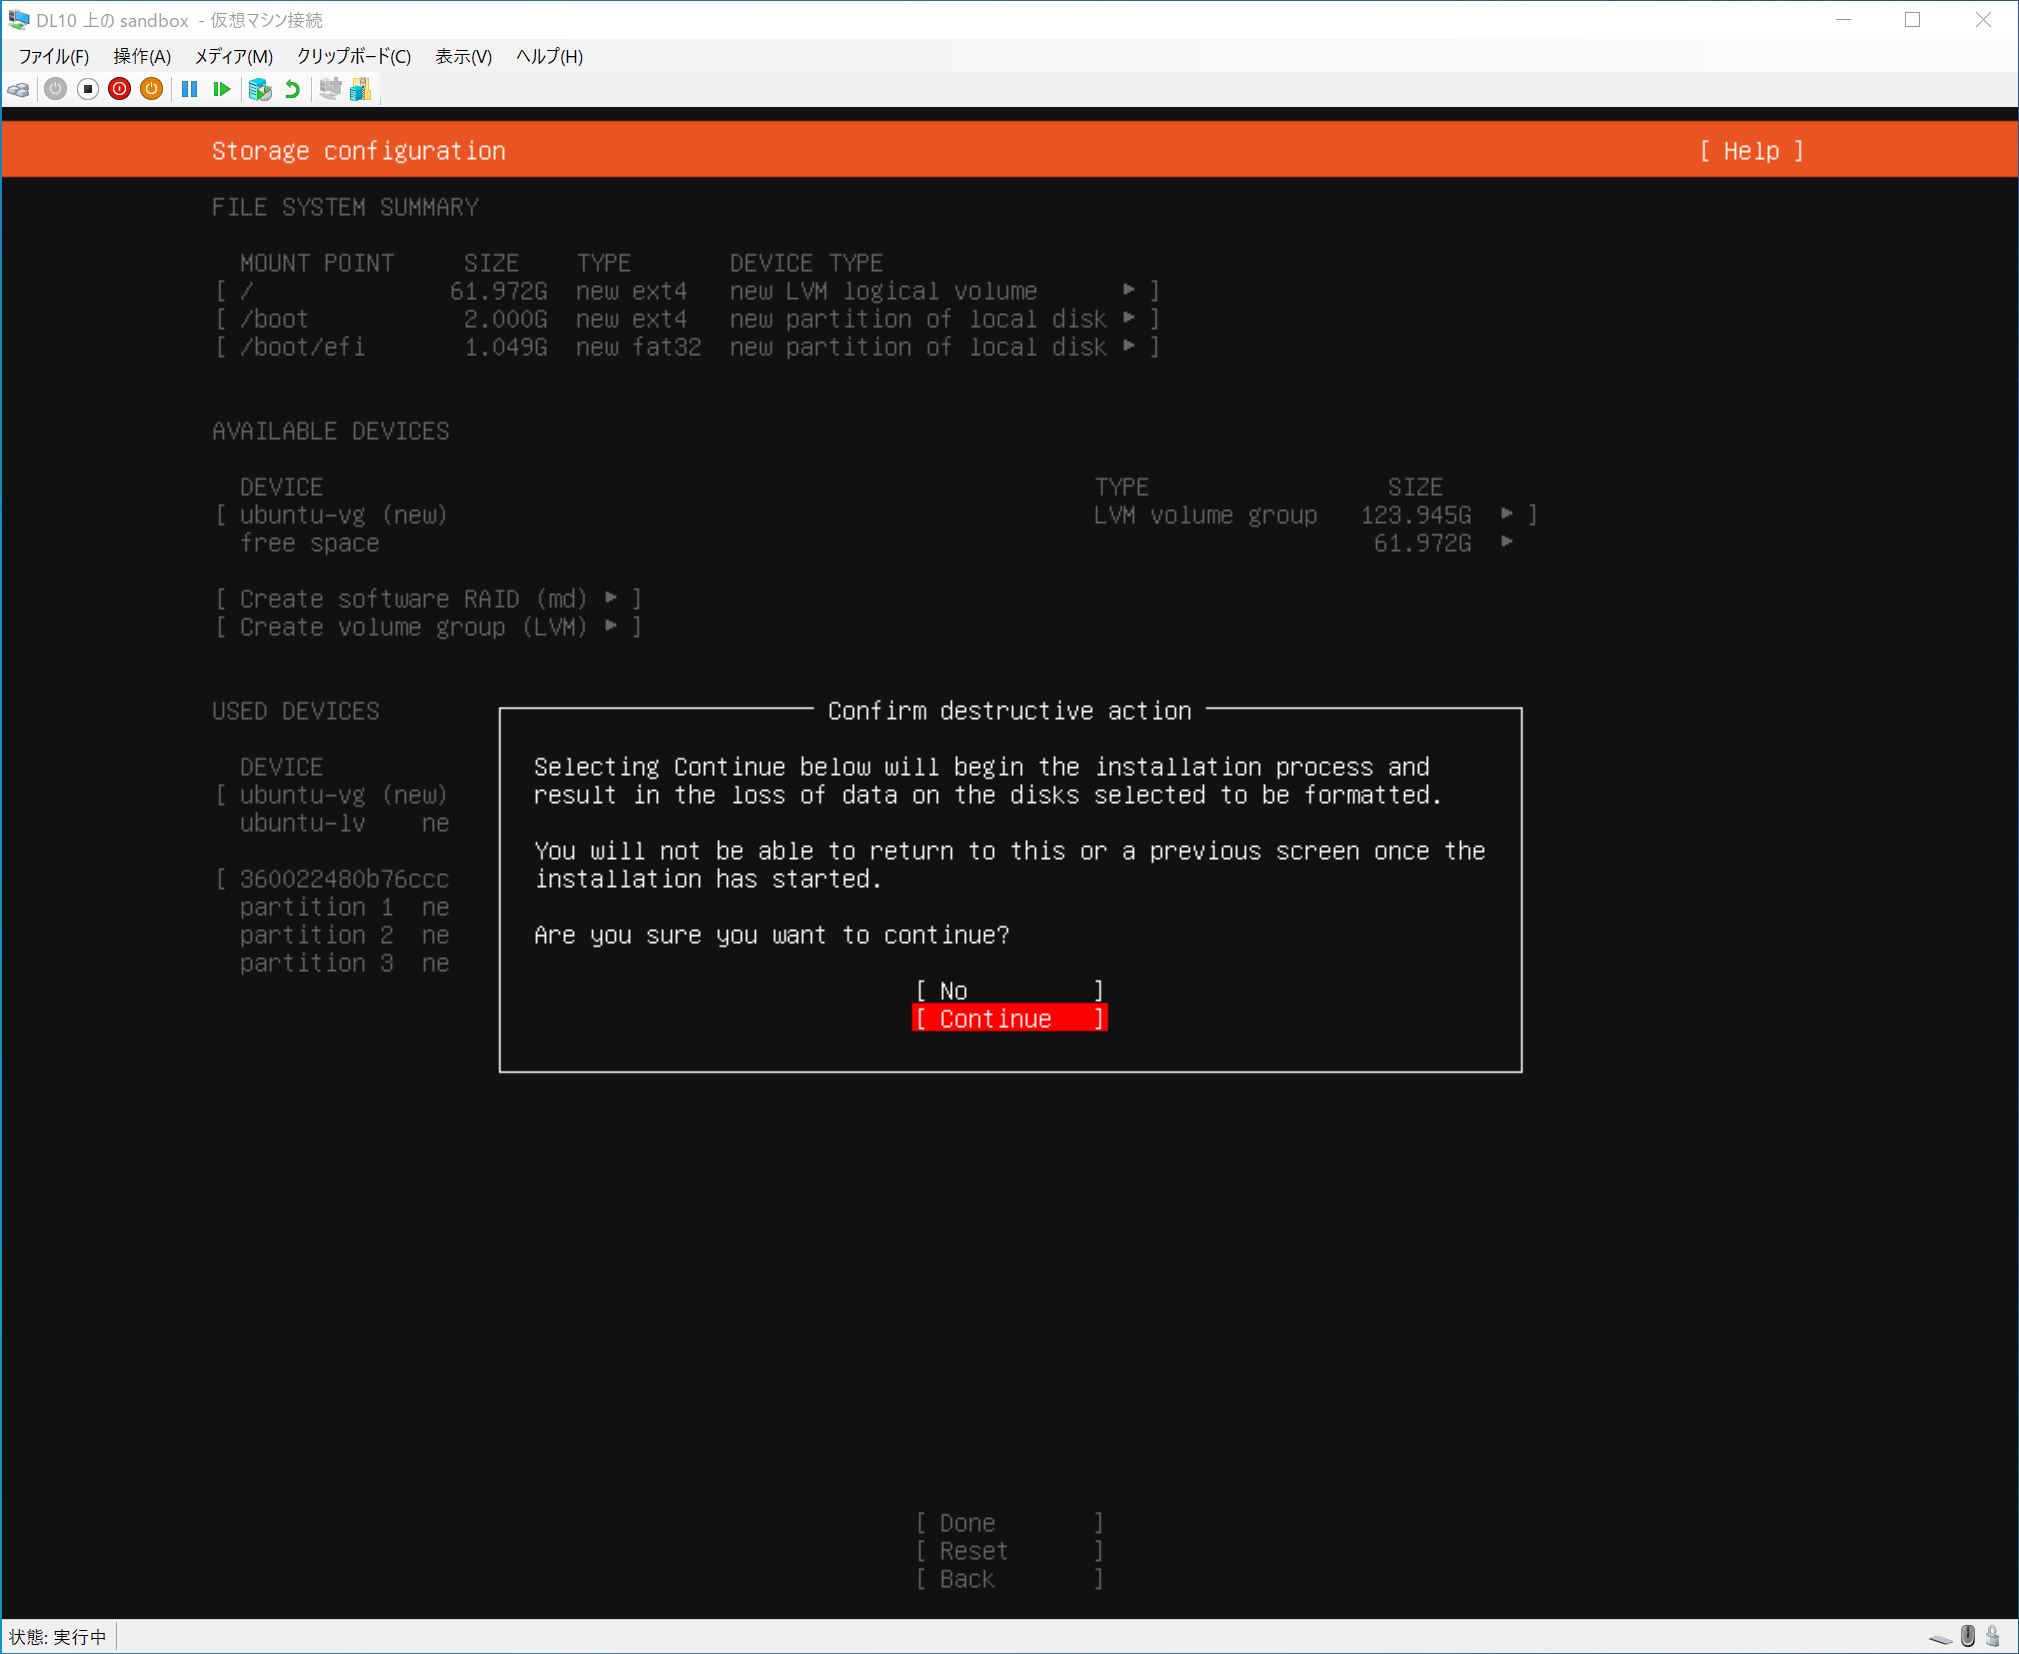
You will be asked to confirm that you do not accidentally erase the disk with the contents. If there is no problem, select “Continue”.
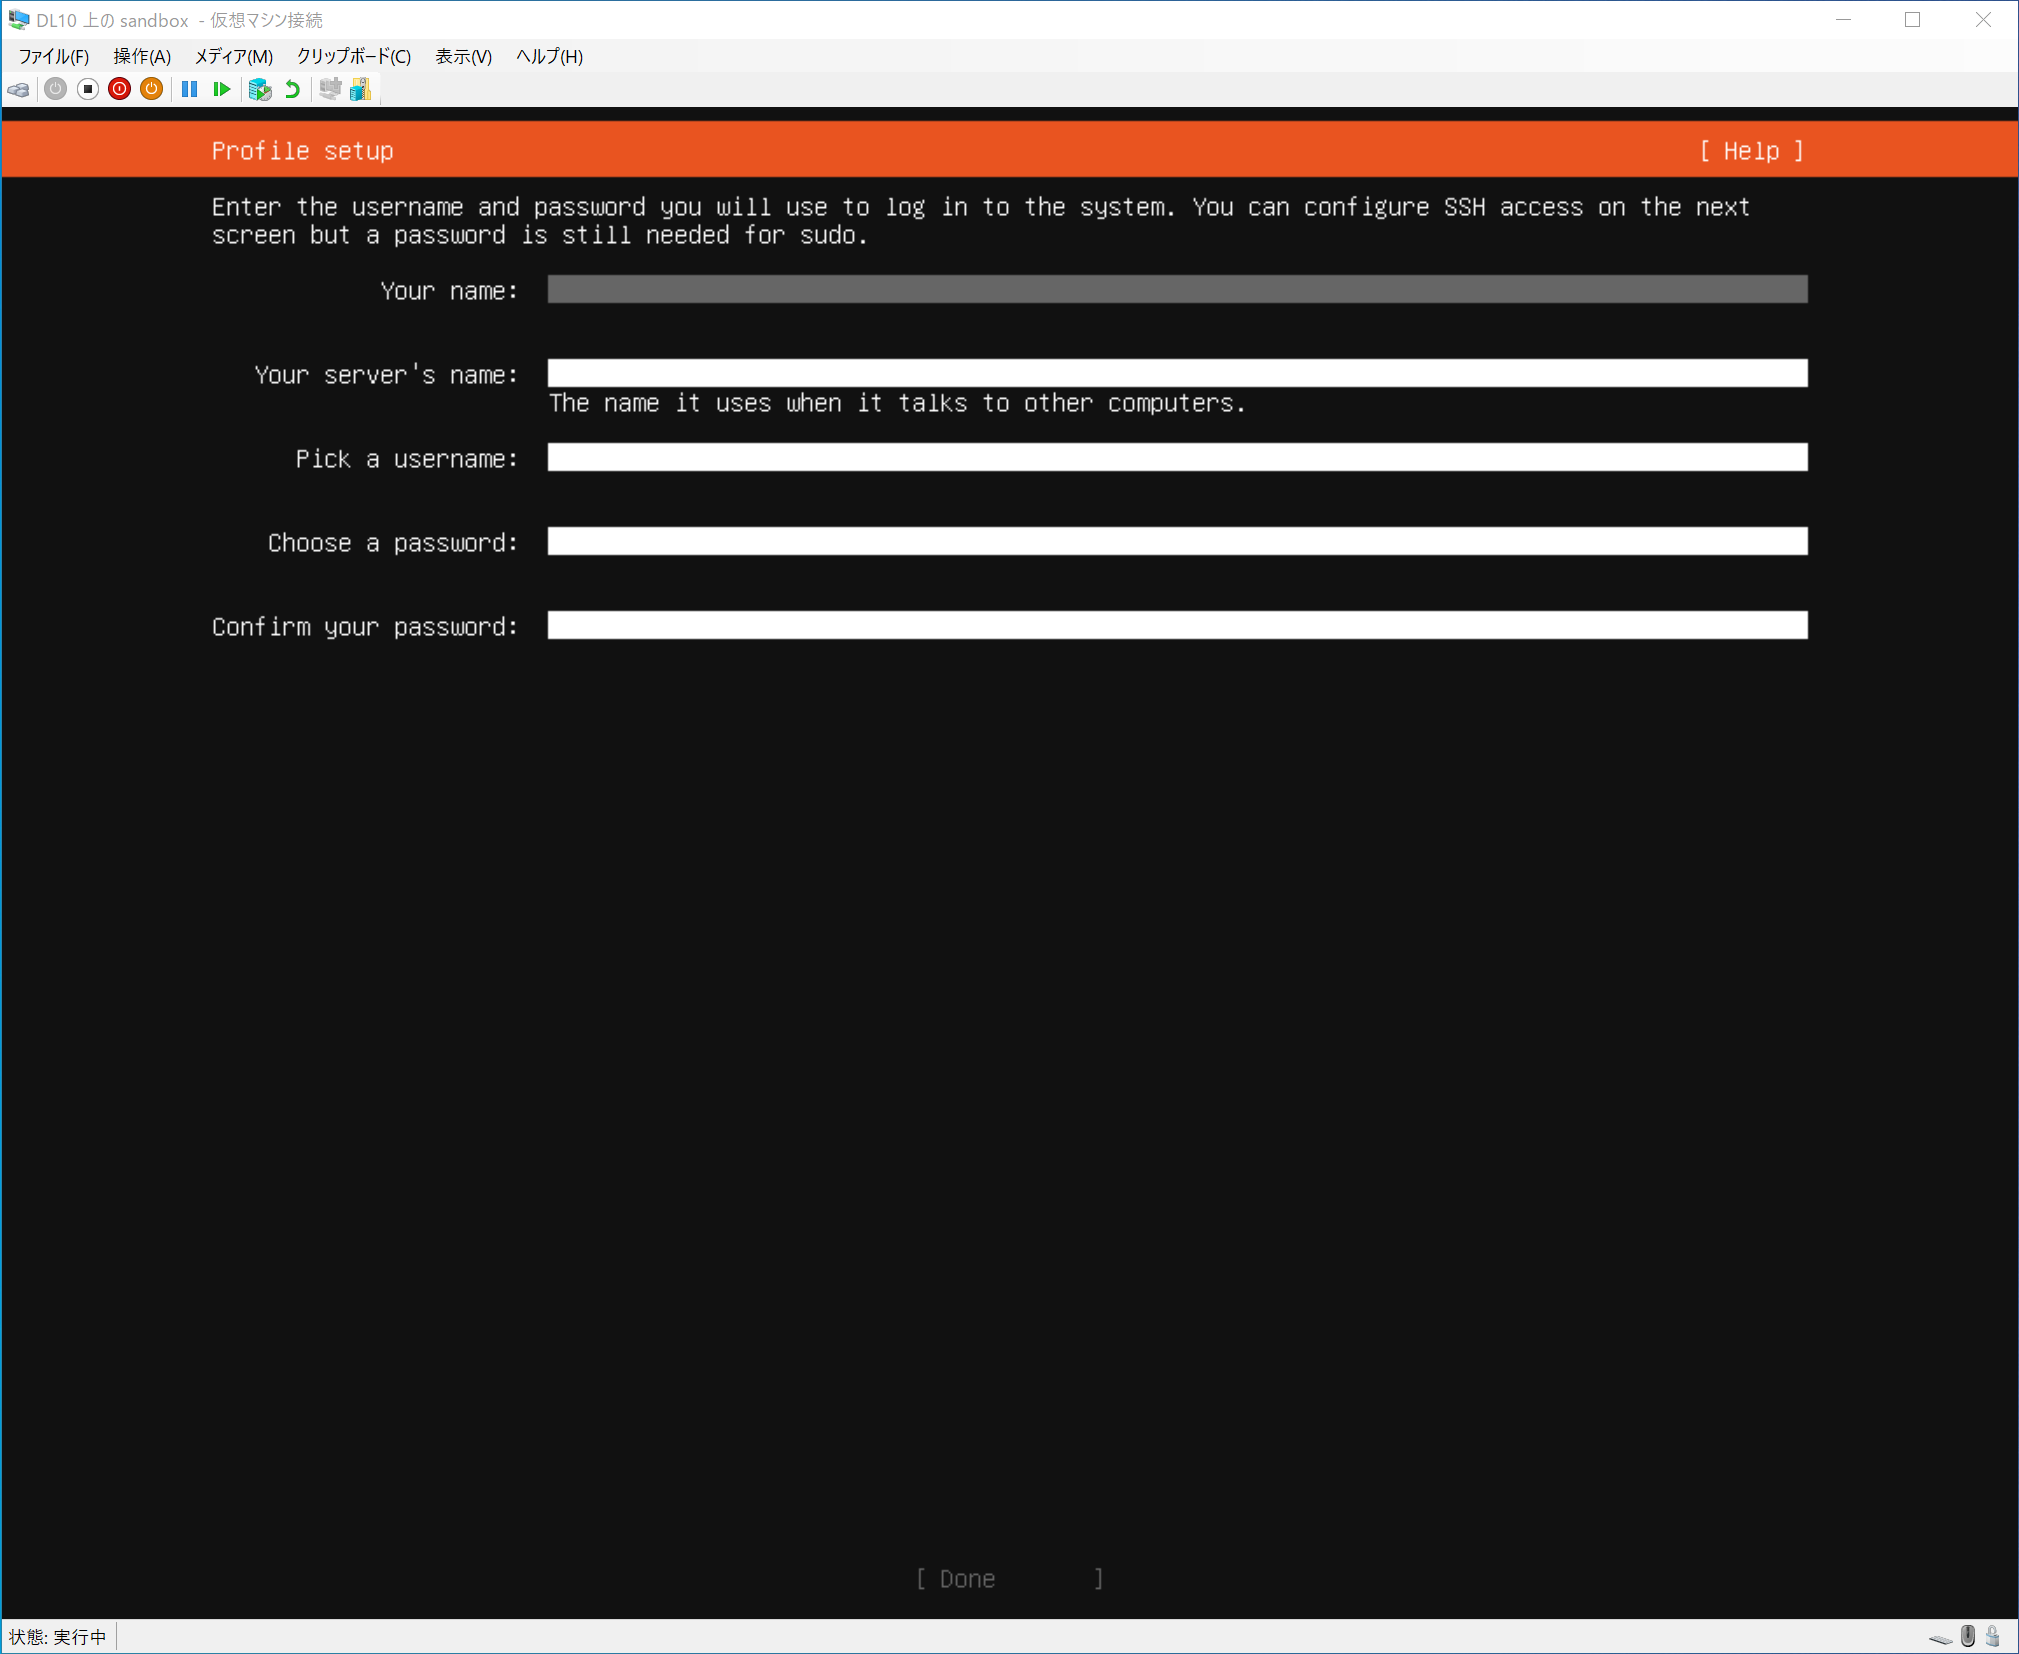
This is the setting for the name, such as user name.
- Your name: Any name.
- Your server's name: Host name. Other devices will see this PC as this name.
- Pick a username: User name. Used for initial login.
- Choose a password: Password. Used for the first login.
- Confirm your password: Confirm your password.
After installation, you will be logged in with the user name and password you set here, so it is a good idea to make a note of them. You can add more users later, but we will assume that you will be working with the user you created here.
You will then be asked if you want to install some software.
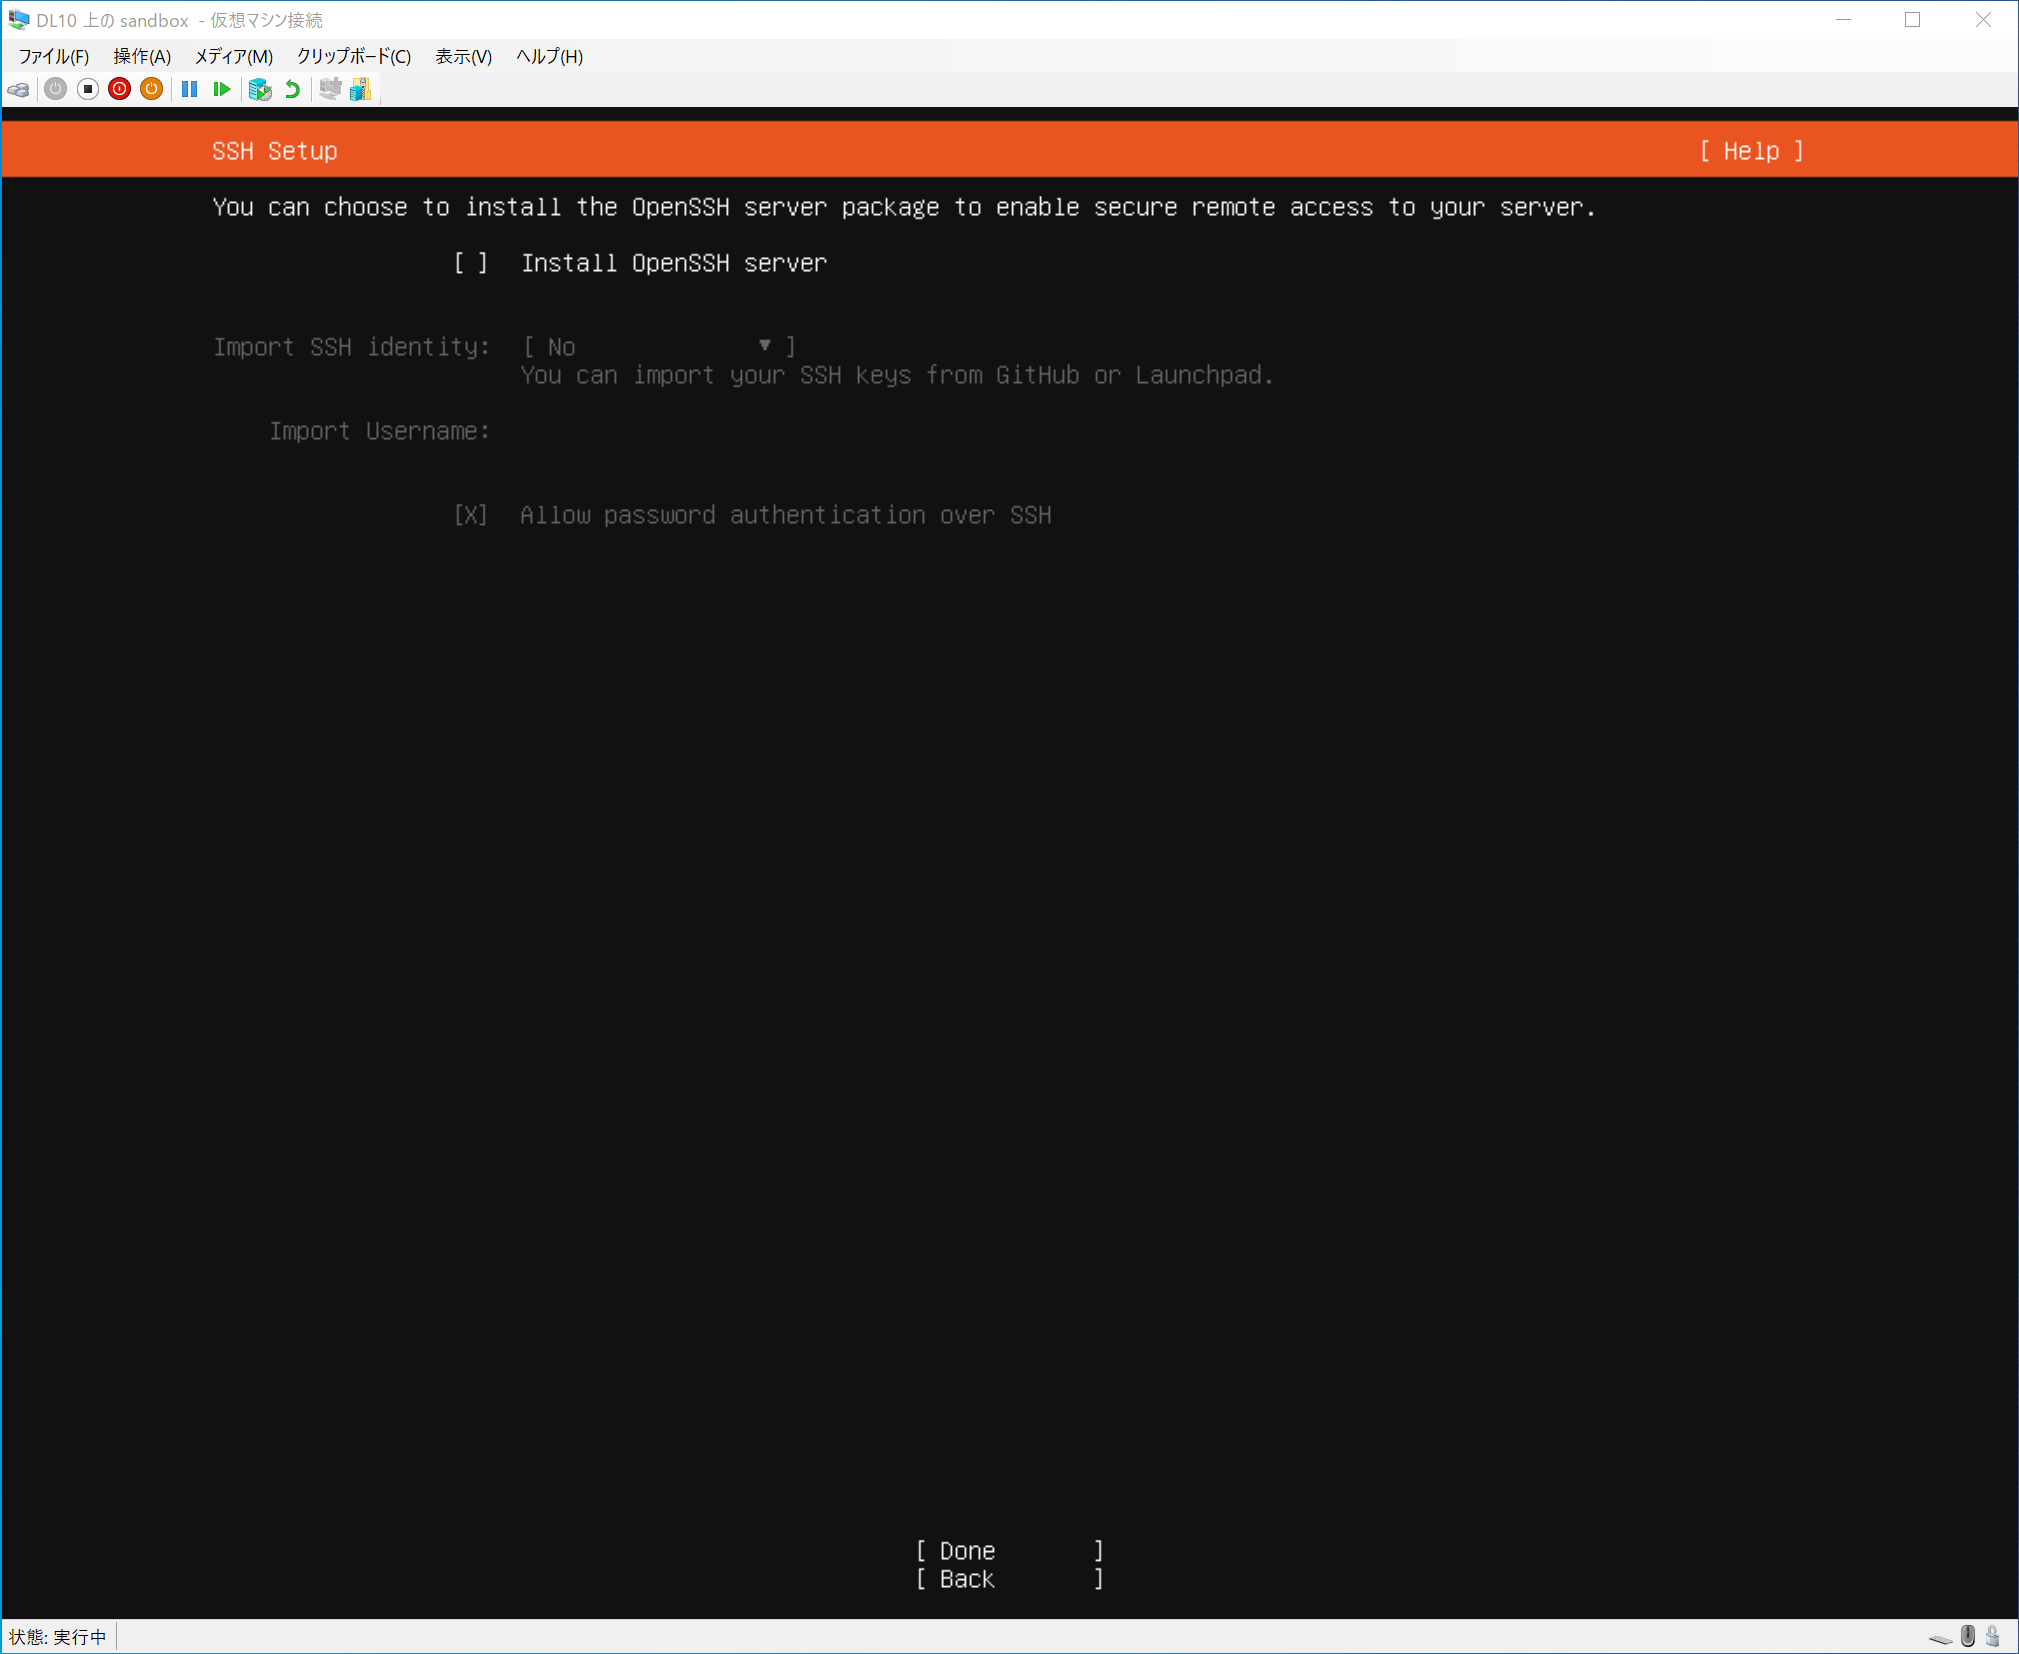
Check the box for “Install OpenSSH server”.
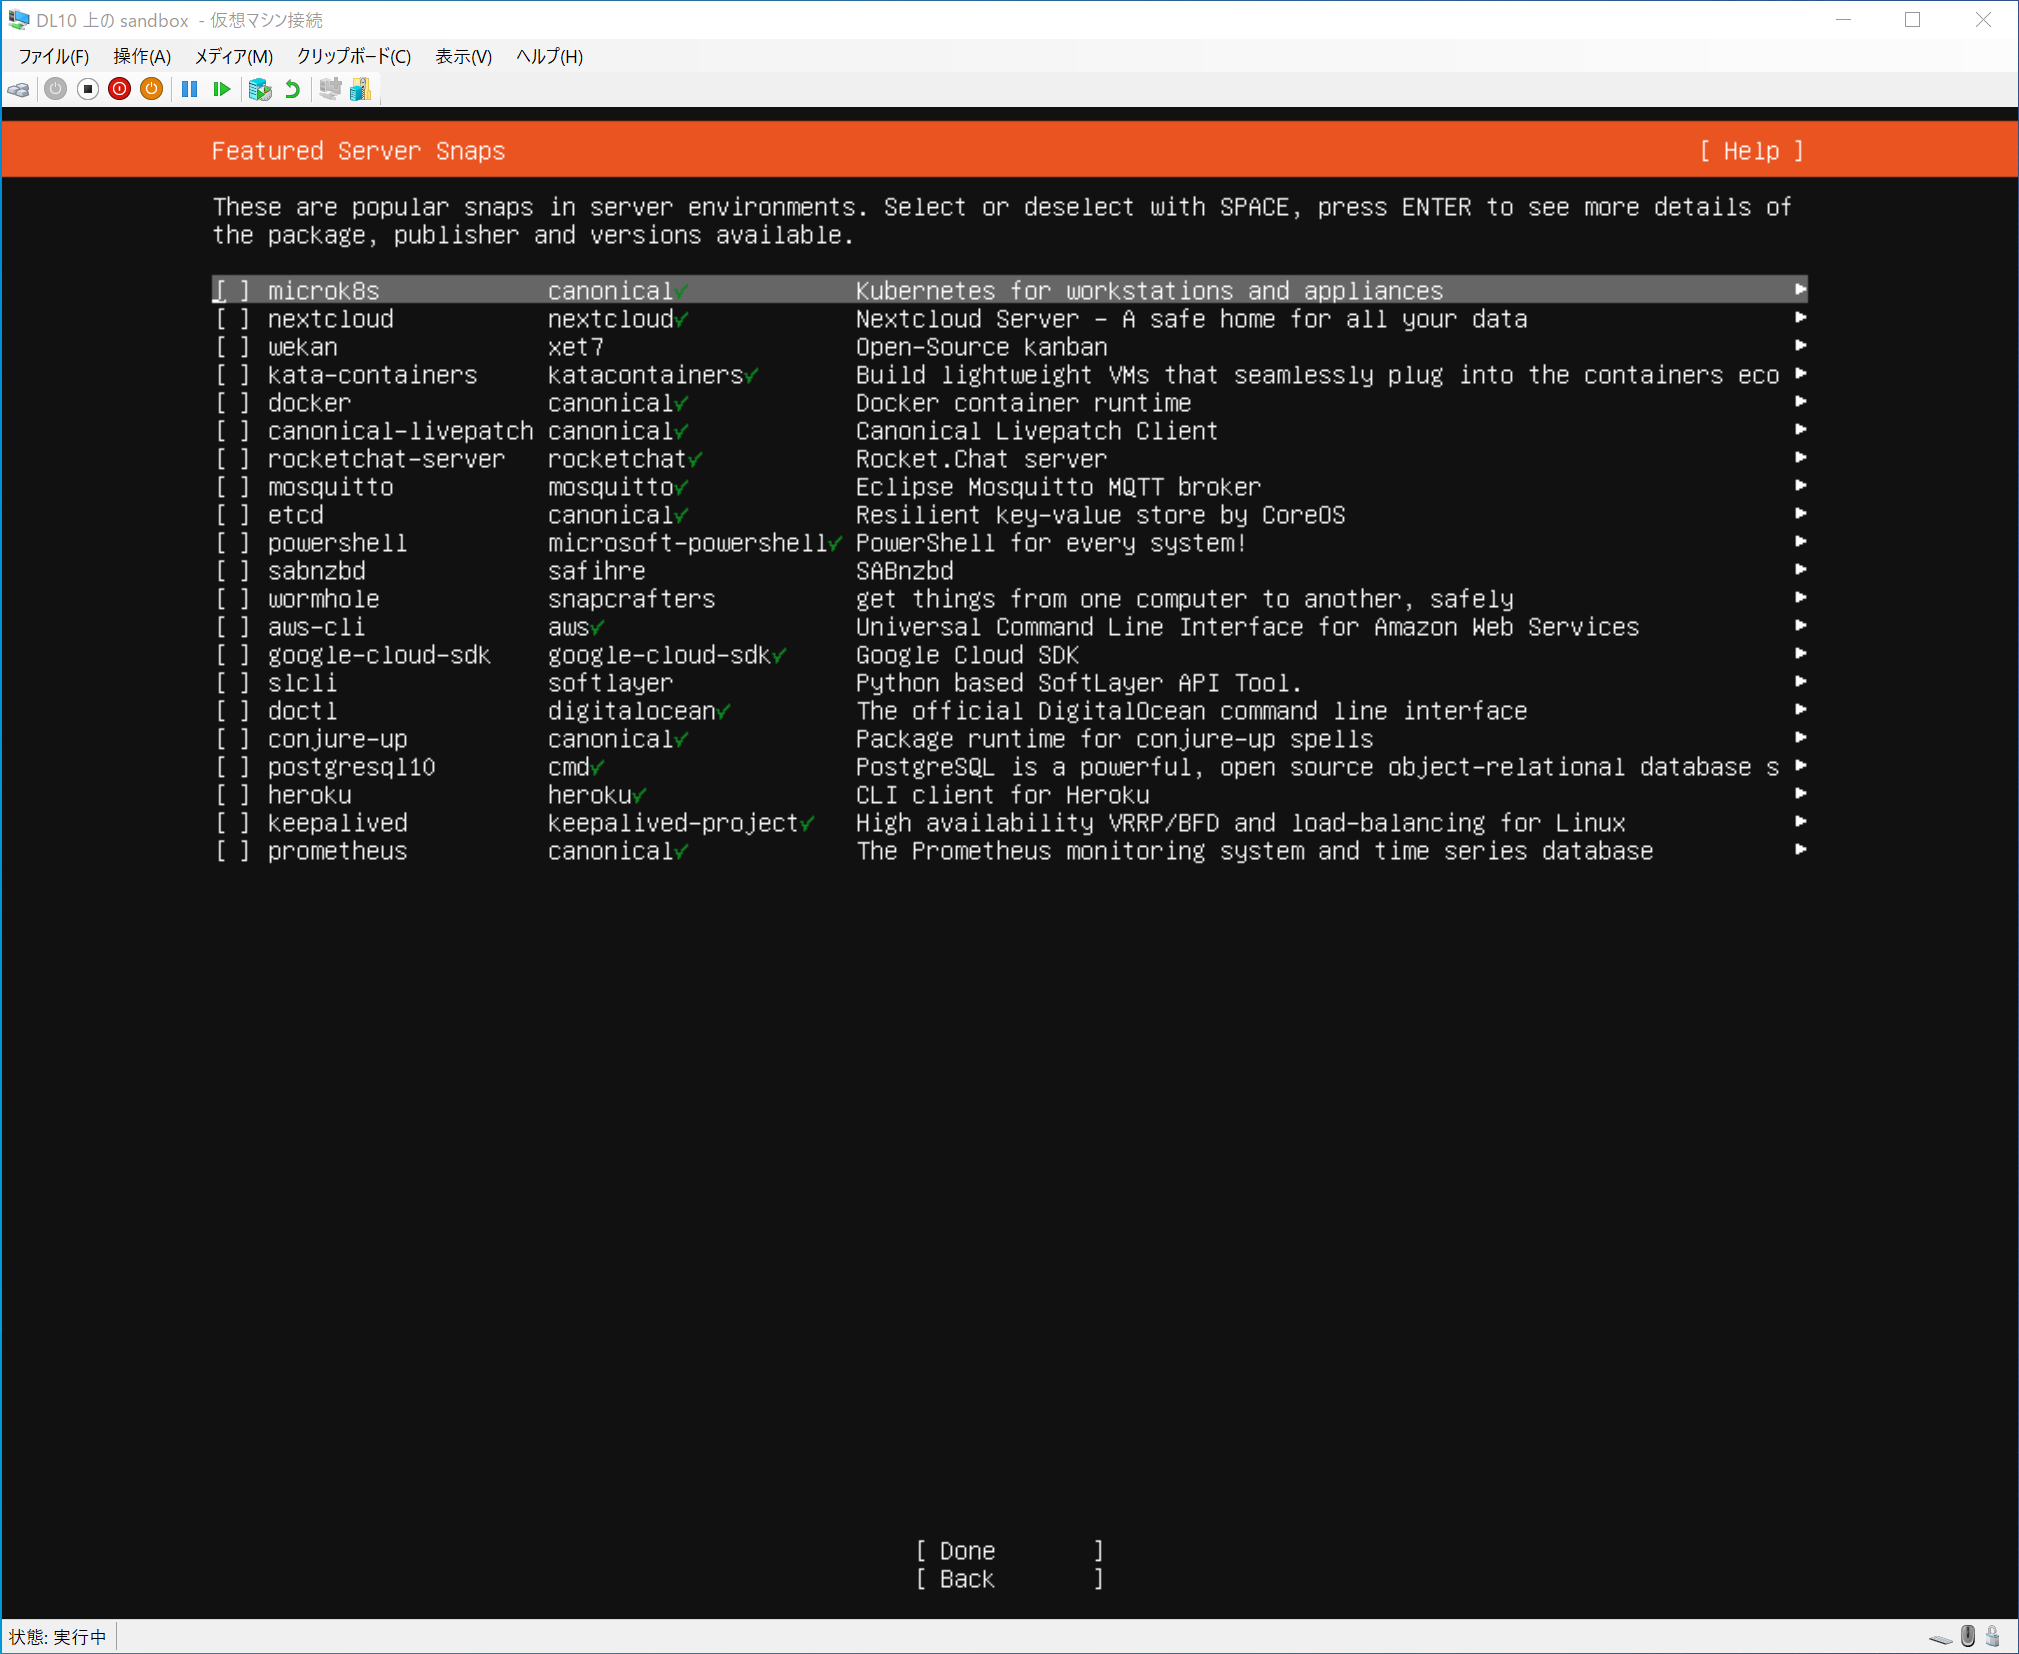
You do not need to check any other software.
What if I forget to include OpenSSH server?
OpenSSH server can be installed at a later time; after the OS installation is complete and you are logged in, type the following command.$ sudo apt install openssh-server
After these settings are completed, installation will begin with the following screen
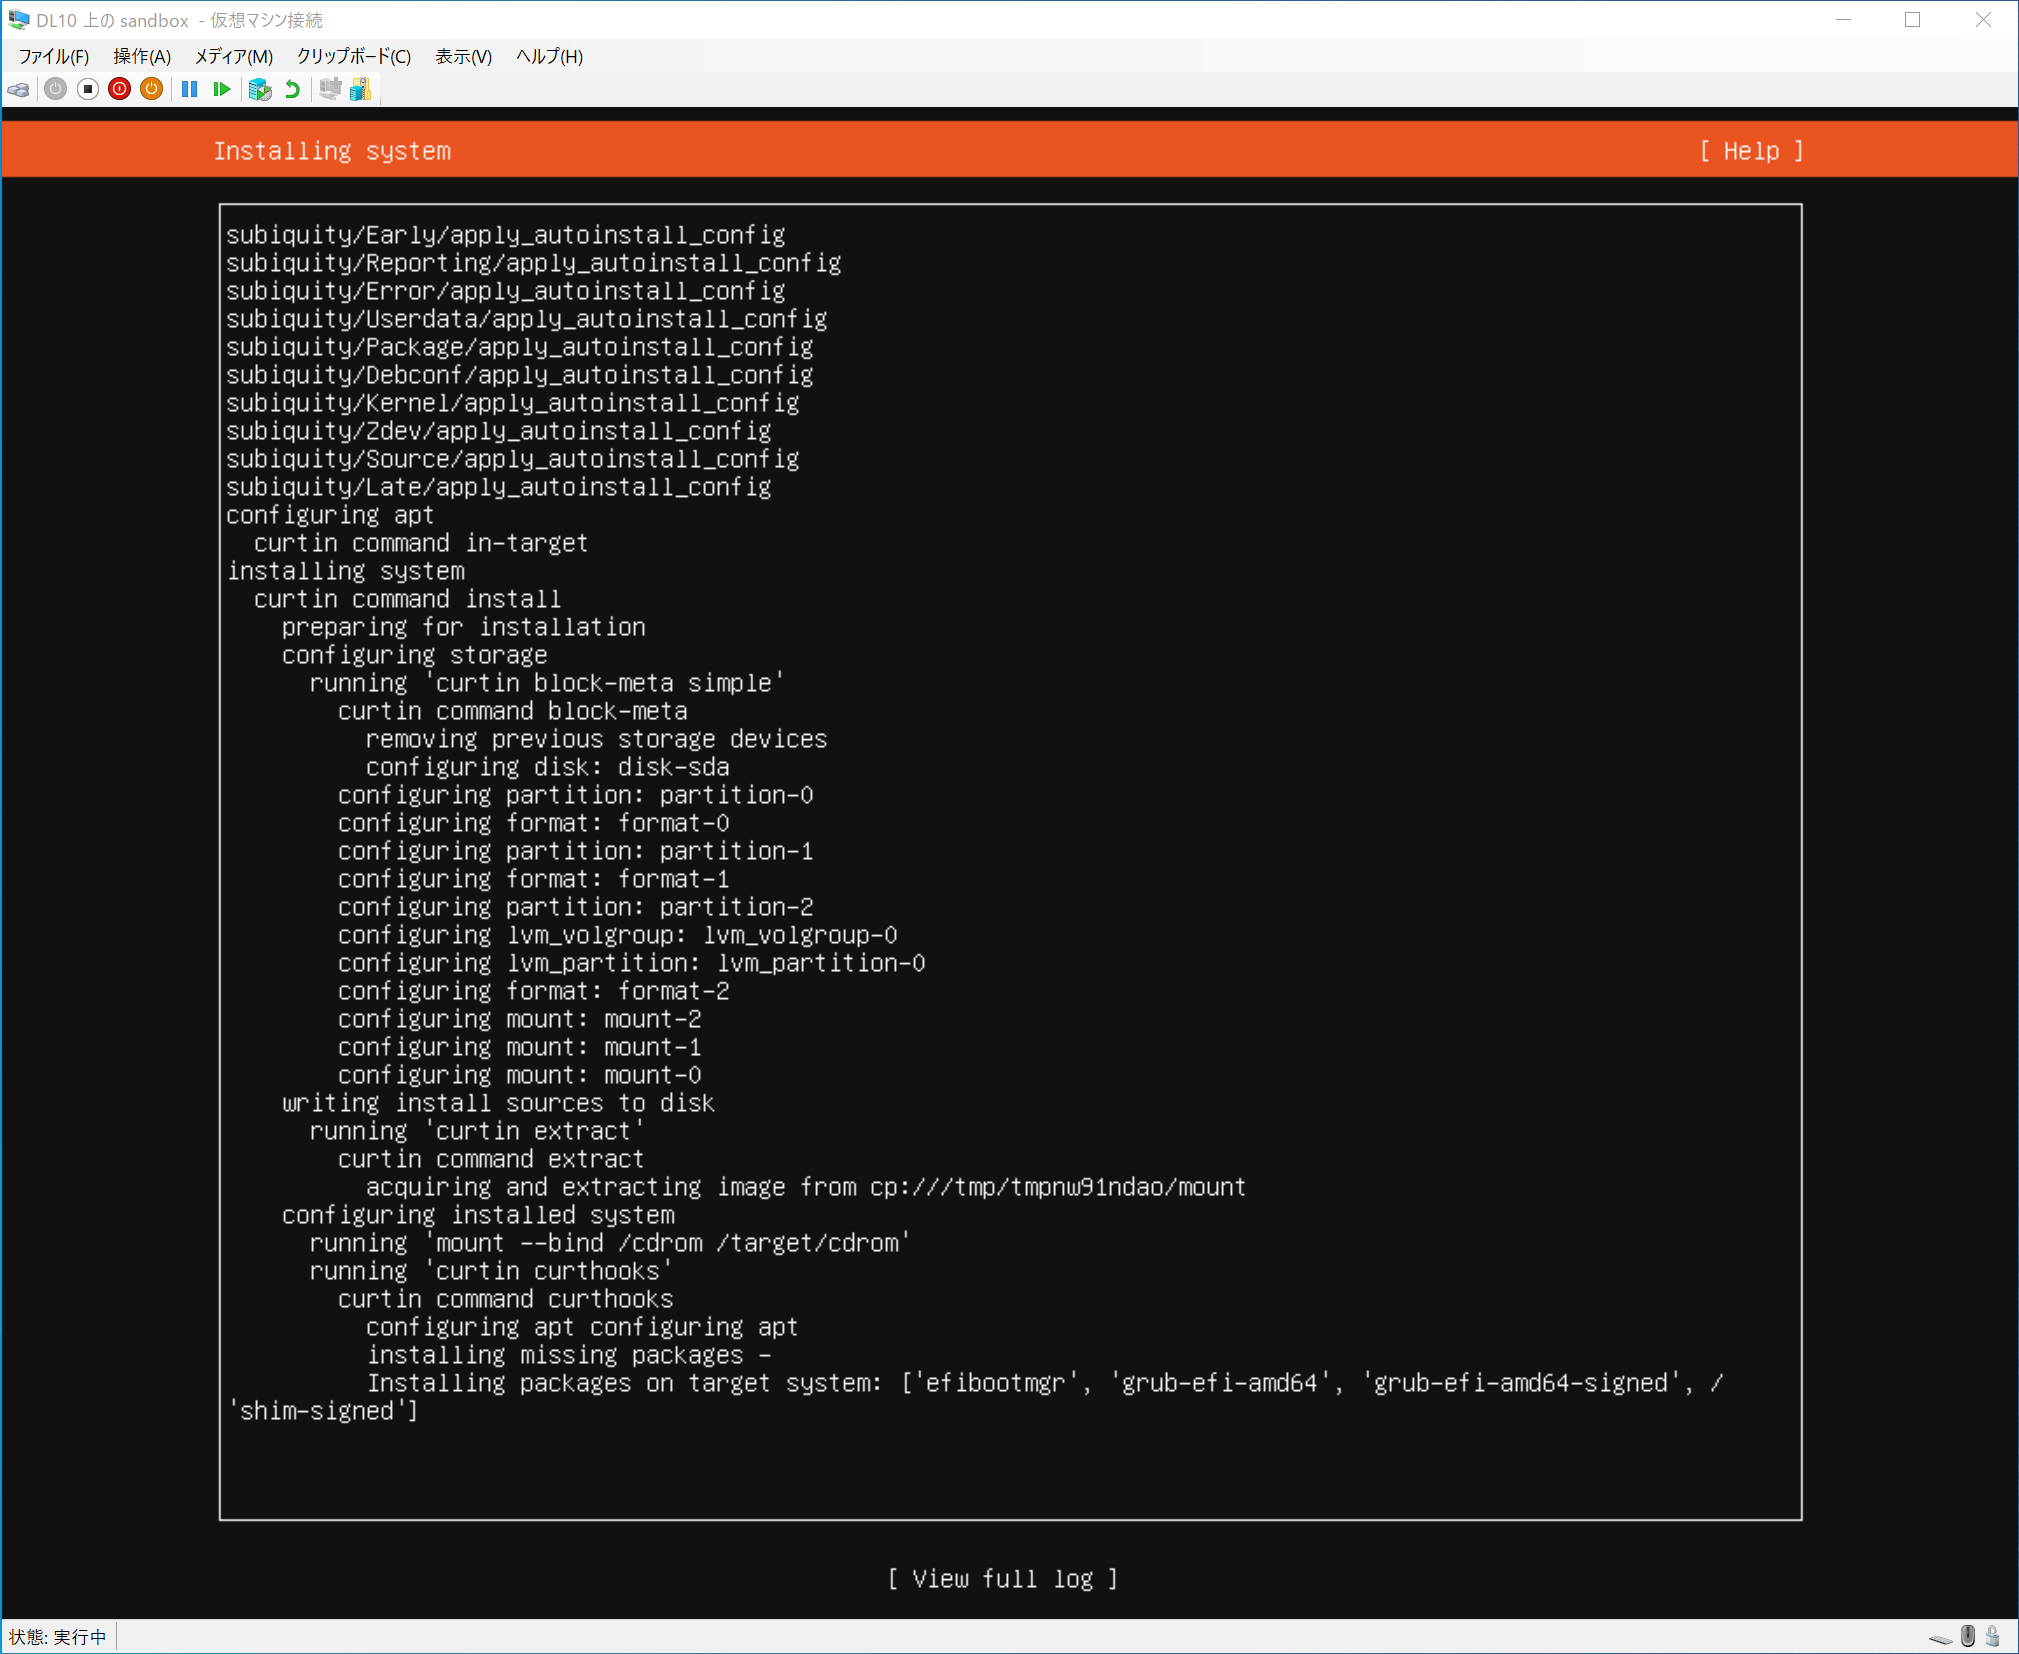
This screen will take a few minutes at most, so wait for a while.
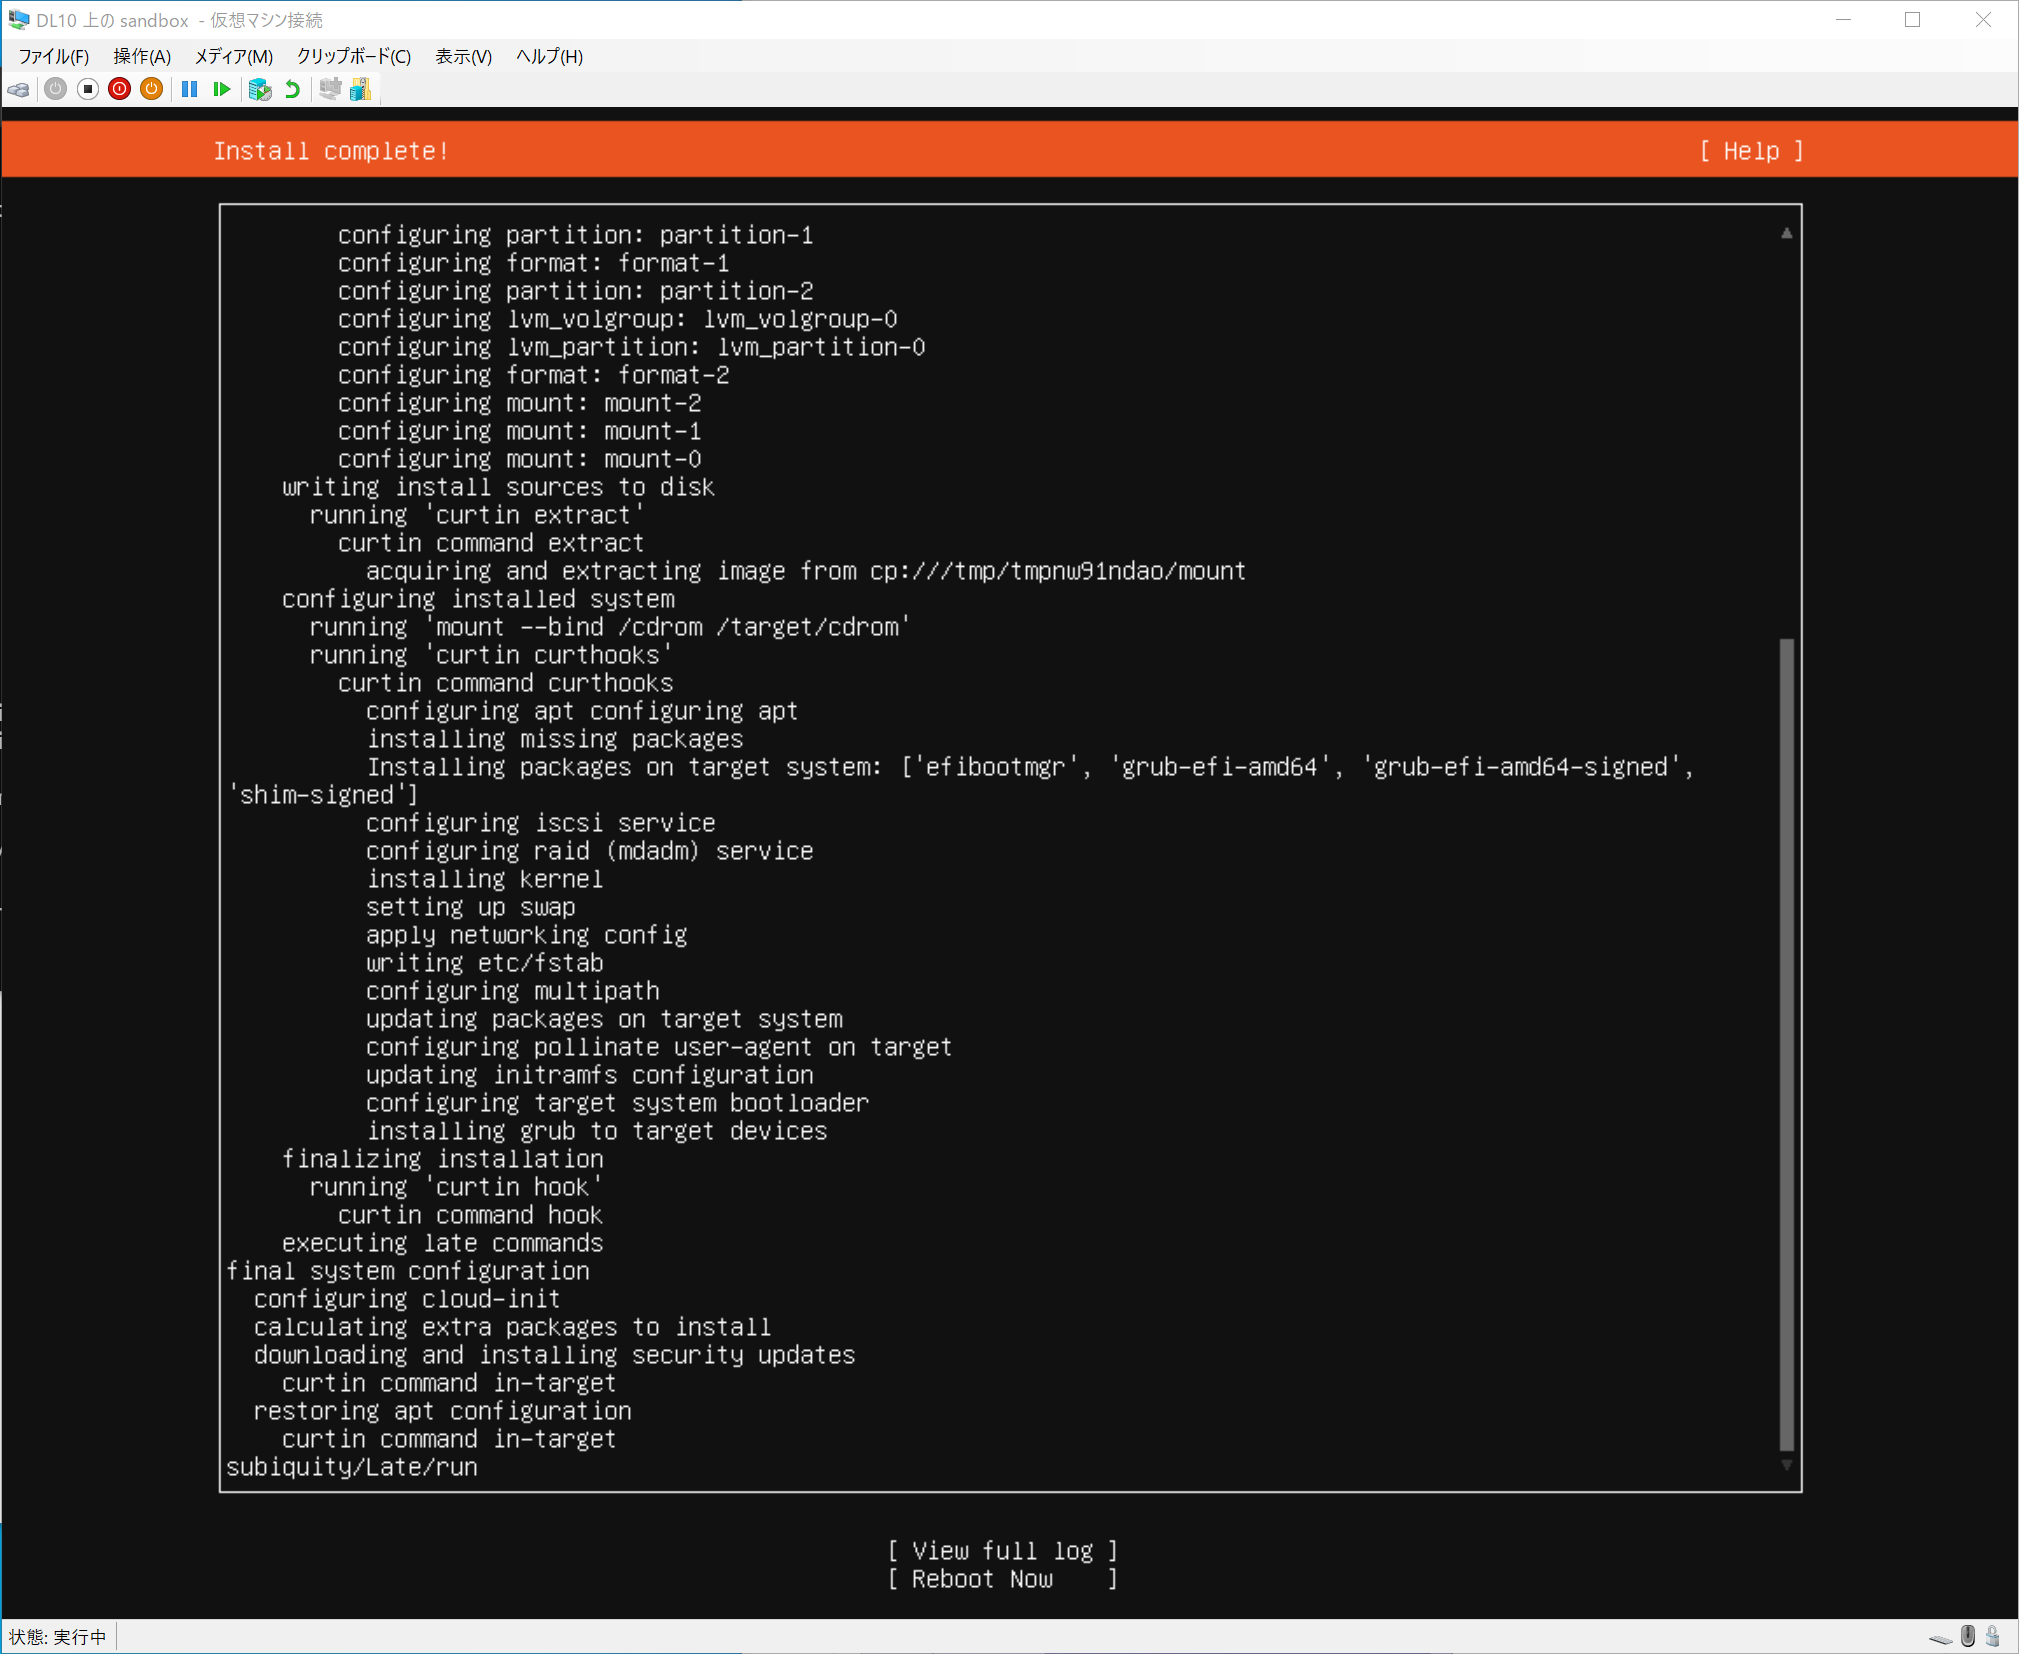
When the option “Reboot Now” appears under “View full log,” the installation is finished. Select “Reboot Now” and restart the virtual environment.
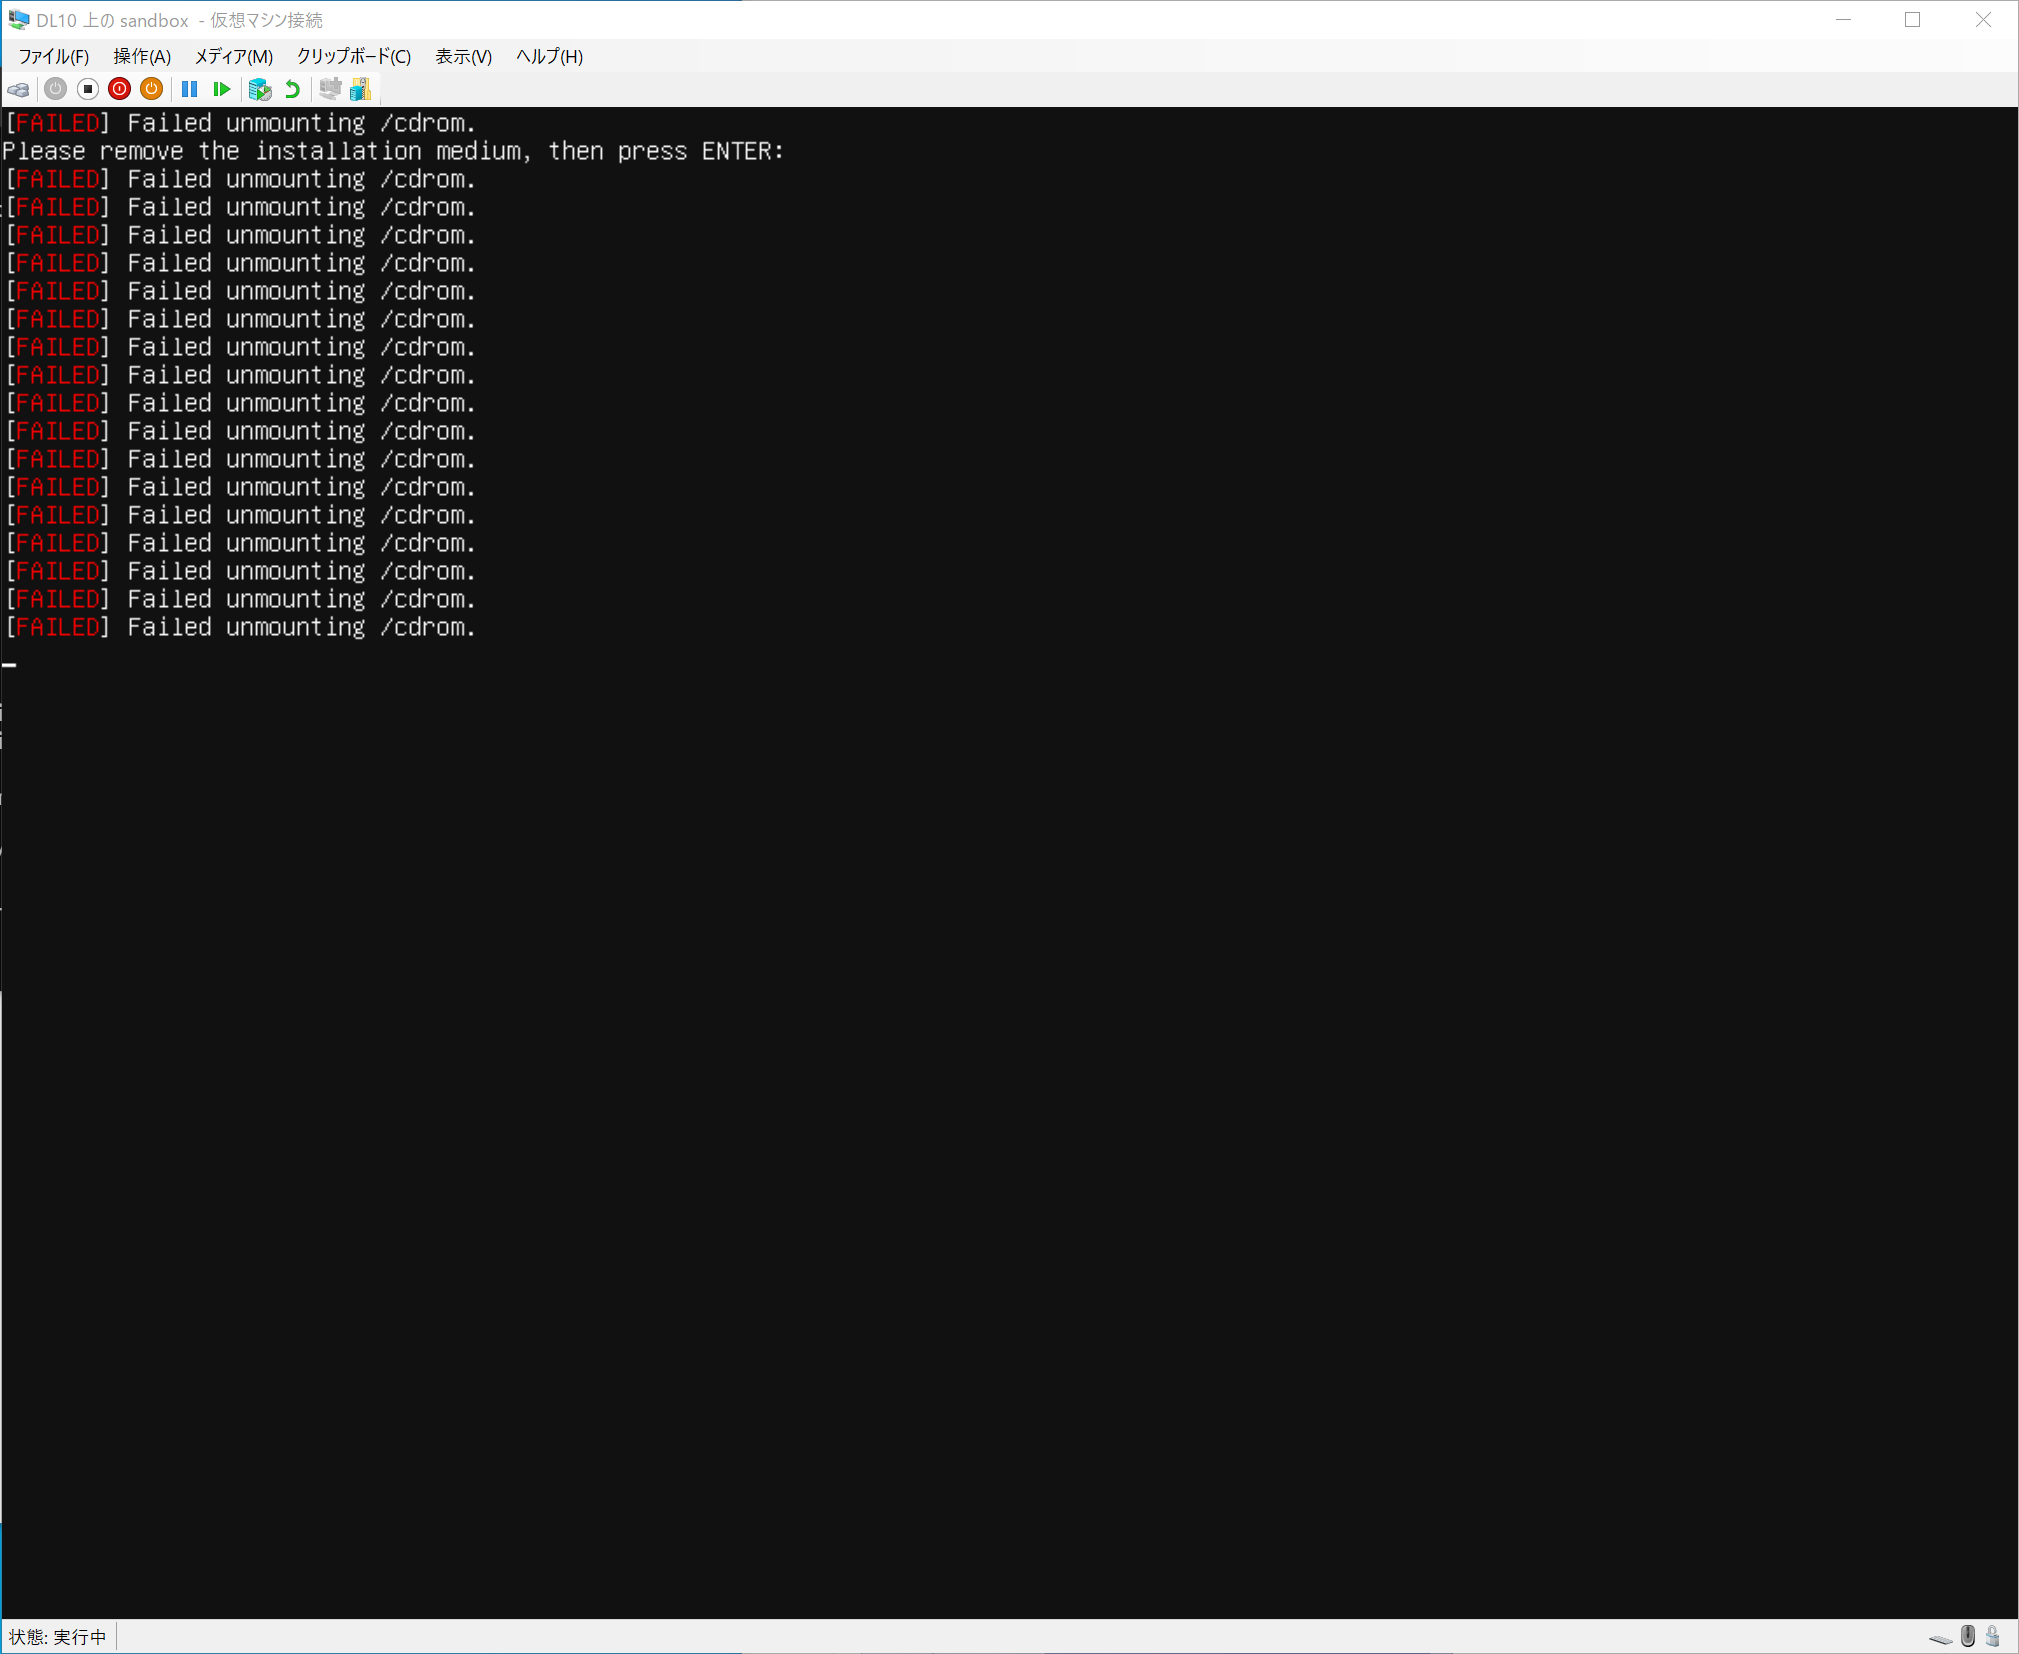
If you see the words Failed unmounting /cdrom. after rebooting for the first time, press the Enter key once!
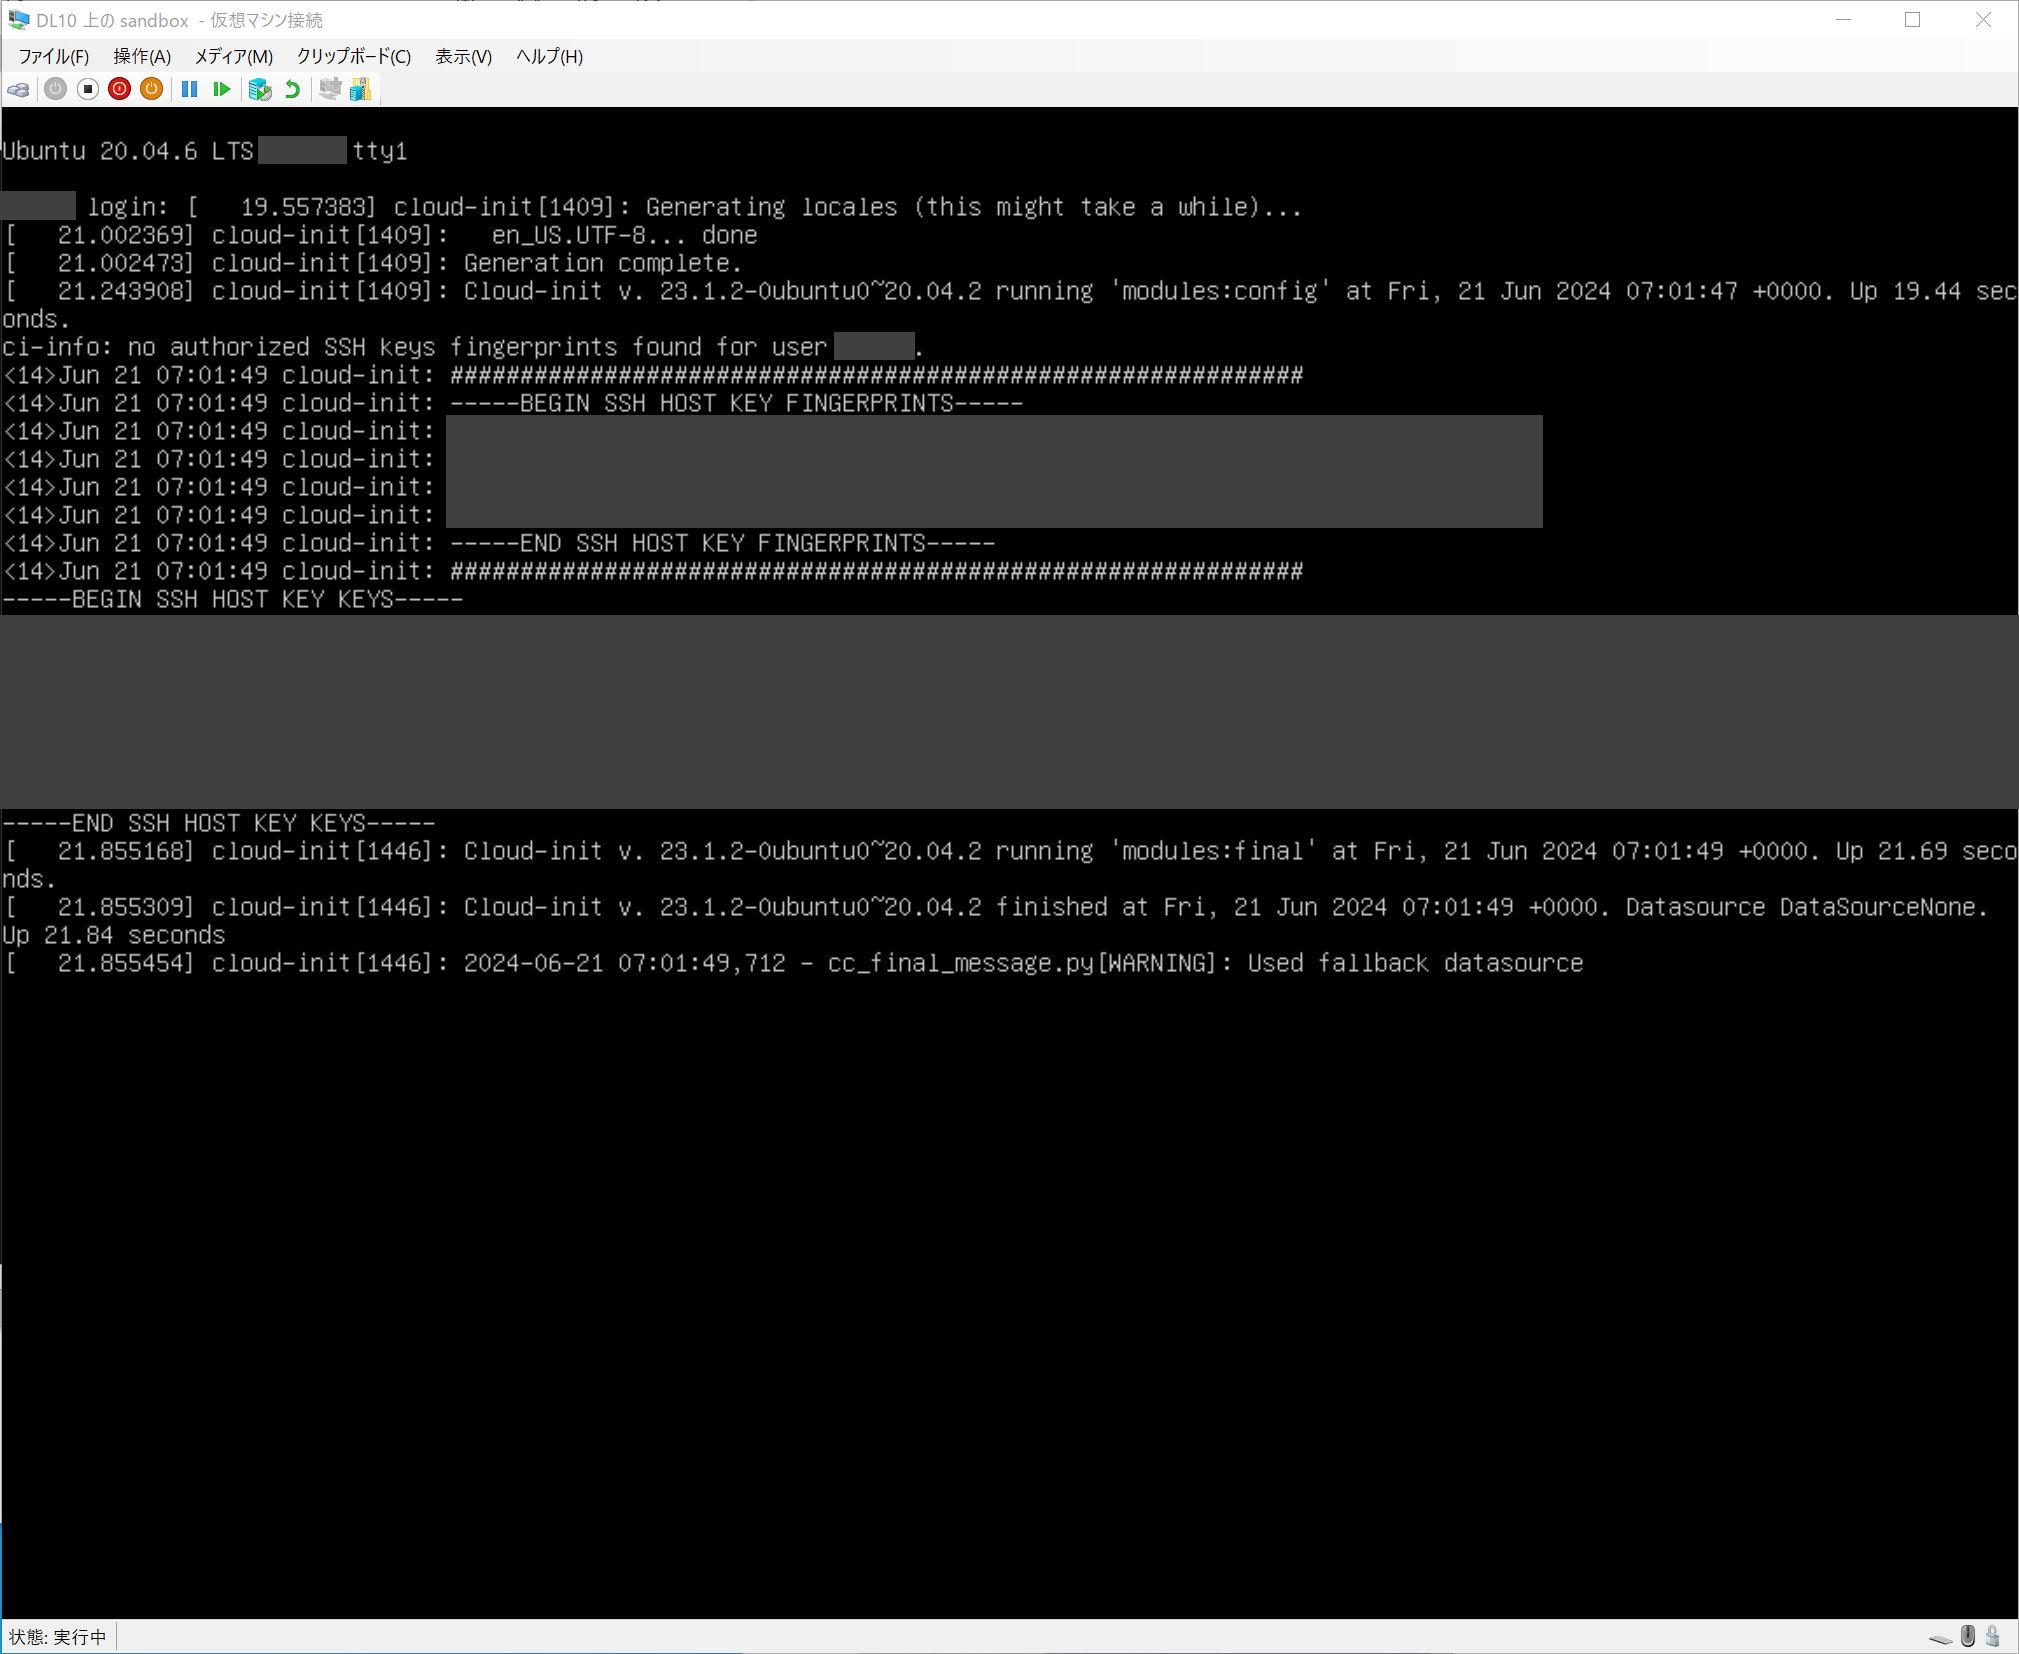
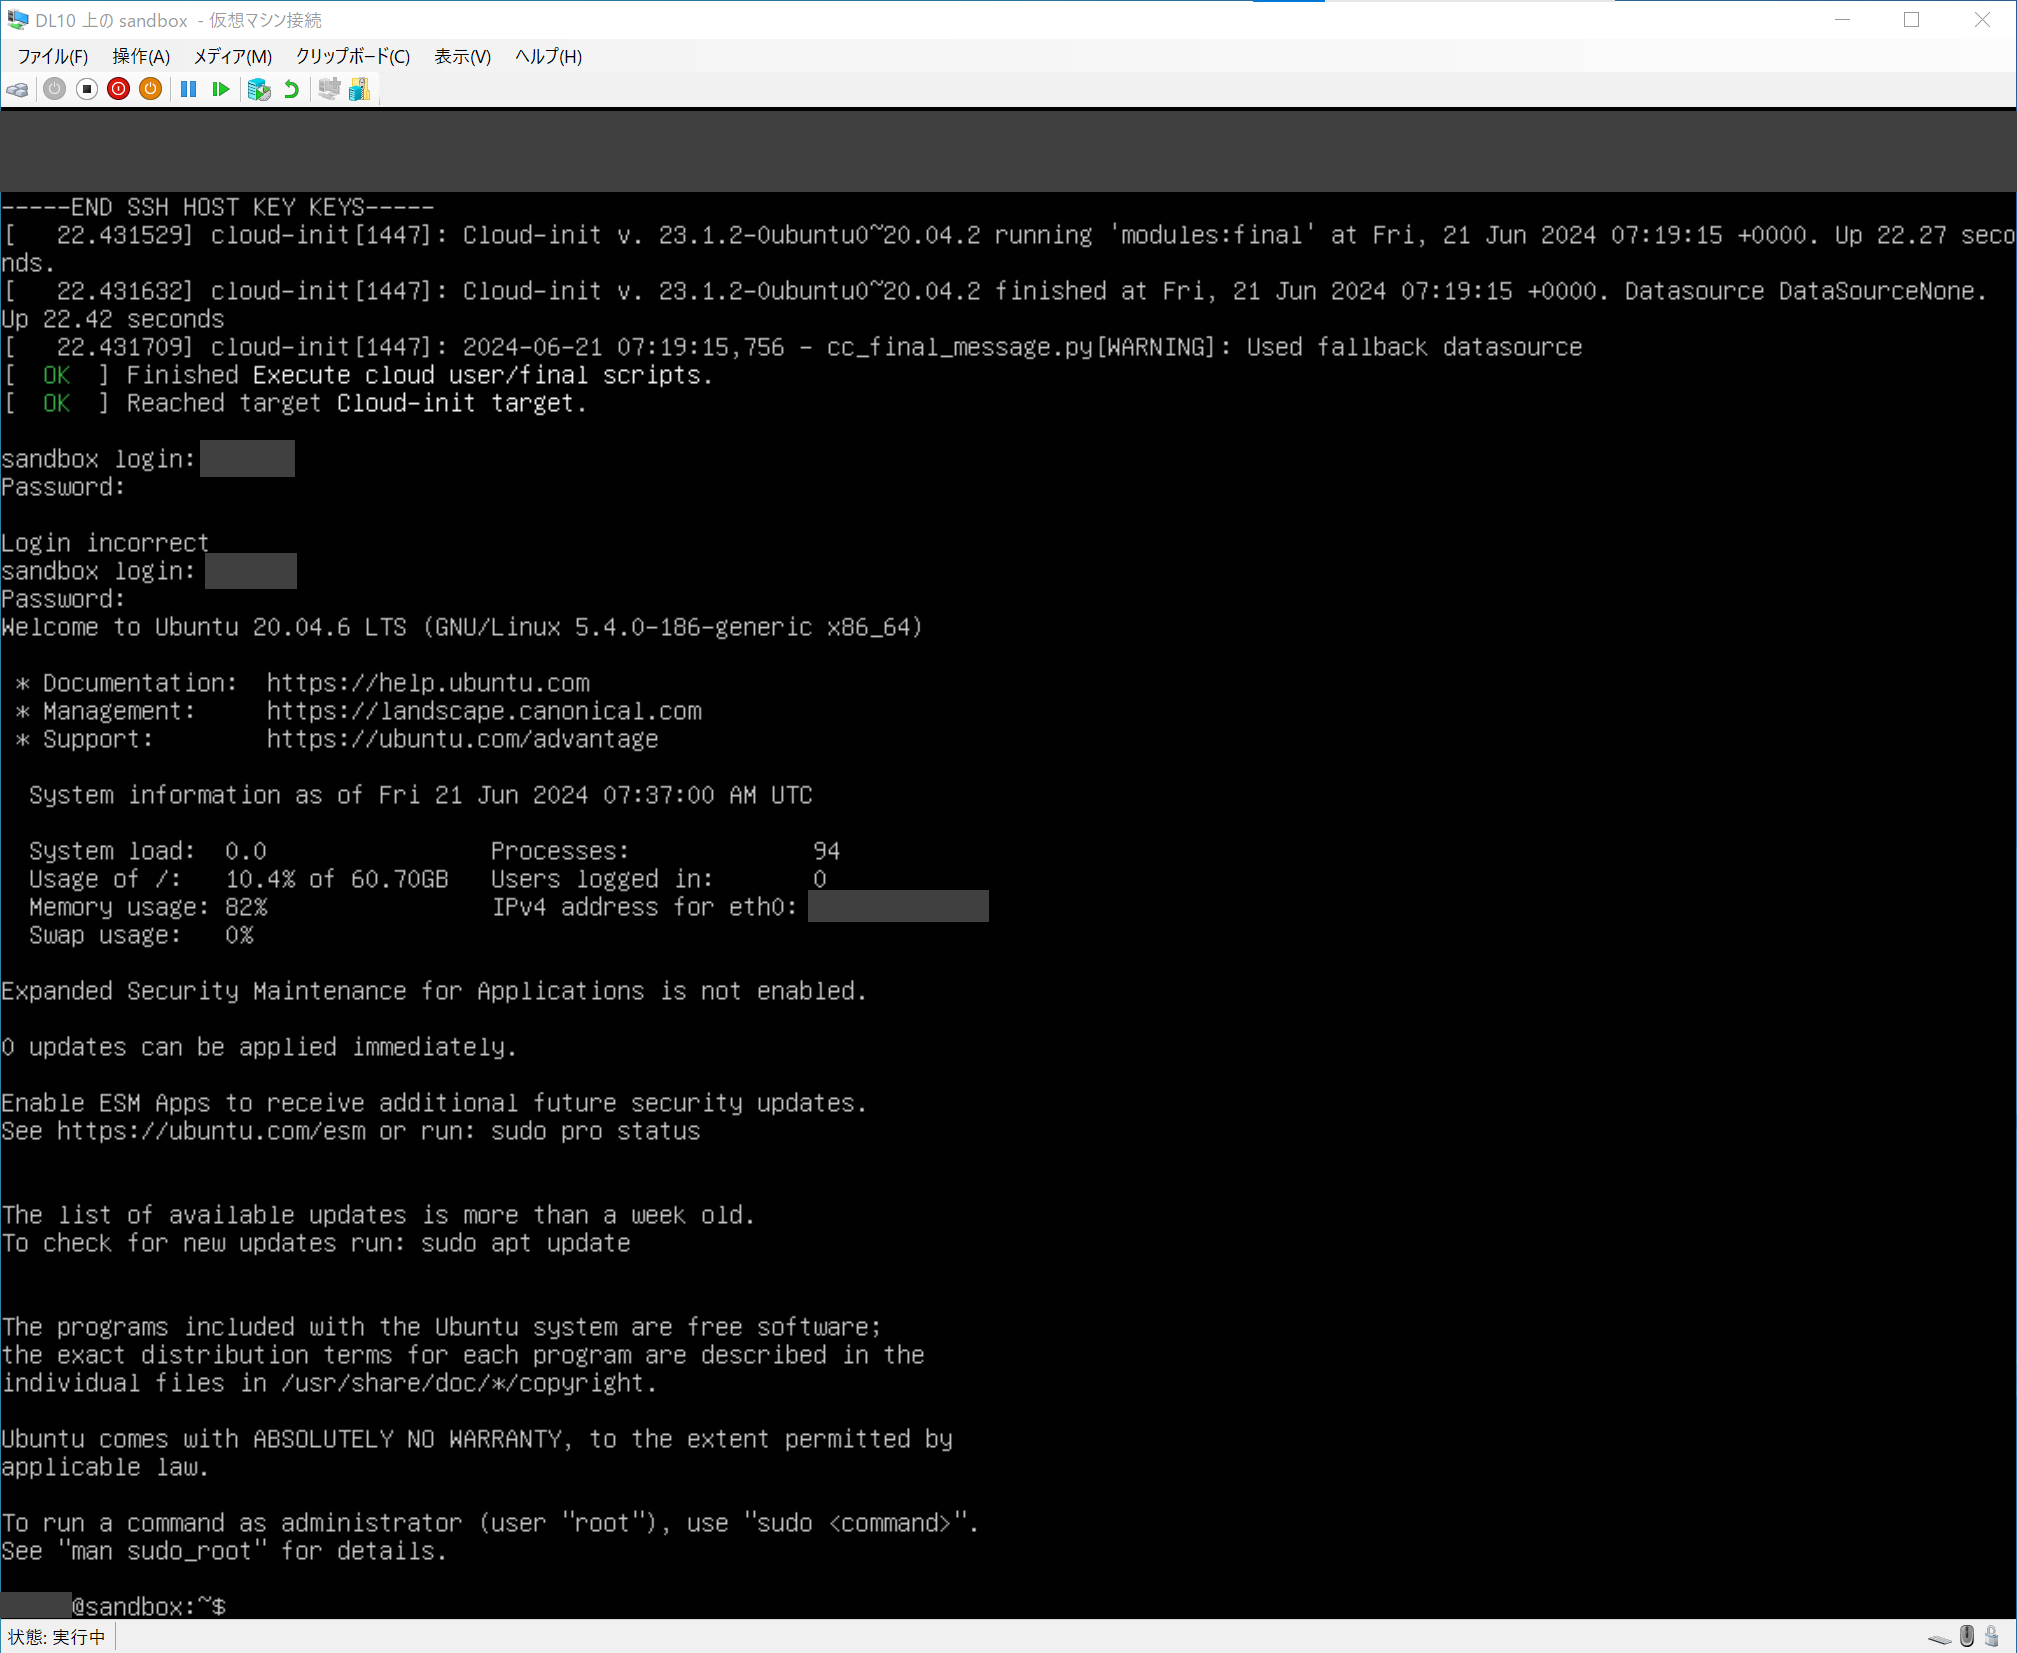
If you have successfully booted, you will see the following login screen (the fourth line says <username> login:). You can log in by entering the password you have just set.
For the second and subsequent login, you will see <machine name> login:, so enter your user name followed by your password.
SSH connection (optional)
The Hyper-V virtual environment screen is inconvenient in that it does not accept mouse operations, and you cannot scroll back to previous operations. Therefore, it is convenient to operate the virtual environment from an SSH client.
There are various ways to do this, but in this article, we will show you how to use the standard Windows functions with PowerShell. There are also other methods using SSH clients such as Tera Term. It is up to you to decide what you want to use.
(As a side note, you can use PowerShell more conveniently by using Windows Terminal application. Note that the screenshots in this manual are taken with Windows Terminal, so it looks different from the standard PowerShell application).
For SSH connections, you will need the IP address of the virtual environment.
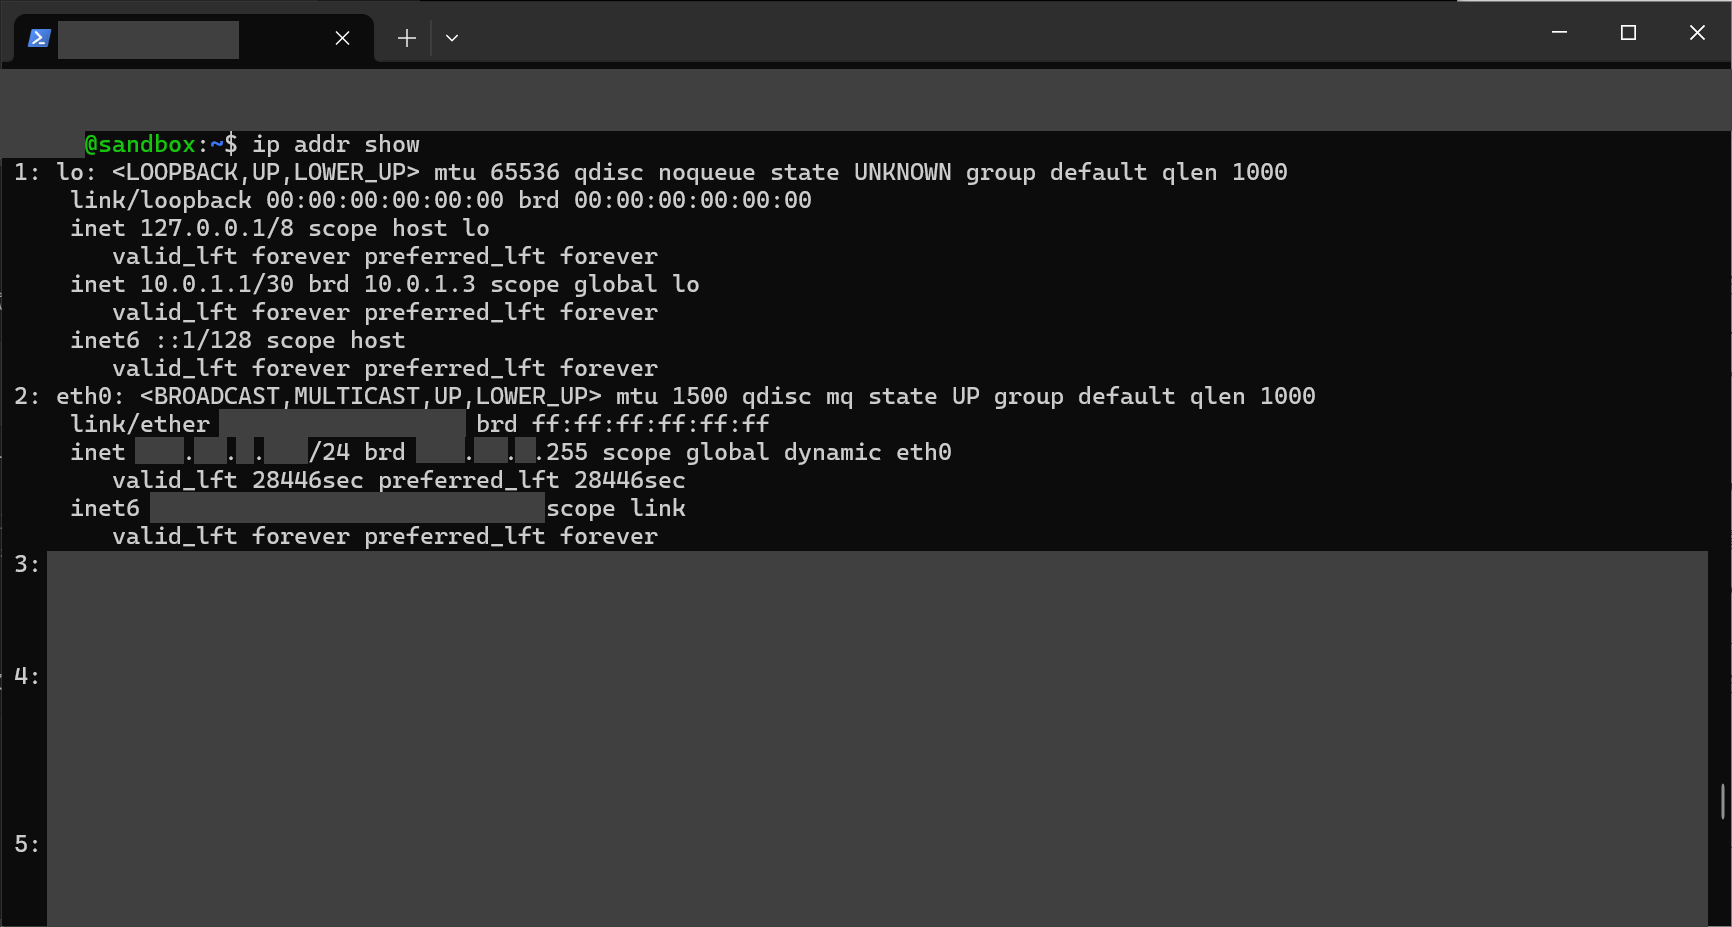
The IP address can be found on the screen after logging into the virtual environment by entering the following
$ ip addr show
Depending on your environment, the IP address will probably be in the eth0 field. The inet xxx.xxx.xxx.xxx.xxx/xx should appear, where xxx.xxx.xxx.xxx.xxx is the IP address you want to know.
If the information displayed by ip addr show is too much to read, you can type ip addr show eth0 with the device name to make it easier to read.
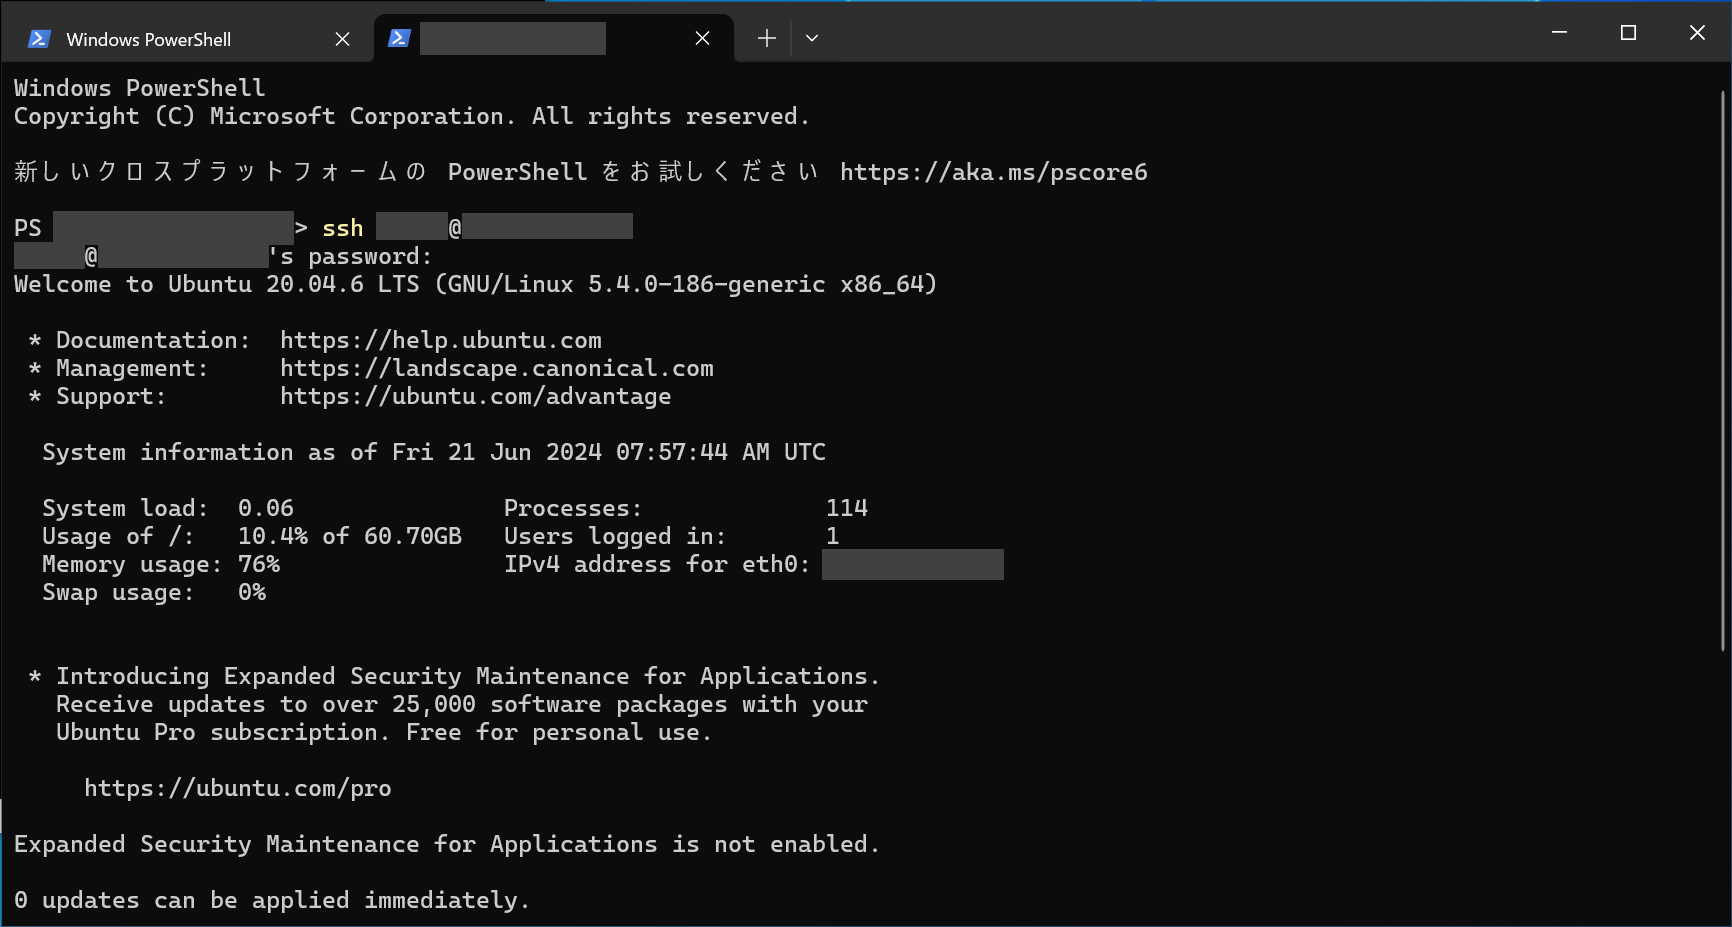
Another way to see the IP address is from the display right after login. In the example in the image below, the IP address is written as IPv4 address for eth0: xxx.xxx.xxx.xxx.xxx.
Once you know the IP address, try to connect from PowerShell, which can be started by searching for “PowerShell” in the Start menu, for example.
In PowerShell, type the following.
> ssh <username>@<IP address>
If you get the following statement the first time you connect, type yes.
The authenticity of host '<hostname>' can't be established.
RSA key fingerprint is xxxxxxxx.
Are you sure you want to continue connecting (yes/no/[fingerprint])?
If the username and IP address are correct, you will be prompted for a password. If successful, you will see the same login text in PowerShell as in the virtual environment.
If you get an error with the SSH command
. If you get an error like the following, the SSH client is not installed on Windows.ssh : The term 'ssh' is not recognized as the name of a cmdlet, function, script file, or operable program. Make sure the name is correctly written, and if it contains a path, make sure the path is correct, and try again.
File transfer (optional)
When operating a virtual environment via SSH connection, you need to transfer files in order to use files elsewhere in the virtual OS. The scp command is introduced as a method of file transfer.
The scp command can be used in Linux and Mac OS terminals, Windows PowerShell, and so on.
To send a file at hand, type the scp command at the source as follows.
> scp <source file location> <destination user name>@<destination IP address>:<destination folder>.
Conversely, you can also receive a file in a different location. In this case, at the destination, enter the following.
> scp <receiving-source-username>@<receiving-source-IP-address>:<receiving-source-file-location> <destination-folder>.
The location of the file/folder (path) should be confirmed in advance, for example C:/users/<Windows user name>/documents/file.zip for Windows, or ~/ or /home/<user name>/file.zip for Linux. Linux: ~/ or /home/<username>/file.zip. If the path contains spaces or other whitespace, the entire path must be enclosed in “”.
If successful, you will be able to see the file at the destination.
For example, if you are sending a file from Windows to Linux, and you are operating on Windows, the following will work.
> scp “C:/users/<Windows username>/documents/file.zip” <Linux username>@<Linux environment IP address>:~/
In this case, you should see file.zip in the ~/ folder on Linux (the same as /home/<username>).
Installing xData Edge (1) - Extracting the Package
Next, we will move on to the installation of xData Edge.
First, prepare the xData Edge installation file xdata-edge-base-3.0.zip in your virtual environment. You can use the scp command mentioned above.
Next, unzip the file in the virtual environment.
unzip <file location>.
If you do not have the unzip command, do sudo apt install zip. Or, if the file is in .tar.gz format, the command is tar <file location>.
Once the file is extracted, move the current directory to the extracted location.
cd ~/xdata-edge-base-X.X/install
Installing xData Edge (2) - Installing software required for operation
In the same directory as before, you will find environment-setup.sh. This will install all the software required to run xData Edge.
Run it (sudo) as an administrator.
sudo . /environment-setup.sh
If you are prompted for a password, enter it.
After executing this, you will be asked if you want to set up a proxy. Since we are going to proceed in a way that we will not use this time, enter n.
Do you need HTTP/HTTPS proxy settings? [y/n]: n
When you are done, be sure to logout/login to your account. Subsequent operations will result in errors.
xData Edge Installation (3) - Setup of each feature
Next, run edge-configure.sh. This is the script that installs each xData Edge feature and actually starts it working.
. /edge-configure.sh
The question after execution is “Use EvWH DB, do not use GPU on this host, and do not use MMS DataServer” this time.
It is recommended to select Use (y) for EvWH DB because of its required features. Other choices should be changed depending on the environment.
Do you need the EvWH DB? [y/n]: y
1: Use the GPU analysis feature on this host.
2: Use the GPU analysis feature on another host. Or do not use the GPU analysis feature.
Select a number [1-2]: 2
Do you want to use GPUs in the development environment? [y/n]: n
Do you need the MMS DataServer? [y/n]: n
How to handle errors if you have not logged out and logged back in
. If you run `edge-configure.sh` without having logged out of your account after running `environment-setup.sh`, you will get the following error Insufficient permissions to accesss MicroK8s.
You can either try again with sudo or add the user <username> to the 'microk8s' group:.
...
Confirmation of Operation
After installation, check the operation of xData Edge.
First, check the operational status of each function of xData Edge.
kubectl get pods
You will see a table like the following. If all STATUS columns in this table are Running, the system is running normally.
However, it may take several minutes to several tens of minutes to complete running. Also, the number of rows (number of running functions) depends on the configuration.
NAME READY STATUS RESTARTS AGE
evwhapi-7694689789-2xn4h 1/1 Running 0 69d
dataloaderapi-7bf4744d65-9tpbv 1/1 Running 0 55d
webapi-endpoint-ffc7bf666-5cf4r 1/1 Running 0 54d
analysis-cpu-69c496fcc9-h4lfk 1/1 Running 0 54d
provenanceapi-6f9f7b65dd-29zss 1/1 Running 0 54d
jupyter-7645d64955-5cmhl 1/1 Running 0 54d
evwhdb01-7555c94c98-w7r2j 1/1 Running 0 13d
analysis-gpu-79d9bc9db-wjz58 1/1 Running 0 13d
nginx-796d7fdb6d-88jrm 1/1 Running 0 18s
getfileapi-ff59c8bdc-2g879 1/1 Running 0 18s
filemanipulationapi-6b4d66568b-vc8bz 1/1 Running 0 18s
Next, check to see if the Web API is loosely connected. This is done if you chose to use the EvWH DB. Enter the following command
curl -H “Content-type:application/json” -H “APIKey: 0df23f0d-44cb-4085-8ac9-158e6ced3056” -H “Secret: 4AzbY3pvfes33aow49nhjn3aUphv9zFWctcT “-X POST -d '{“id”:1, “jsonrpc”: “2.0”, “method”: “prov.get_session_list”, “params”: {“show_all”:false}}' http://localhost/api/v1/provenance /jsonrpc
This is working correctly if the following string appears immediately after.
{“result”: [], “id”: 1, “jsonrpc”: “2.0”}